
How to Fit Solar Panels to Your Van Roof Rack: The Complete Guide

Solar is the first thing most people put on their rack. It’s also the thing we see done badly most often — a panel perched on top of the crossbars with universal Z-brackets, whistling down the M6.
We designed our racks so you don’t have to do it that way. Recessed solar is built into the geometry of every YAKKT rack, and fitting it takes about half an hour with normal hand tools. Nothing goes through your van’s roof except the cable.
This guide covers the lot: which panel to buy (including the one line on the datasheet that decides whether it sits flush), what you’ll actually generate through a UK year, and the fitting itself. Everything here applies to every van we build for — Crafter, Sprinter, Transit, Ducato, and the rest.
Why We Recess Solar
Most racks treat solar as an afterthought. You buy the rack, then work out how to strap a panel to it.
Look closely at a YAKKT side rail and you’ll see two rows of crossbar mounting holes, 30mm apart. That 30mm isn’t arbitrary — it’s the frame depth of a standard rigid solar panel. Put your bars in the right row and the panel finishes dead level with the crossbars, deck panels and side rails. One flat plane across the whole roof.
That flat plane is worth having. There’s no leading edge for the wind to catch, so nothing whistles and you’re not dragging a spoiler down the motorway. There’s nothing for a branch or barrier to grab. And the panel sits inside the rack structure rather than on top of it — which is better for the panel, and frankly looks like it was meant to be there. Because it was.
Picking a Panel
The solar market is drowning in spec-sheet noise. Here’s what actually matters on a van roof.
Mono or Poly?
Mono. This used to be a longer conversation — polycrystalline (the blue, shattered-glass-looking ones) was cheaper per watt, and on a house roof with unlimited space that argument held up. But poly converts around 15-17% of light into power against mono’s 20-23%, and your van roof is the most contested real estate you own. Every square metre has a job. Buy monocrystalline; the price gap has all but disappeared anyway.
All-Black Panels
The nicer mono panels now come all-black — black cells, black backsheet, black frame. On our racks they look superb. The rack is powder coated textured black, so a recessed all-black panel makes the whole roof read as a single surface.
There is a trade-off, and we’d rather tell you than have you find out: black backsheets run a few degrees hotter, and solar cells lose 0.3-0.4% of output for every degree above 25°C. On a hot day that’s maybe 1-3% down. We think the look earns it. If you’re chasing every last watt-hour, get a white backsheet with a black frame and split the difference.
Shading — the Spec Nobody Reads
Shade is what quietly kills van solar. Cells are wired in series, so a shadow the size of your fist — an aerial, the corner of your roof tent — can pull down the output of the whole panel, not just the bit it covers.
Two things to check on the datasheet before you buy. First, bypass diodes: they let current route around a shaded section, and any decent panel has at least three. Second, half-cut cells: the panel is split into two independent halves, so shade across the bottom leaves the top producing at full tilt. Worth seeking out if your layout puts solar anywhere near a tent, box or aerial.
Shade also changes how you plan the roof. Give your panels the bays furthest from anything that casts a shadow, and if you’re running several panels near potential shade, wire them in parallel rather than series so one struggling panel can’t throttle the rest.
Frame Height — Read This Bit
The 30mm recess matches a 30mm panel frame. Most 100-200W camper panels and plenty of residential ones use a 30mm frame, but some of the bigger residential panels run 35mm or 40mm.
A 35mm frame still mounts perfectly securely — it just sits 5mm proud instead of dead flush. Frame height is one line in the mechanical specs on the datasheet. Read it before you order. It’s the single number that decides whether you get the seamless finish.
What About Flexible Panels?
People ask. They’re light — 2-3kg against 8-12kg for rigid — and they lie almost flat. But they cook. A flexible panel can’t shed heat, so it degrades faster, and the warranties are typically half what you get on a rigid panel.
If you want them anyway, they bond straight onto our deck panels rather than using the bracket recess. For a build you’re keeping, we’d fit rigid mono every time.
What You’ll Actually Generate
The wattage on the label is measured in a lab: 1,000W/m² of light with the panel held at 25°C. A flat panel on a van in Britain sees nothing of the sort, so here’s how to convert label watts into real numbers.
Daily output ≈ panel wattage × peak sun hours × 0.75. The 0.75 covers flat mounting (your panel can’t tilt at the sun), panel temperature, and charge controller losses. UK peak sun hours look roughly like this:
| Season (UK) | Peak sun hours/day | Real output per 100W of panel |
|---|---|---|
| Summer (May-Jul) | 4.5-5.5 | 340-410 Wh/day |
| Spring/Autumn | 2.5-3.5 | 190-260 Wh/day |
| Winter (Nov-Jan) | 0.8-1.5 | 60-110 Wh/day |
The winter line is the one to sit with. You’ll get roughly a fifth of your summer output in December — so if you camp year-round, that’s the number to size your system against, not July’s.
How Much Fits on Your Van
That depends on rack length and how much roof you’re giving to solar versus decking, a tent, or storage. As a guide from the builds we see:
| Van | Typical solar array | Summer output | Winter output |
|---|---|---|---|
| VW Transporter / Transit Custom (SWB) | 200-300W | 0.7-1.2 kWh/day | 0.15-0.3 kWh/day |
| Crafter / Sprinter / Transit MWB | 400-600W | 1.4-2.5 kWh/day | 0.3-0.6 kWh/day |
| Crafter / Sprinter LWB, Ducato L3H2 | 600-900W | 2.0-3.7 kWh/day | 0.4-0.9 kWh/day |
For context: a 12V compressor fridge wants around 0.5-0.7 kWh a day, lights and phones another 0.2, and a diesel heater’s fan 0.1-0.2 in winter. A 600W array on an LWB van covers all of that comfortably from March to October, and gets most of the way there in winter with a DC-DC charger topping up as you drive.
Two 400-450W residential panels are the sweet spot for most LWB builds — far better £-per-watt than camper-branded panels, and exactly what the mid-span support bar (below) exists for. Check your bay dimensions against the panel datasheet, or lay the whole roof out in the vankit.io configurator.
What You’ll Need
- Your YAKKT rack, fitted — if you’re not there yet, start with the installation guides
- Your panel(s) — rigid, mono, 30mm frame
- YAKKT solar brackets, one set of four per panel — or standard solar clamps if you’re going the Option 2 route
- For big residential panels: one extra crossbar per panel as a mid-span support
- Metric hex keys, a tape measure, and about 30 minutes
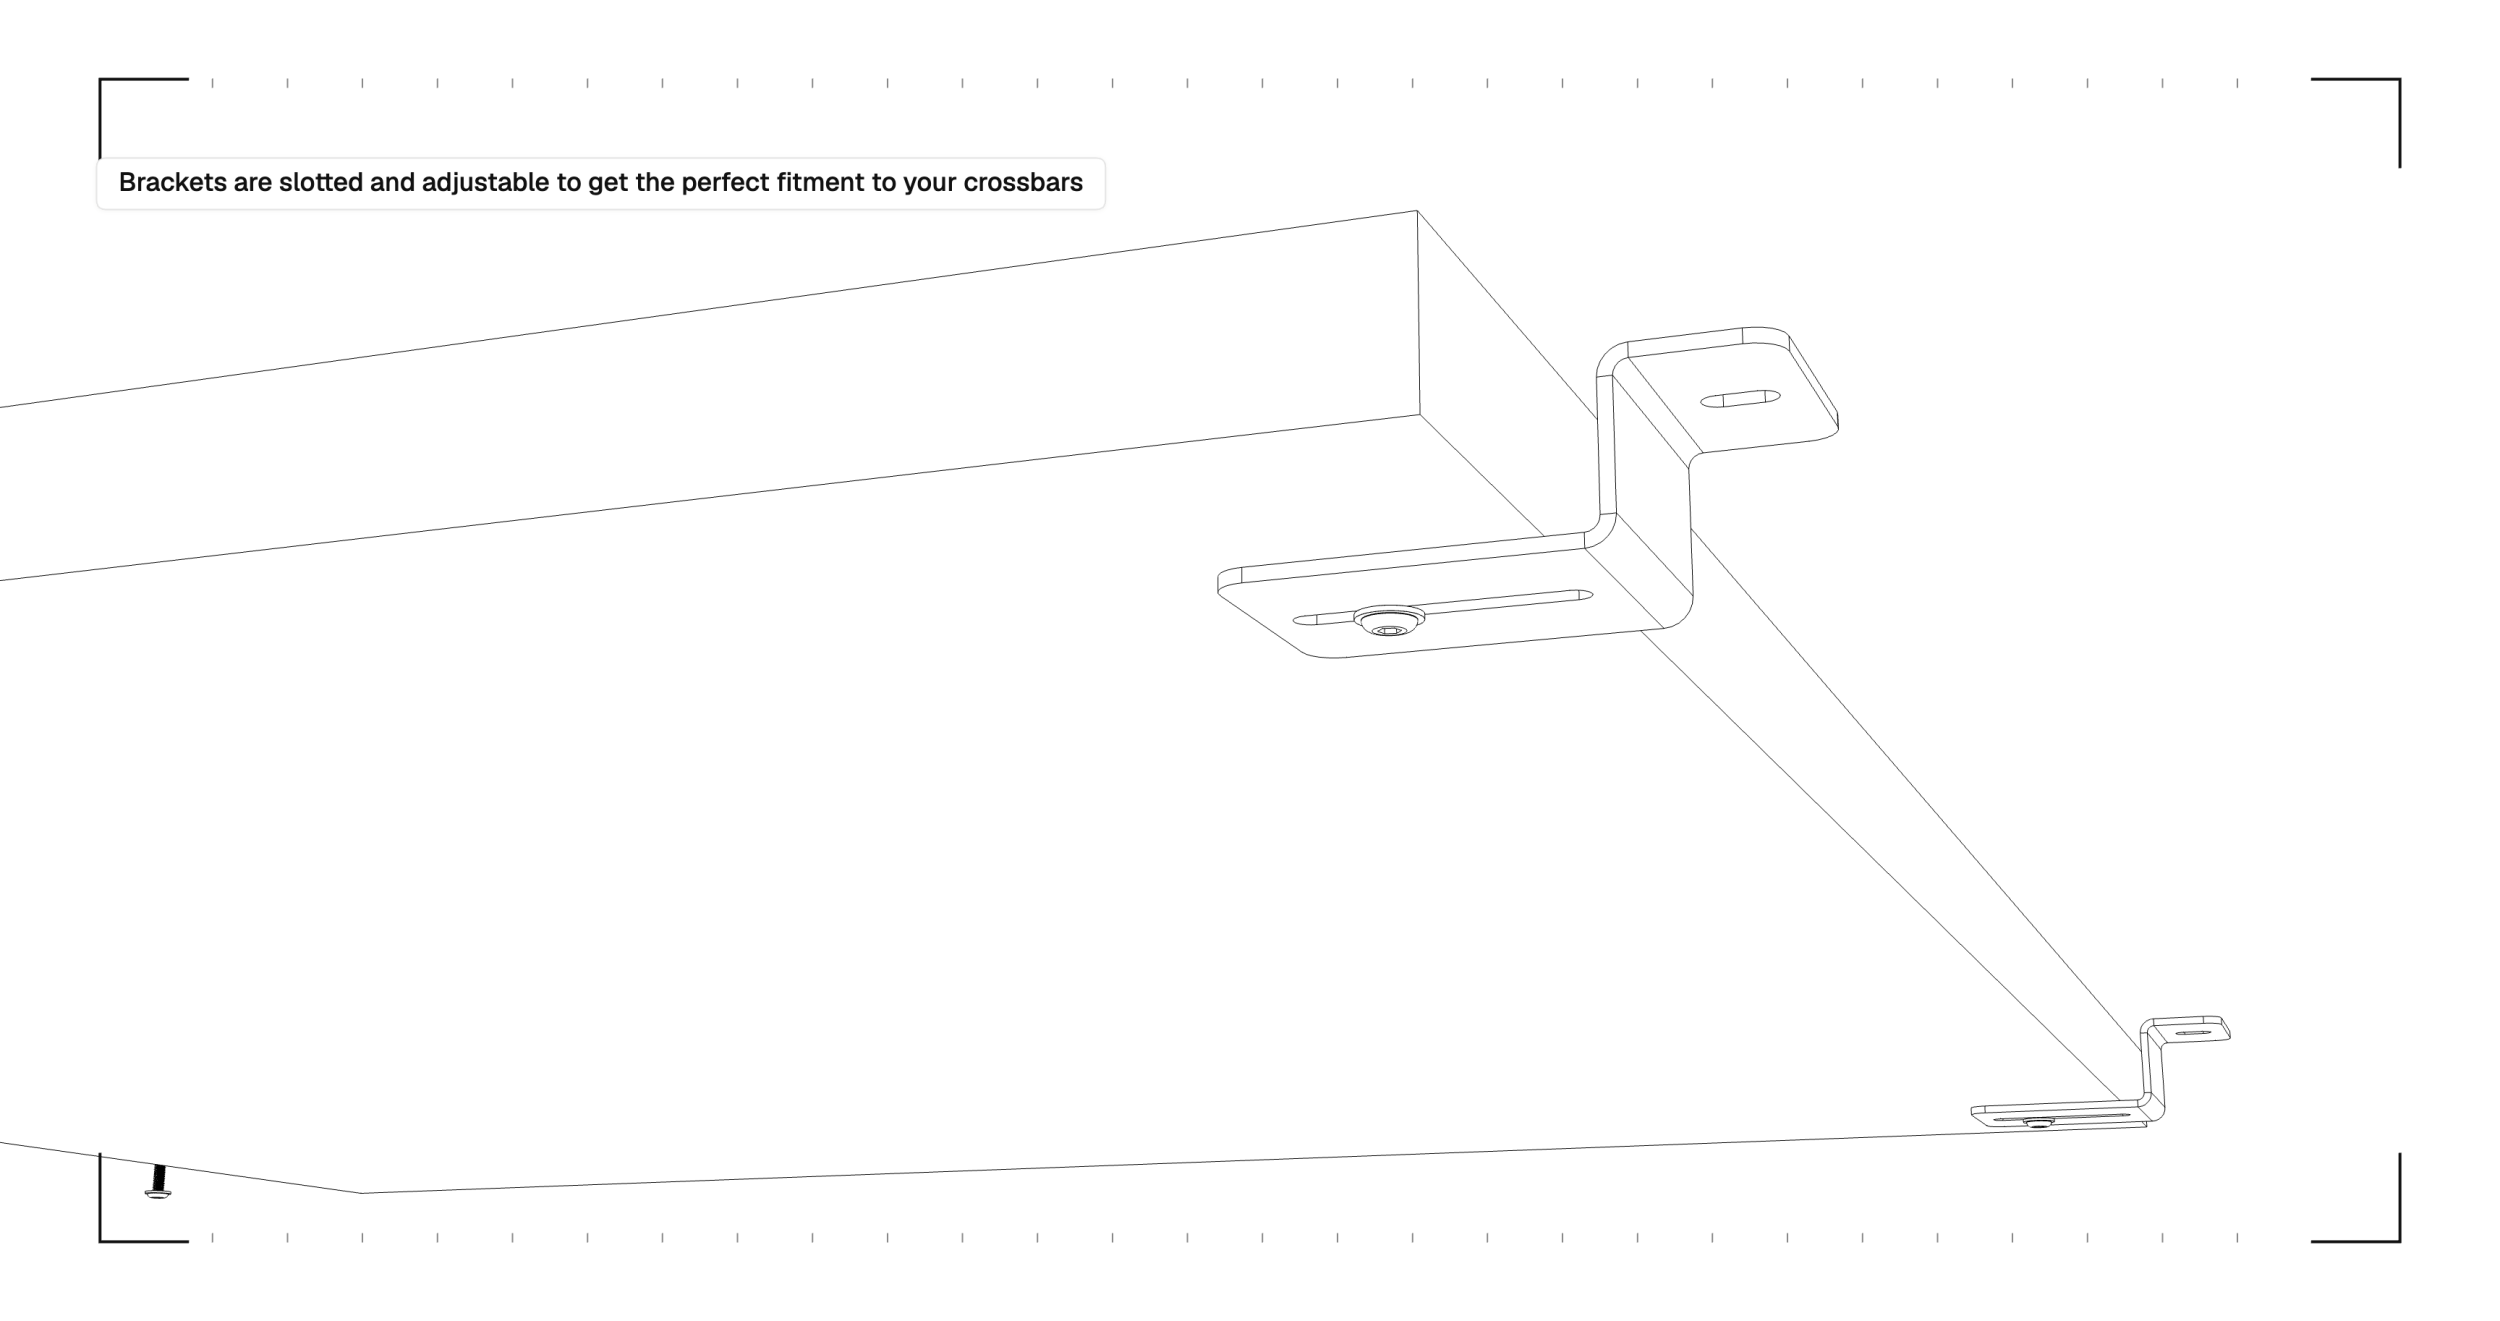
The brackets themselves are cut from 2mm stainless, powder coated textured black to match the rack, and ship with all fixings including the T-nuts. Each one is slotted, so it adjusts to whatever panel width lands between your crossbars. A set of four does one panel and costs £28.
Two Ways to Mount — Pick One
Both routes end with the panel flush. Which you choose comes down to the hardware you have and how often the roof layout changes.
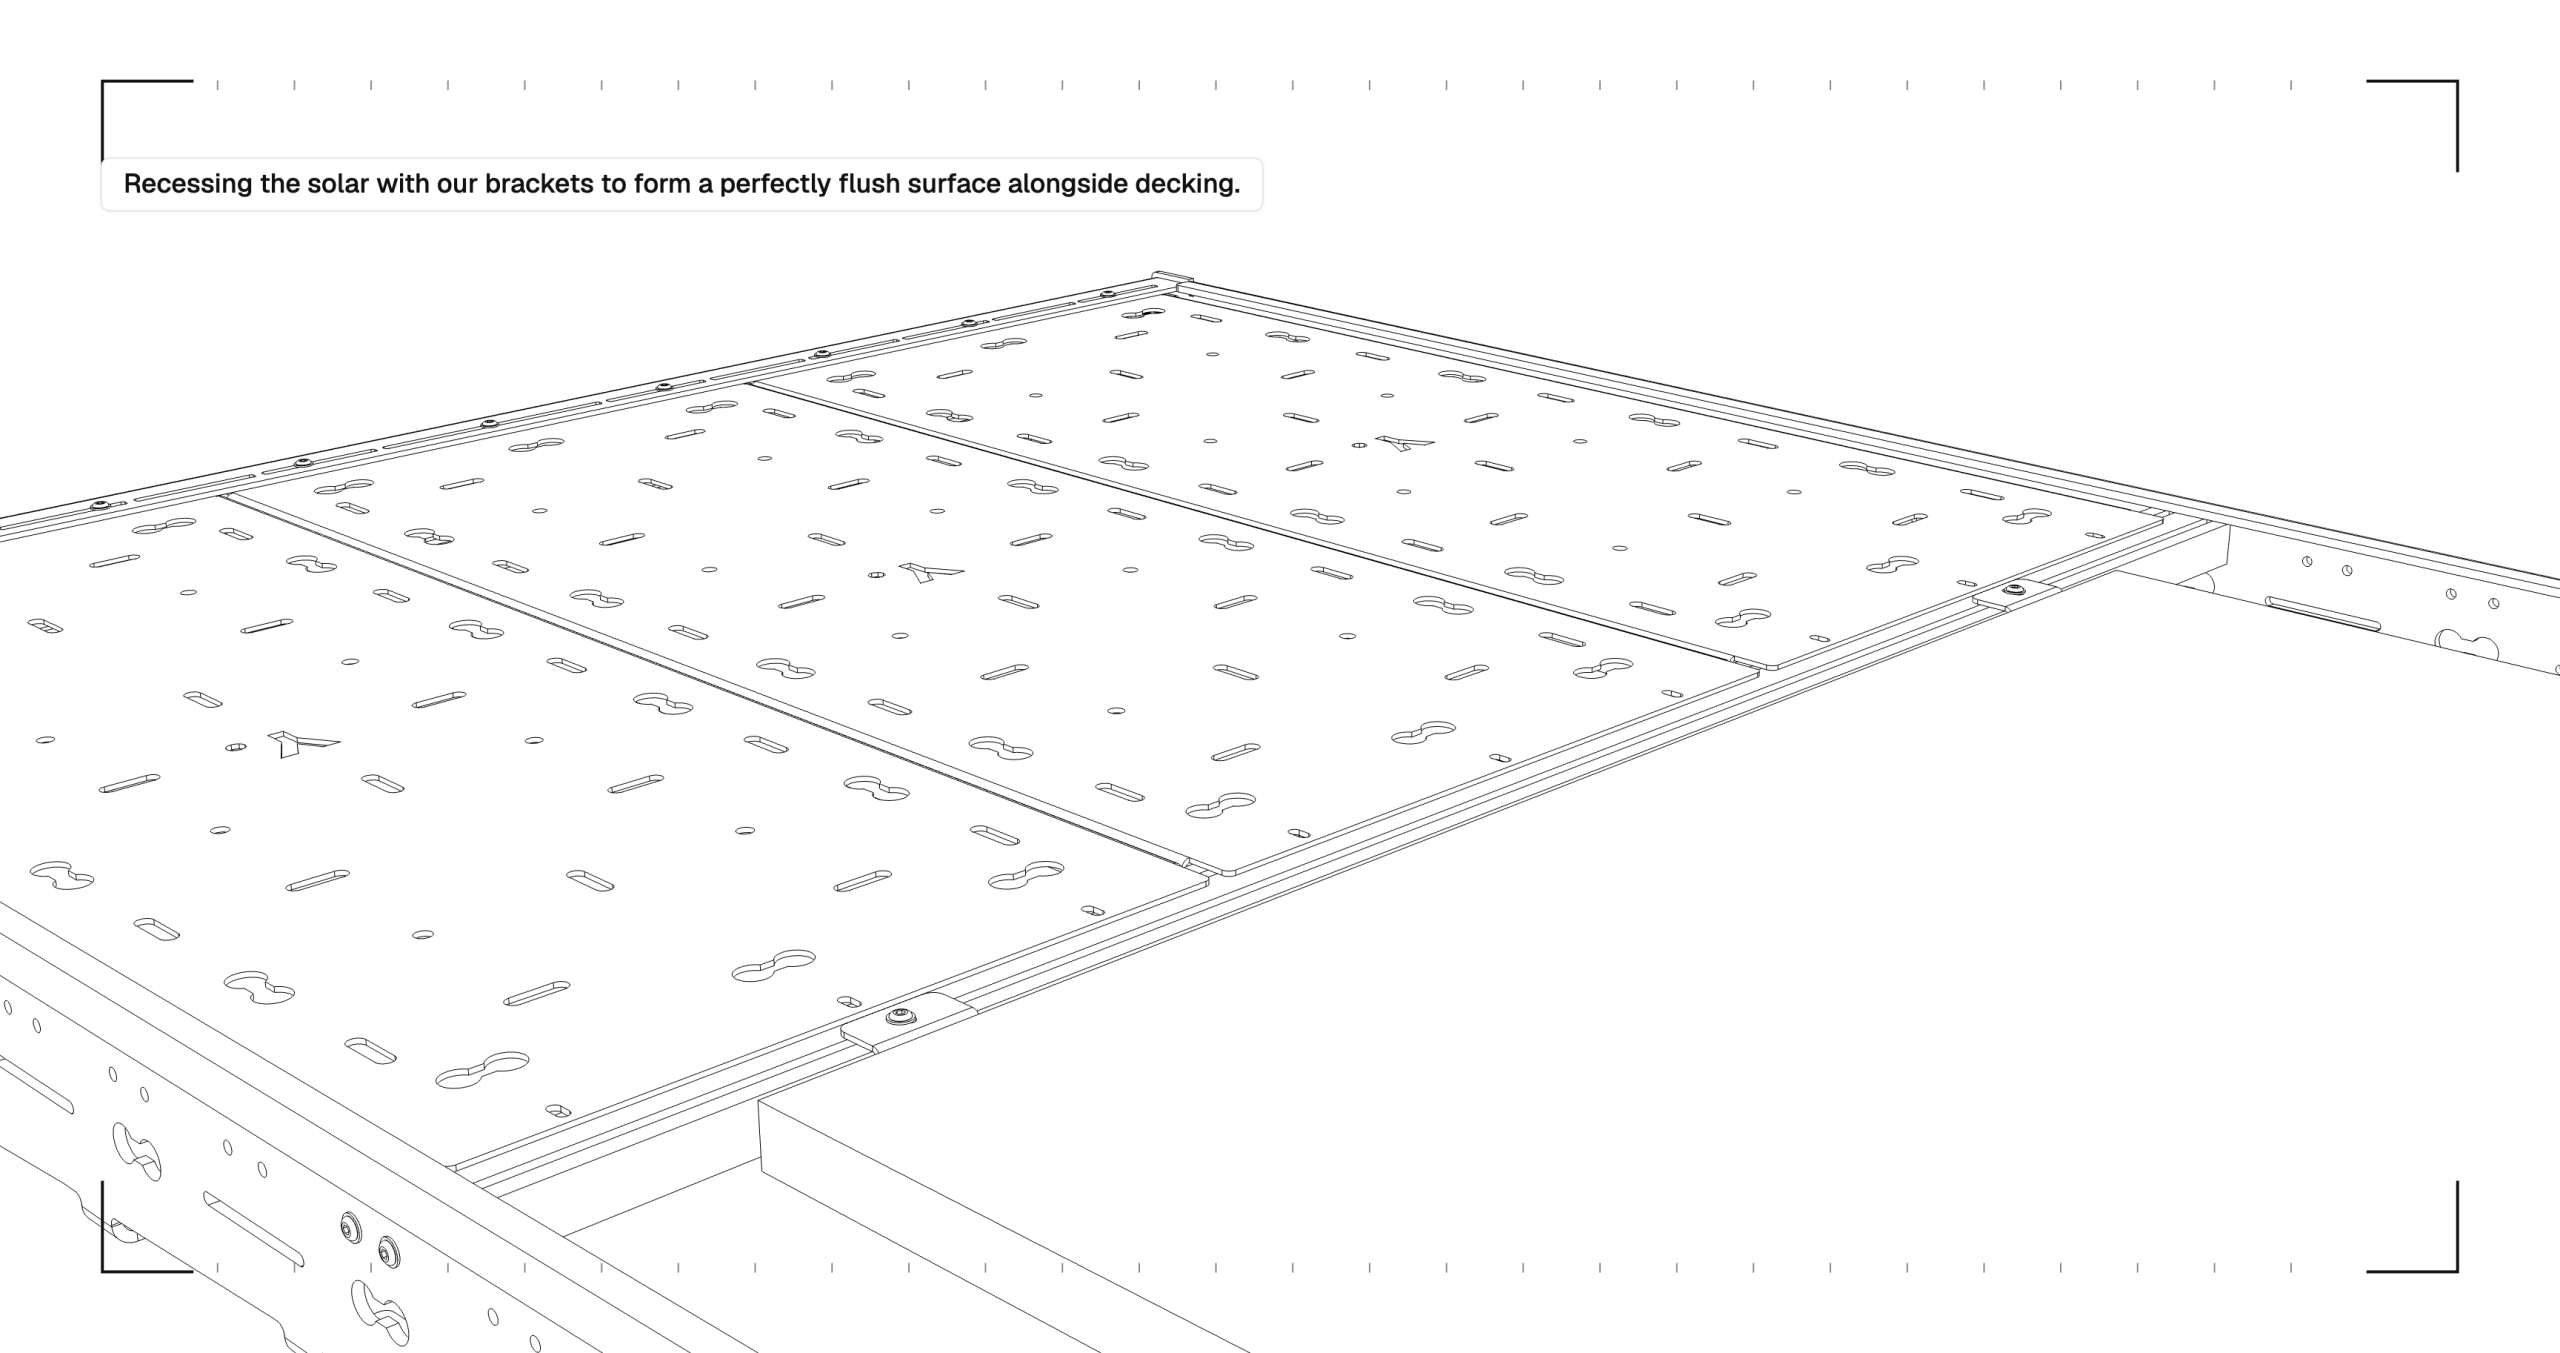
Option 1 — YAKKT Brackets, Bars in the Higher Position (What We Recommend)
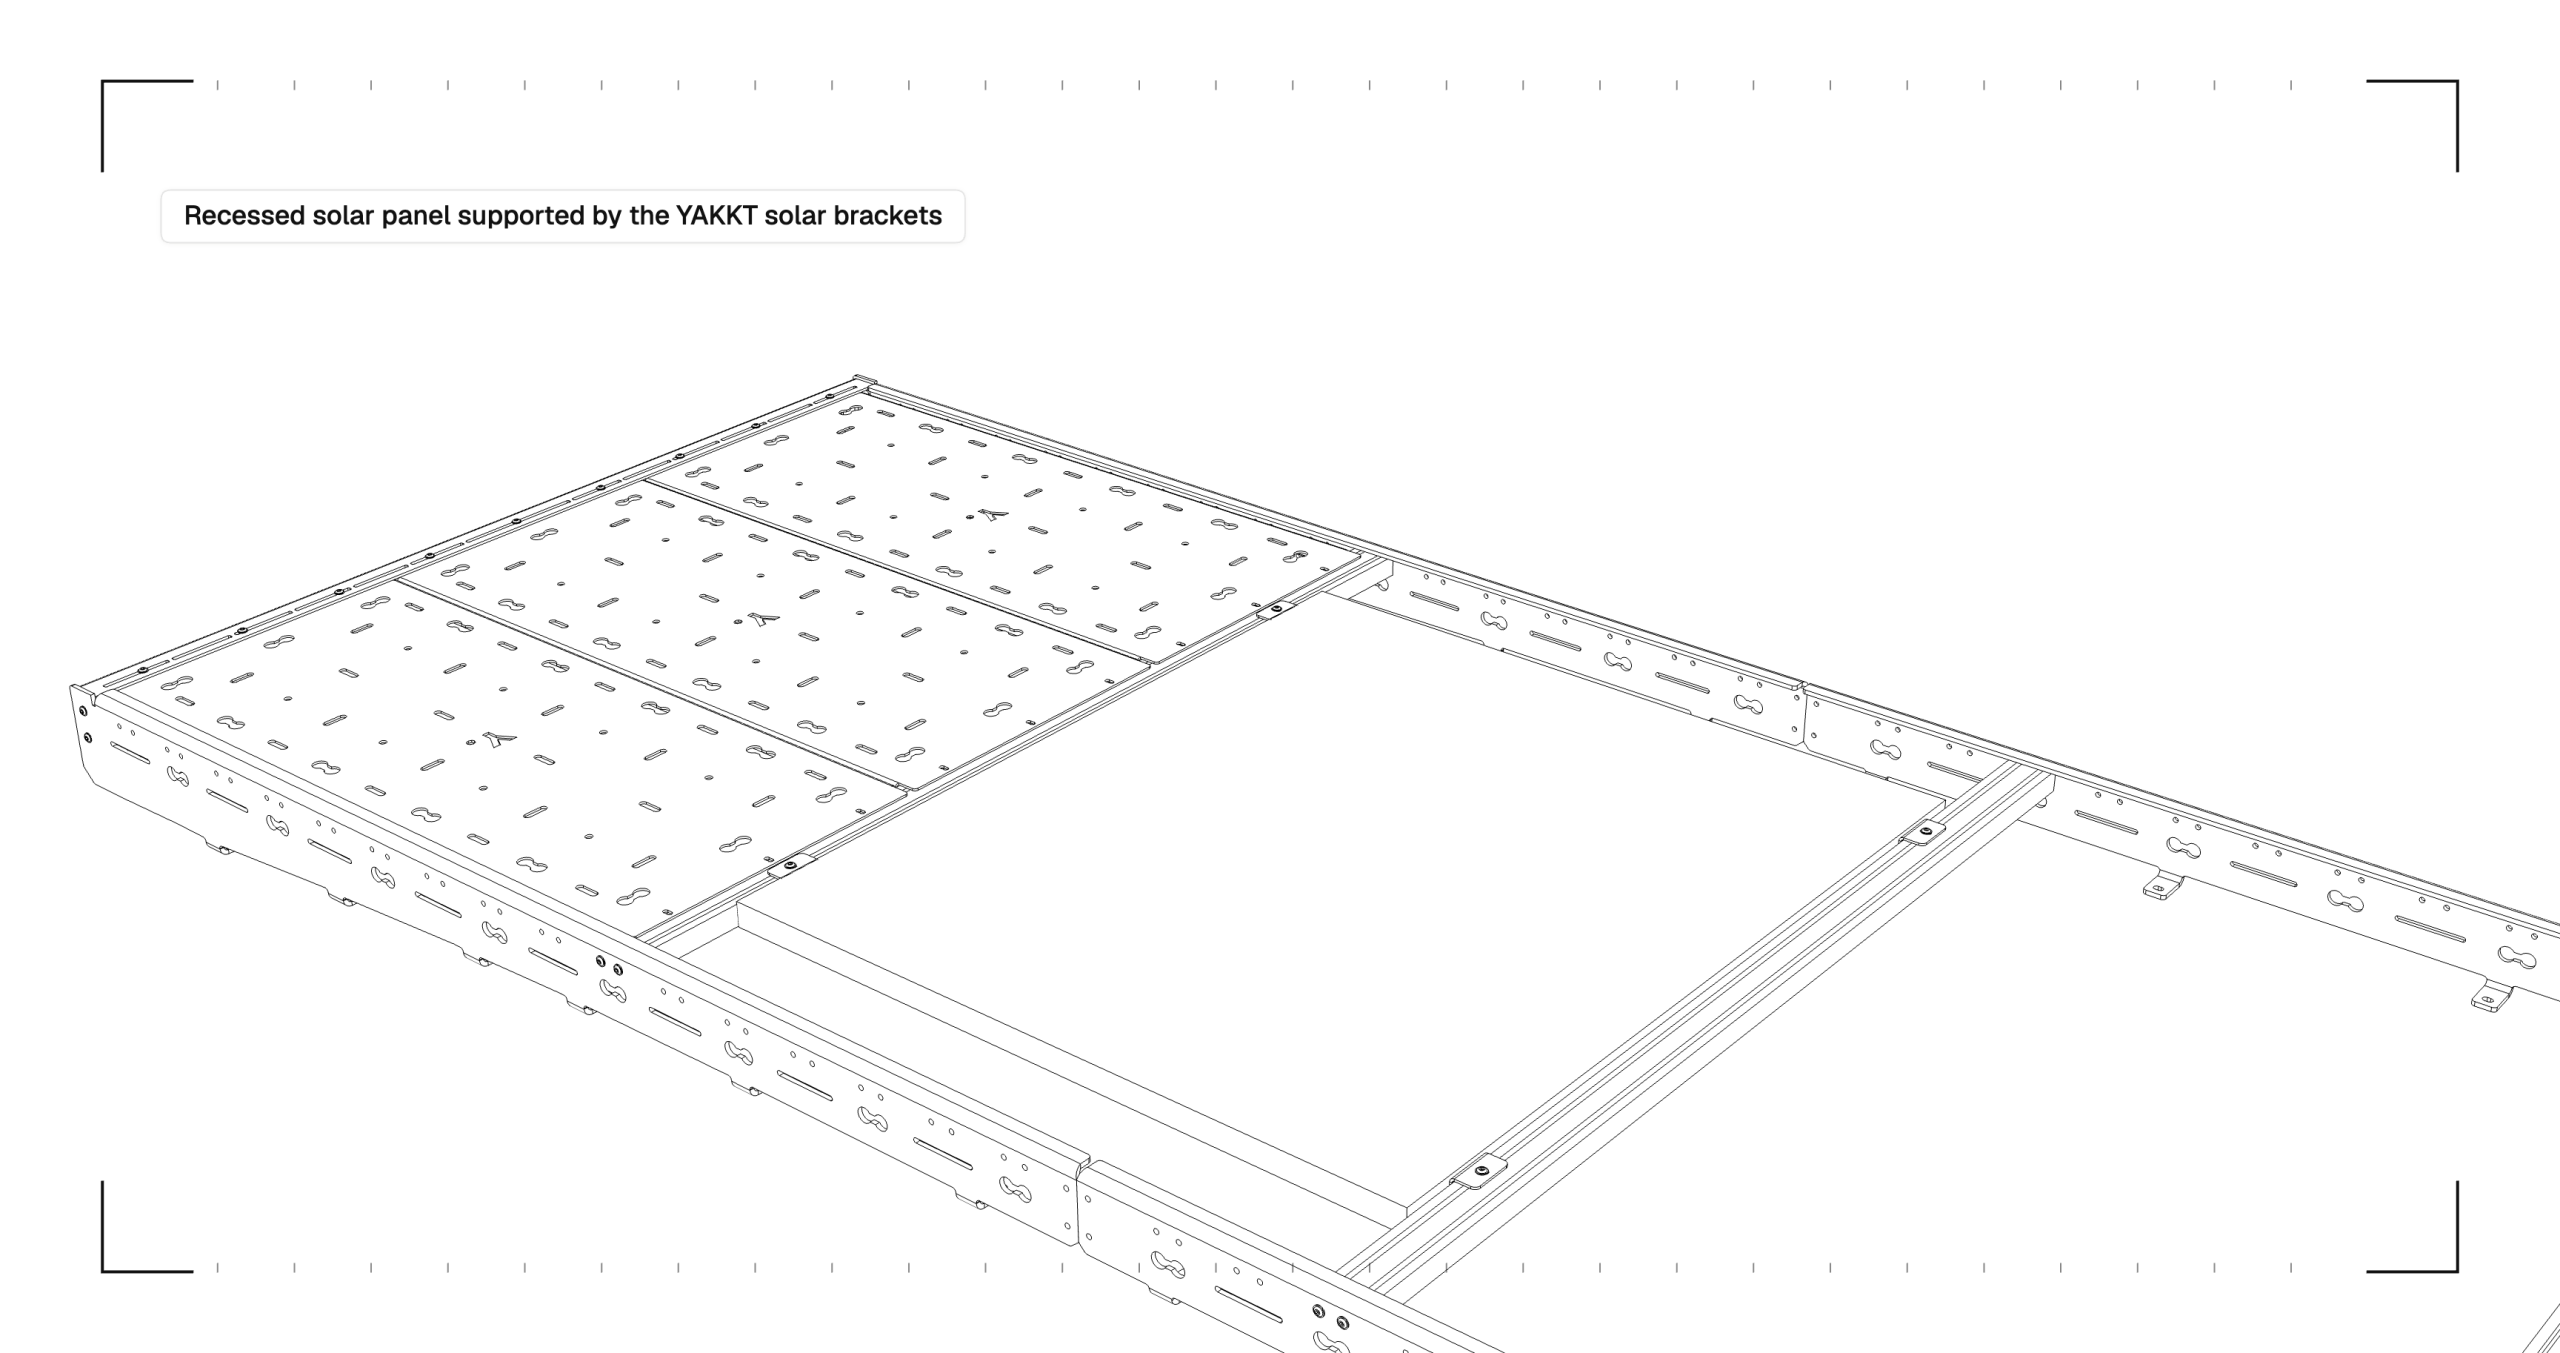
Crossbars go in the higher holes, and the panel recesses down between them on the brackets, which bolt to T-nuts in the crossbar’s T-slot. Top of the panel lands level with the bars and any decking alongside. Cleanest finish, most secure fixing.
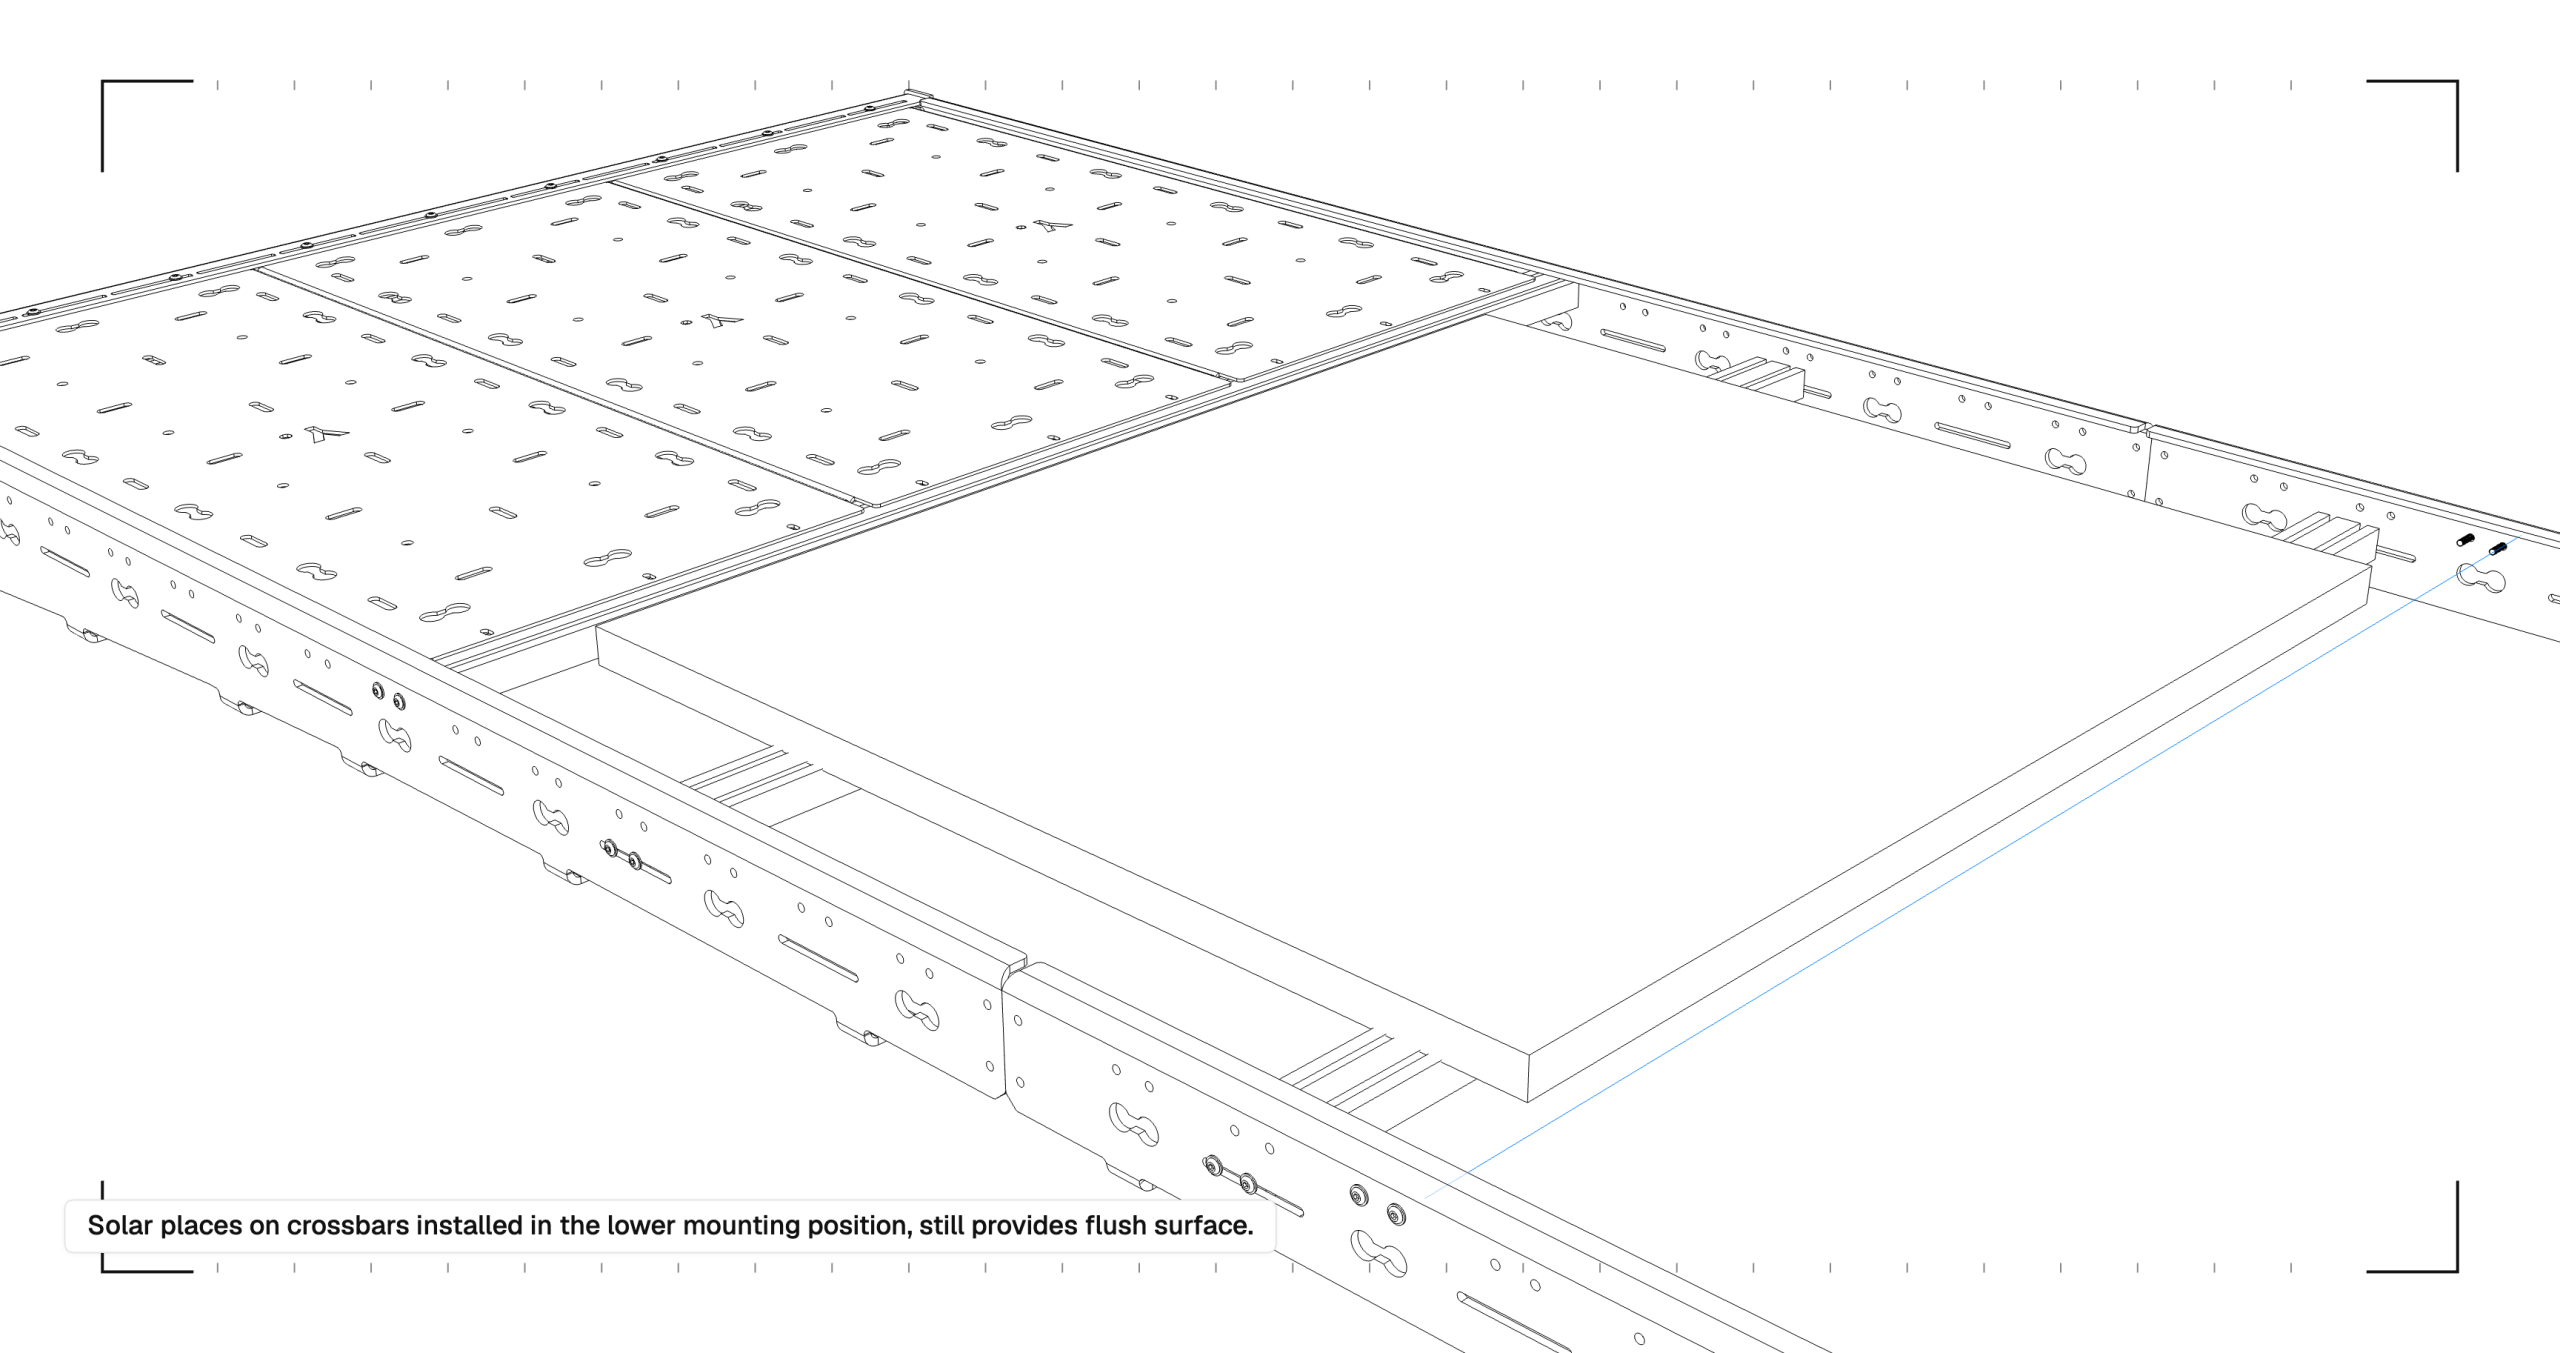
Option 2 — Solar Clamps, Bars in the Lower Position
Or drop the crossbars into the lower holes — 30mm down — and sit the panel on top of the bars with standard solar clamps. The 30mm drop means the panel top still lands flush with the deck plane. Good route if you already own clamps, or if your panels come on and off between trips.
And the One to Avoid
A panel resting on bars in the higher position, without proper brackets or clamps, sits proud of the whole deck plane. You lose everything the recess gives you, and it’s not a fixing we’d put our name to.
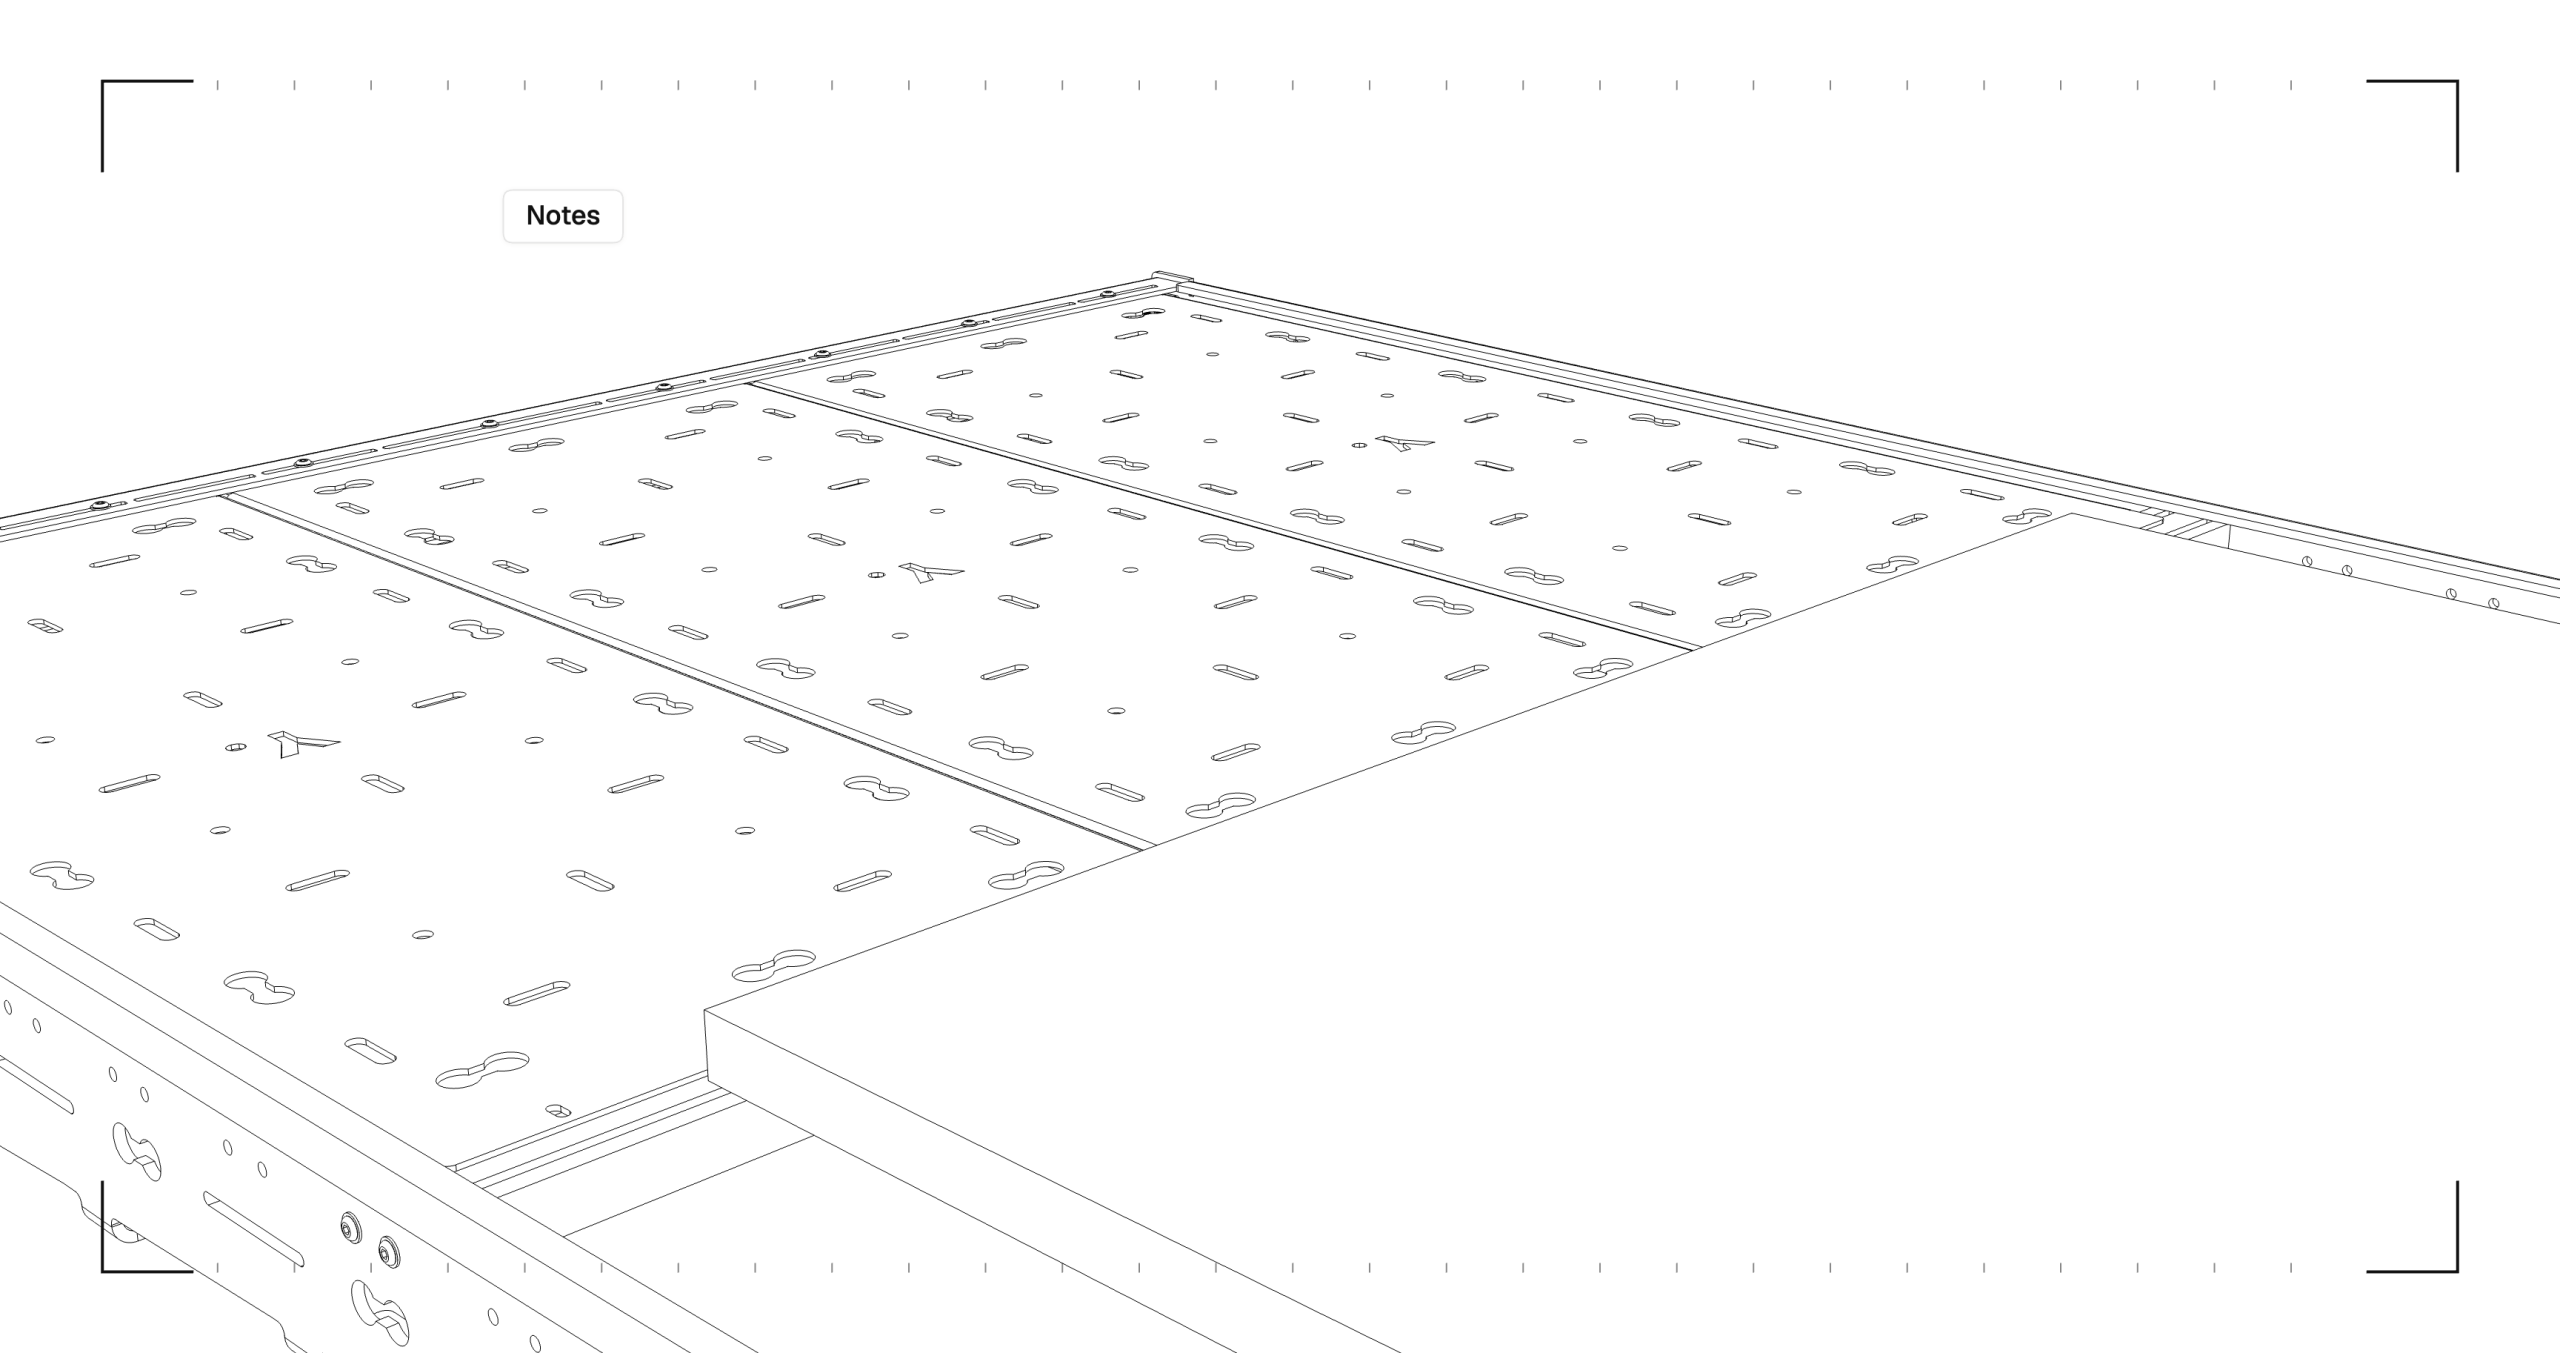
If your bars are high, use the brackets. If you want the panel on top, move the bars down. Simple as that.
Fitting — Option 1, Step by Step
Step 1 — Plan the Roof
Do this before touching a bolt. Panels live between crossbars, so your bar spacing sets your panel bays — check clearance from fairings, aerials and anything else up there, and think about where shade falls.
If you’re running decking too, plan the roof as one surface: solar in some bays, deck in others, all finishing at the same height. That’s the whole point of the system.
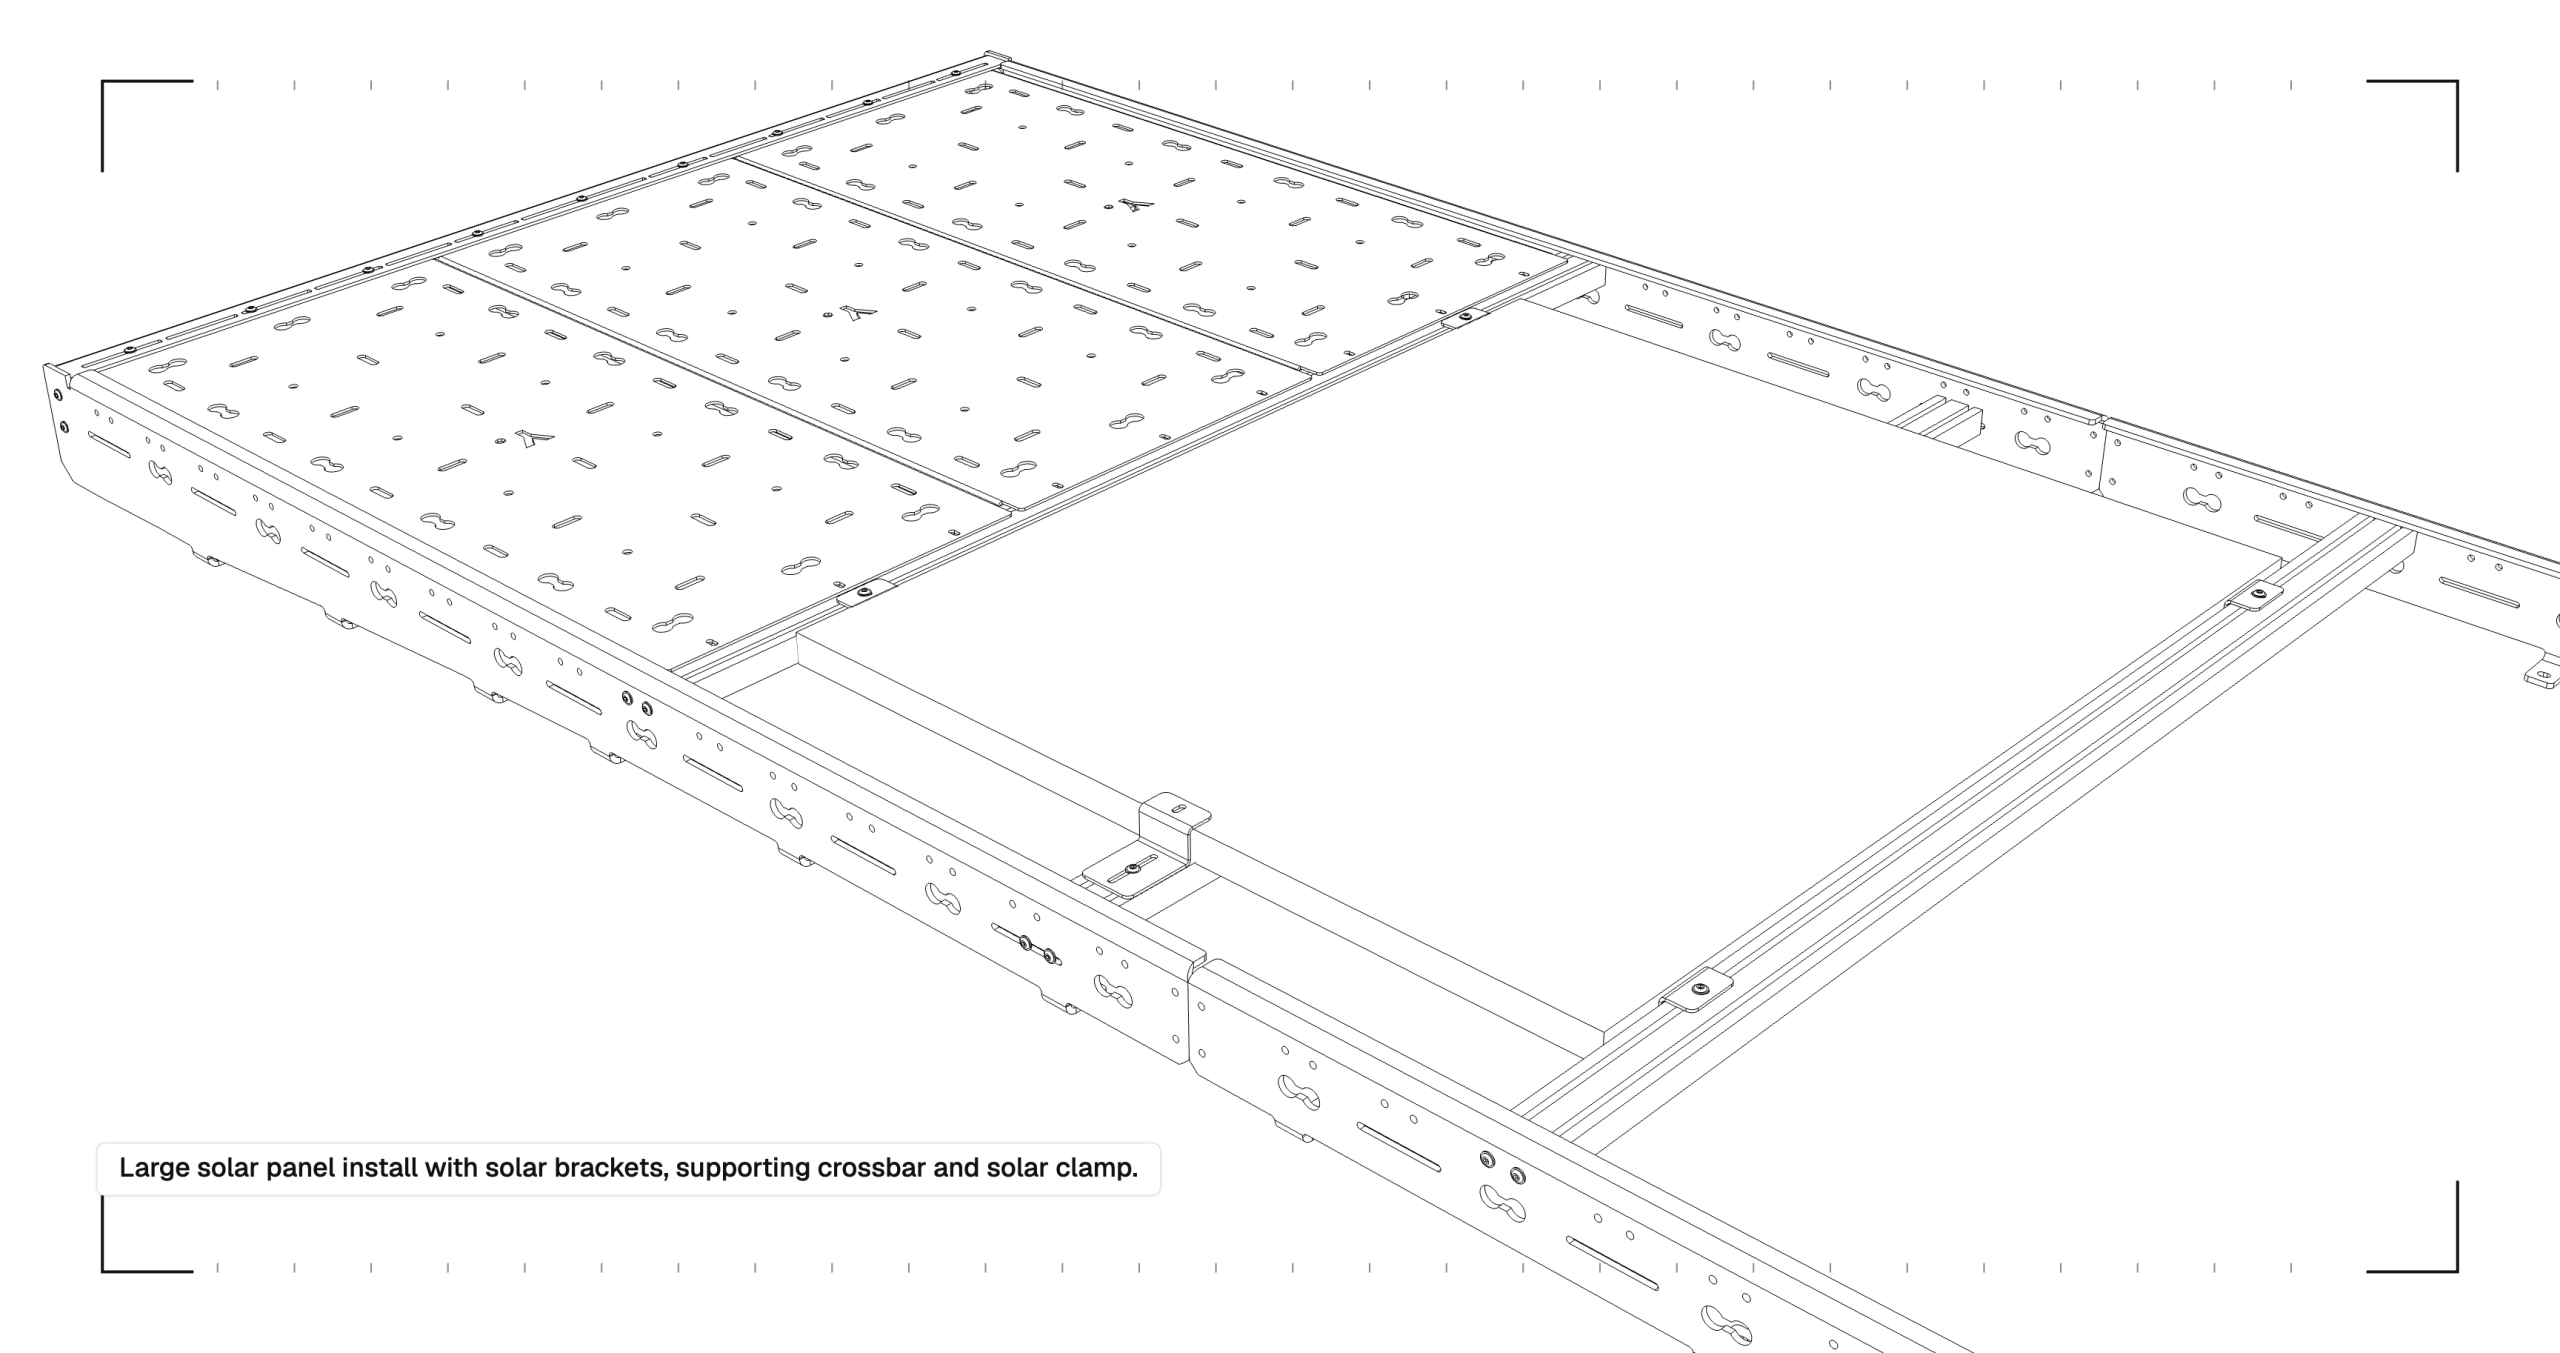
Fitting a big residential panel? Plan an extra crossbar in the lower position under the middle of the span. The main bars carry the panel edges through the brackets; the support bar stops a two-metre panel flexing in motorway wind. A standard mid-panel solar clamp on that bar finishes the job — we don’t supply those, but they’re a few quid online.
Step 2 — Brackets onto the Panel
Slide the brackets along the panel frame to line up with your crossbar positions. Leave everything loose — the slots are there so you can adjust once the panel’s up.
Step 3 — T-Nuts into the Crossbars
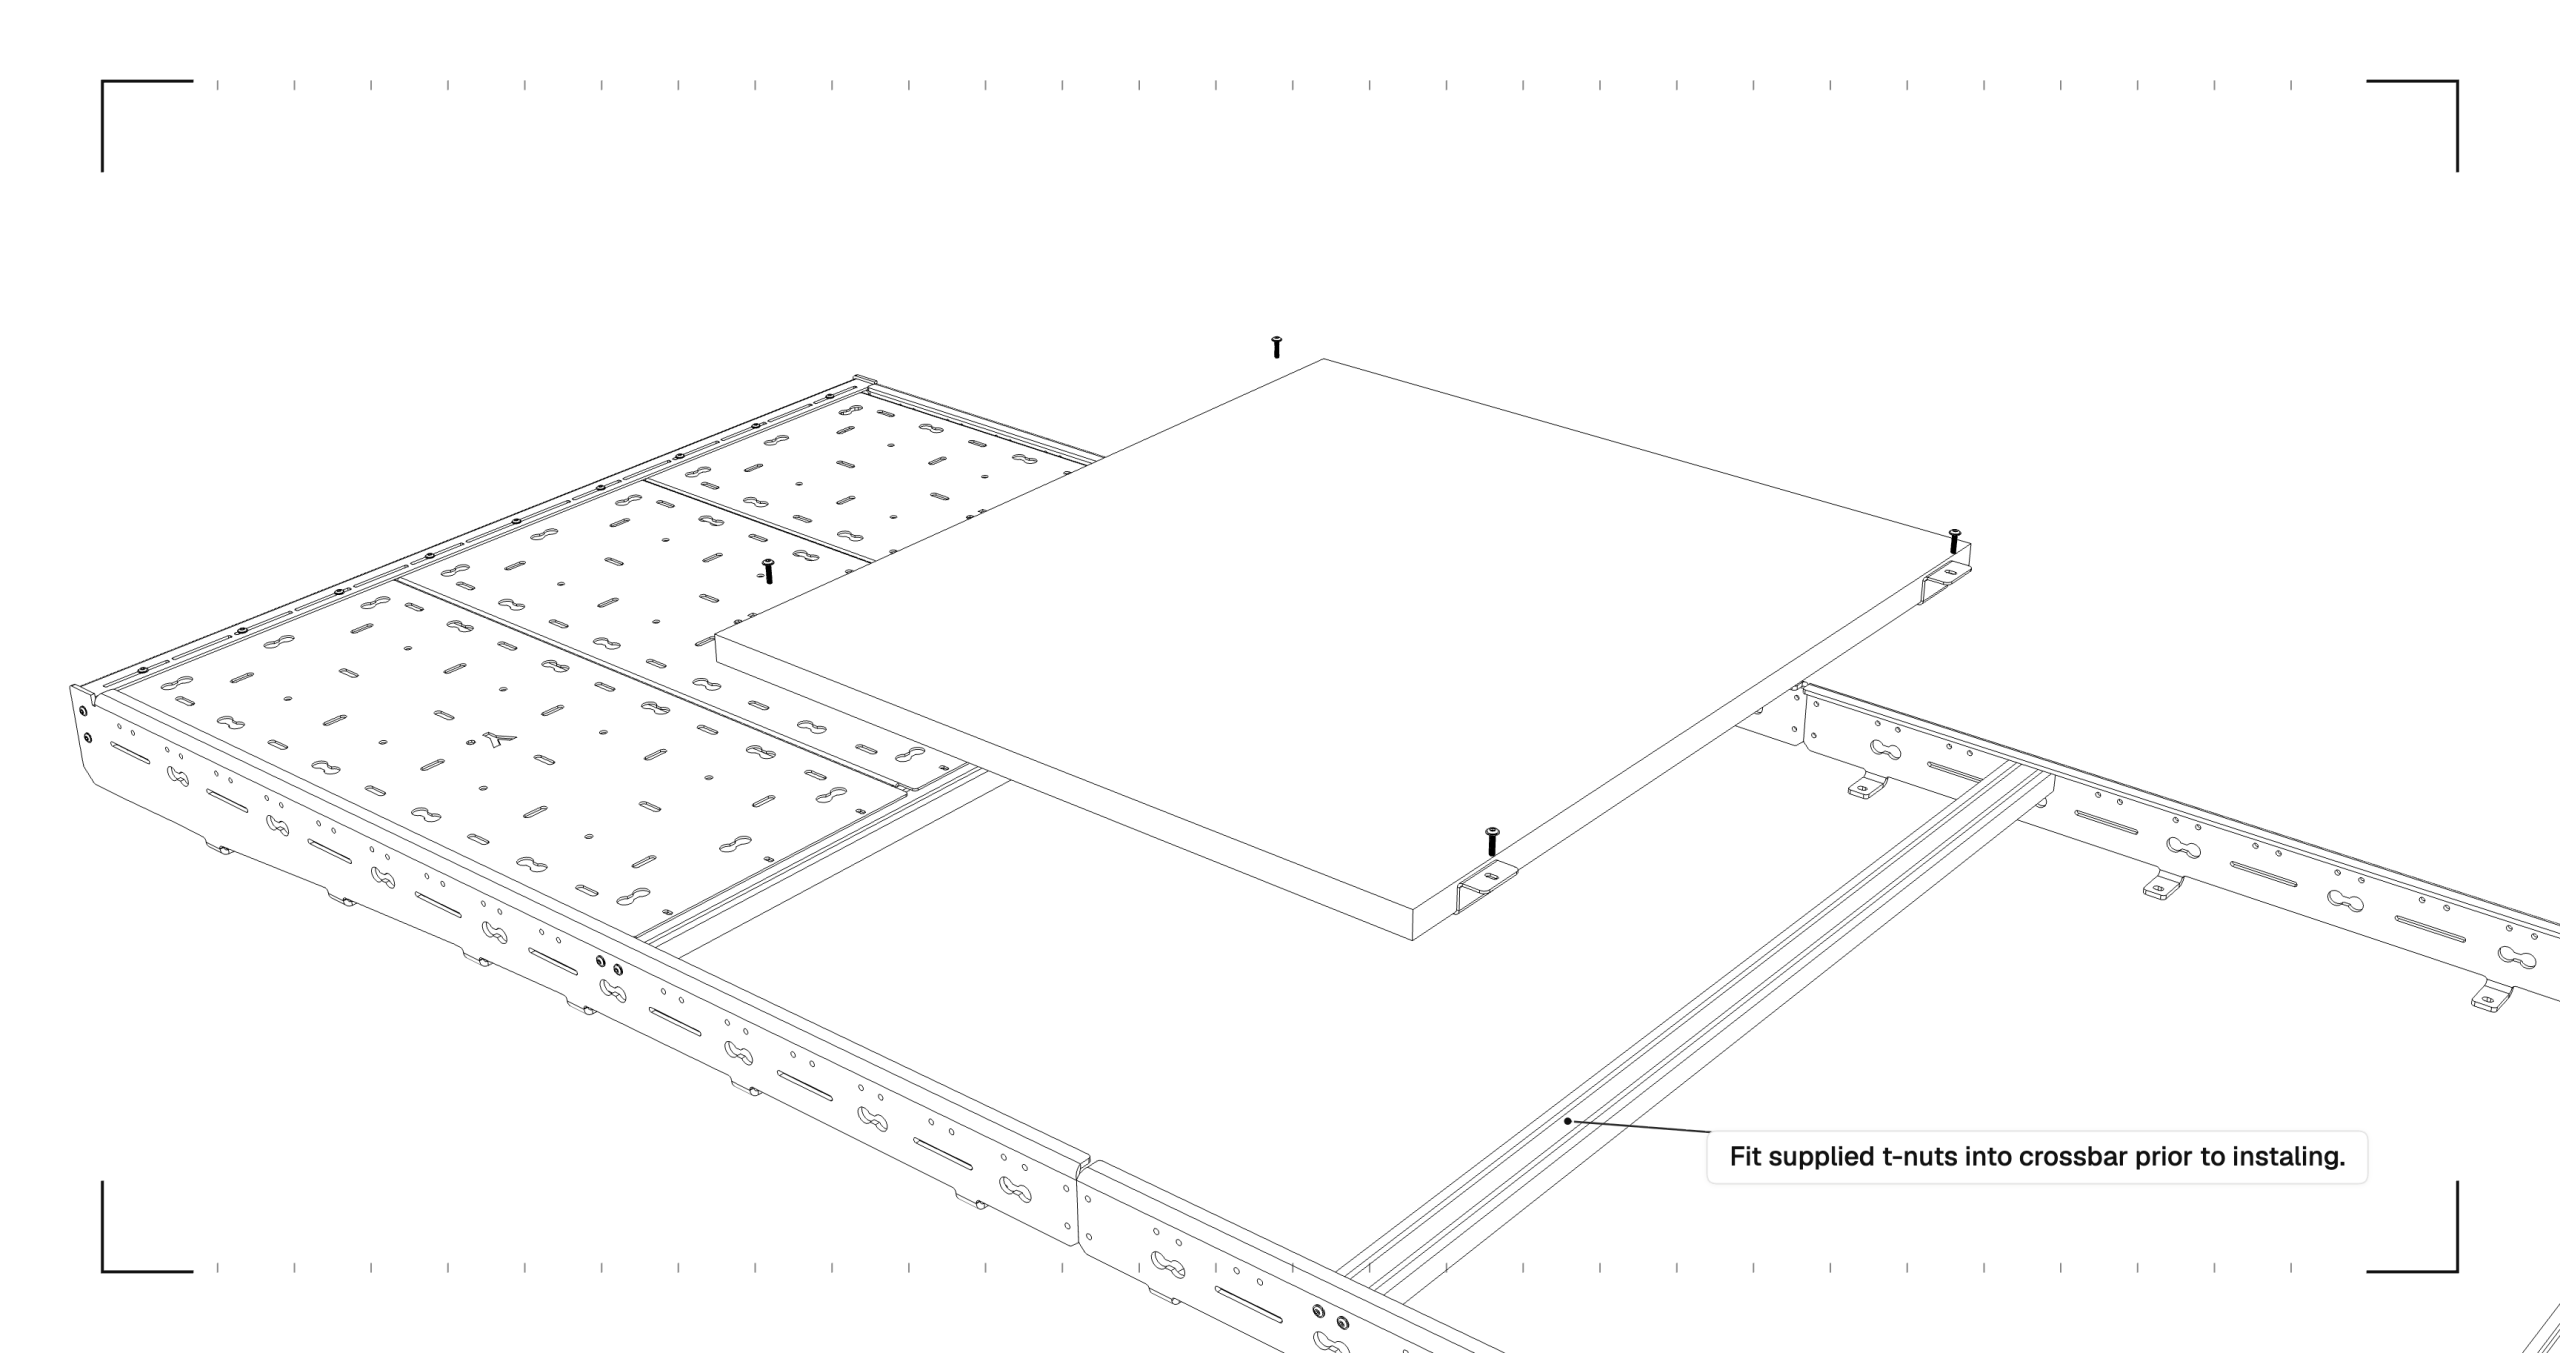
Drop the supplied T-nuts into the crossbar T-slots at each bracket position. Loose again — they need to slide for final alignment.
Step 4 — Panel Up
Lift the panel into its bay and start each bracket bolt into its T-nut. Big panel? Fit the mid-span support bar first. Have a last look at clearances before committing.
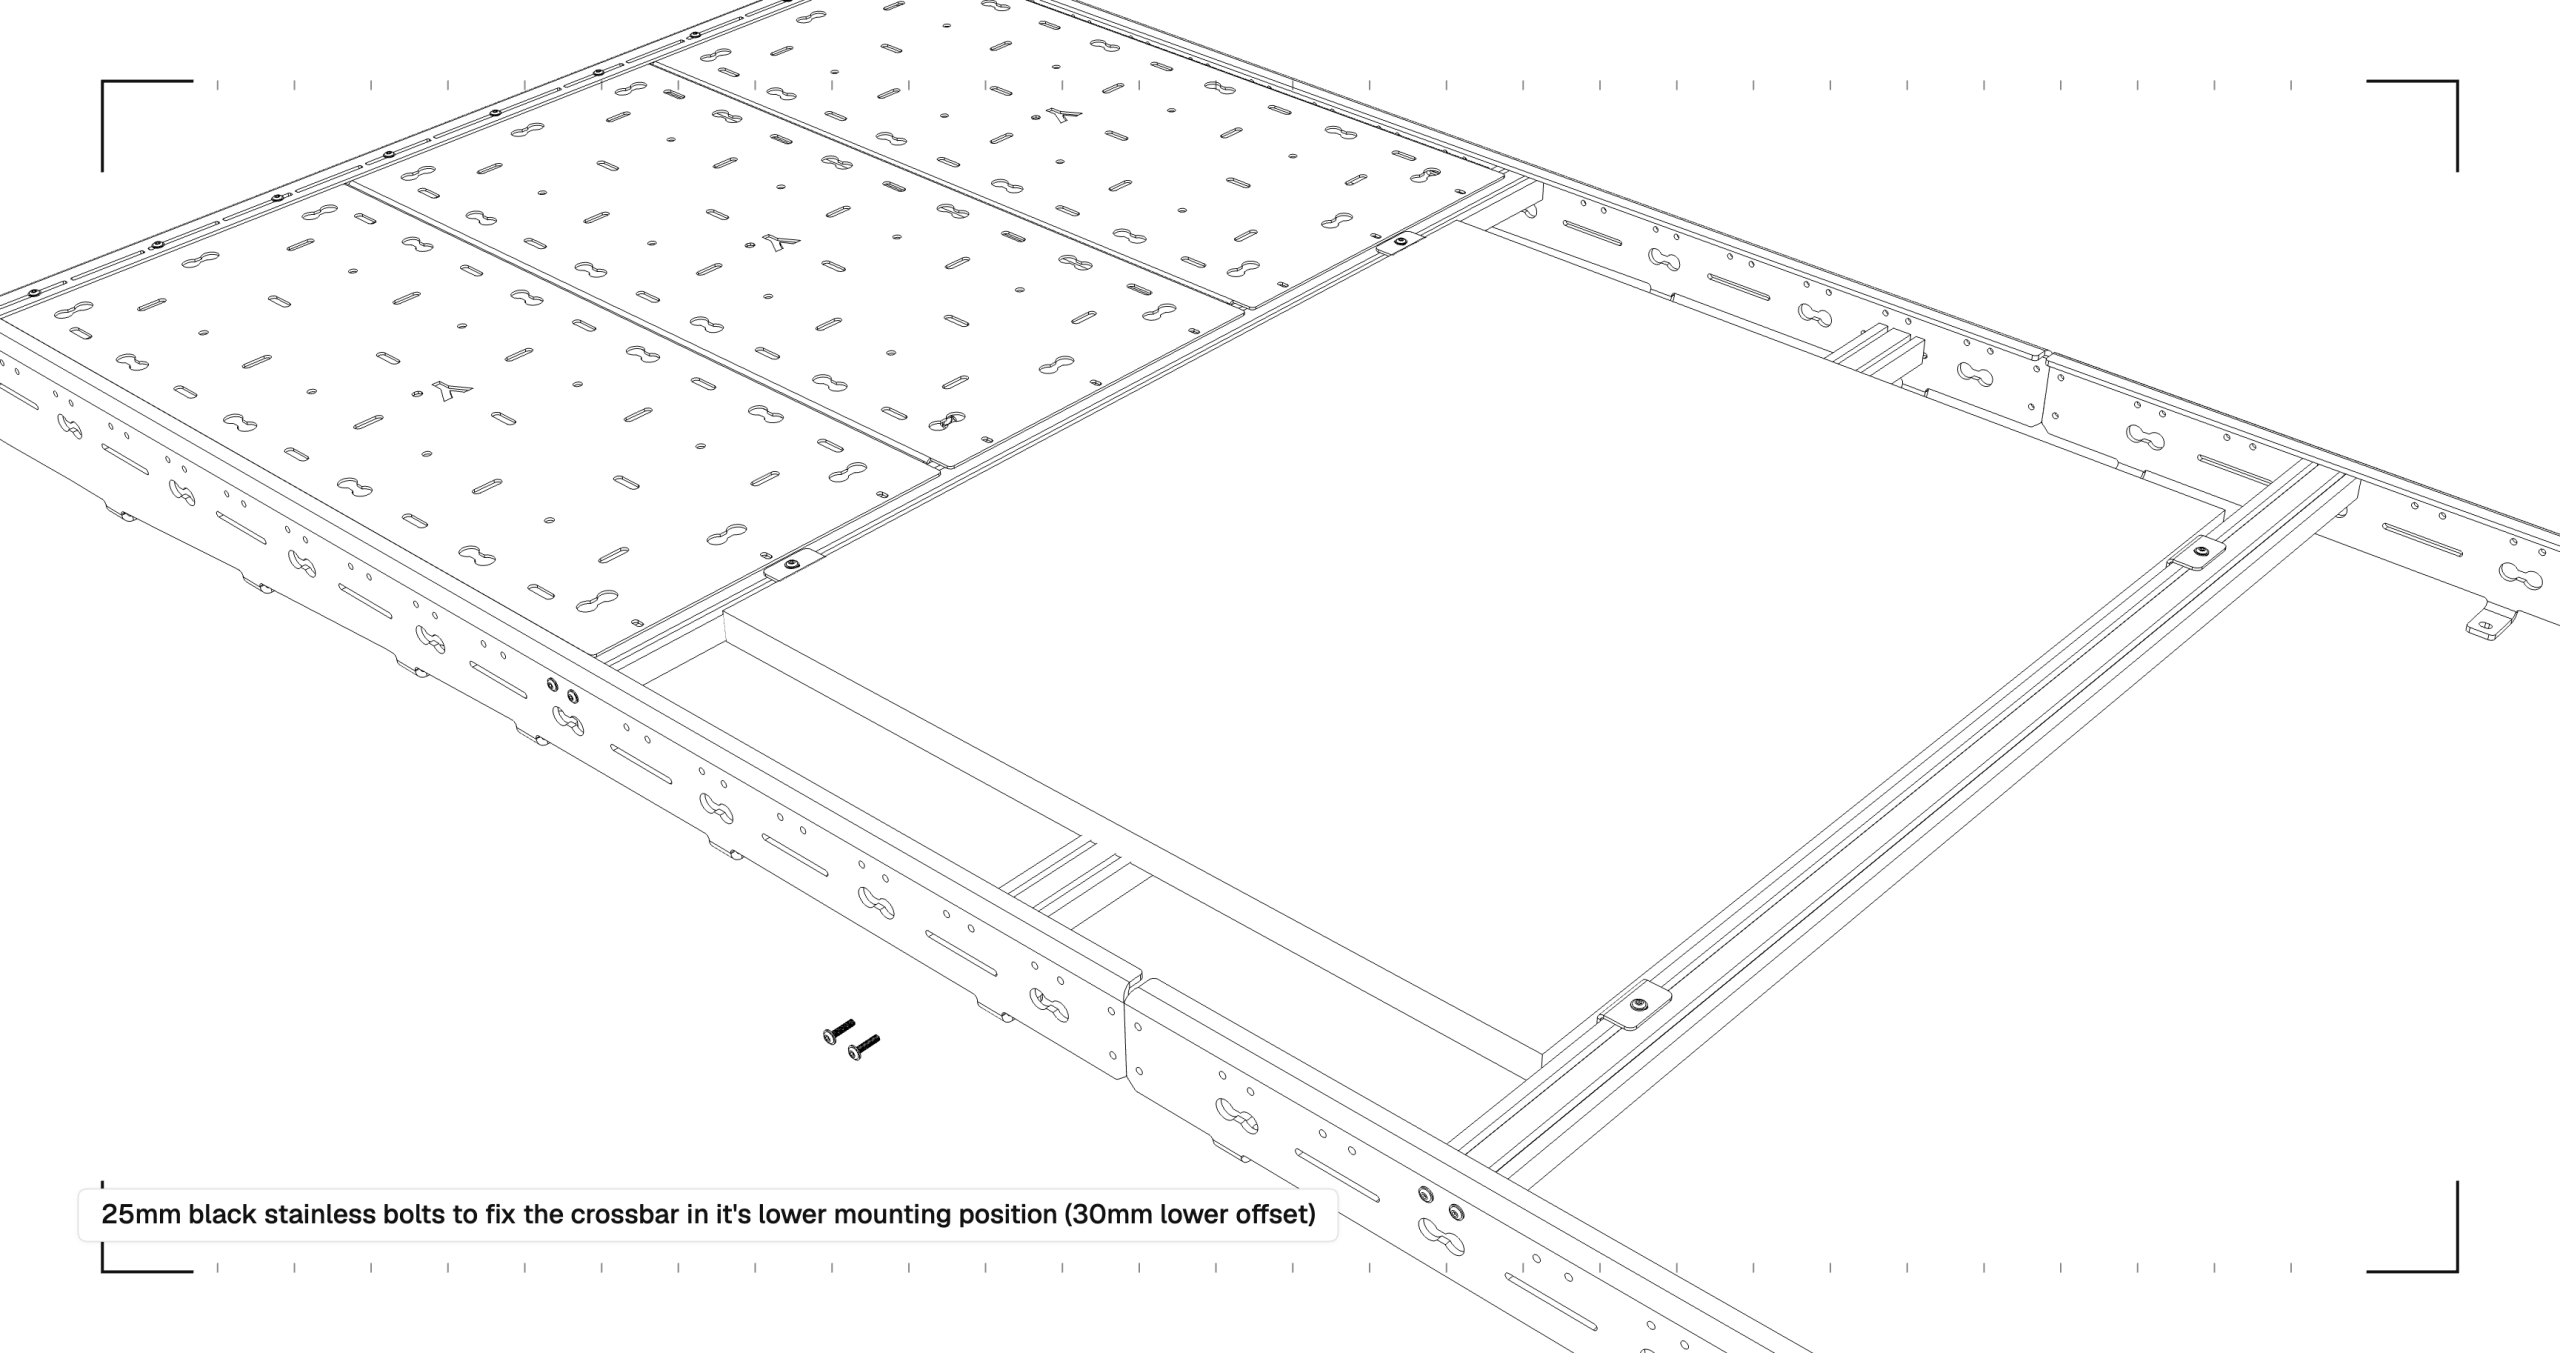
A hard-earned tip: stainless bolts into stainless T-nuts will occasionally gall if you run them in fast — they seize solid mid-thread and you’ll be drilling them out. Thread them by hand, slowly, and back off half a turn if you feel one tightening up. Never use a drill driver on them.
Step 5 — Square Up, Tighten Down
Slide brackets and T-nuts until the panel sits square in its bay with even gaps, then work round tightening each bolt. Lay a straight edge across the finished roof if you fancy — panel, bars, deck, all in one plane.
Fitting — Option 2
Simpler, because the panel sits on top:
- Move your crossbars to the lower holes (M6 × 25mm black stainless bolts into the side rails)
- Set the panel on the bars and check clearances
- Clamp it down with solar clamps into the crossbar T-slots
- Check the height — the panel top should land level with your decking and side rails
Getting the Cable Inside
The rack’s job ends at the panel; the electrics are your build’s department. But since we’ve done this a few times ourselves:
- Use a proper waterproof cable entry gland, sealed well — it’s the only hole this job should ever put in your van
- Run the cable along the underside of a crossbar and cable-tie it off; the T-slots give you anchor points the whole way
- Leave a small service loop at the panel end so the connectors aren’t under tension
Mistakes We See
- Panel proud of the bars. If it sticks up above the side rails, your bars are in the wrong row for your method. Go back a step.
- No mid support under a big panel. A 100W panel spans a bay happily. A two-metre residential panel flexing at 70mph will fatigue. Fit the bar.
- Tightening before aligning. The brackets and T-nuts slide on purpose. Square everything first, then tighten.
- Power tools on stainless fixings. That’s how galling happens. Hand tools, steady pressure.
The Finished Roof
Done properly, you shouldn’t really see the install at all — just a flat black roof with solar quietly built into it. Nothing whistles, nothing snags, and the panel is held by the rack rather than sitting on it.
And nothing here is permanent. Add a second panel next winter, swap a bay of solar for decking, clear the lot for a roof tent — the T-slot system means the roof changes as your build does.
Fits Every YAKKT Rack
The brackets are universal across every rack we make, CORE and PRO: VW Crafter, MAN TGE, Mercedes Sprinter, Ford Transit, Fiat Ducato, Citroen Relay and Peugeot Boxer.
Shop the solar brackets — £28 a set, all fixings included, free UK delivery. Planning extra crossbars for more panels? Order them with your rack and you’ll dodge the individual-bar delivery surcharge.
Odd panel size, awkward layout, not sure what fits? Message us on WhatsApp at +44 7871 319441 — we’ve almost certainly seen your setup before.


