Step-by-step fitting guide for the YAKKT VW Crafter / MAN TGE LWB PRO roof rack. Below you’ll find the tools you need, a full hardware bag breakdown and the install sequence in order. Allow around 1hr 30 with 2 people.
At a glance
| Time to install | 1hr 30 |
| People needed | 2 |
| Difficulty | Easy |
| Drilling required? | No |
| Interior trim removal? | No |
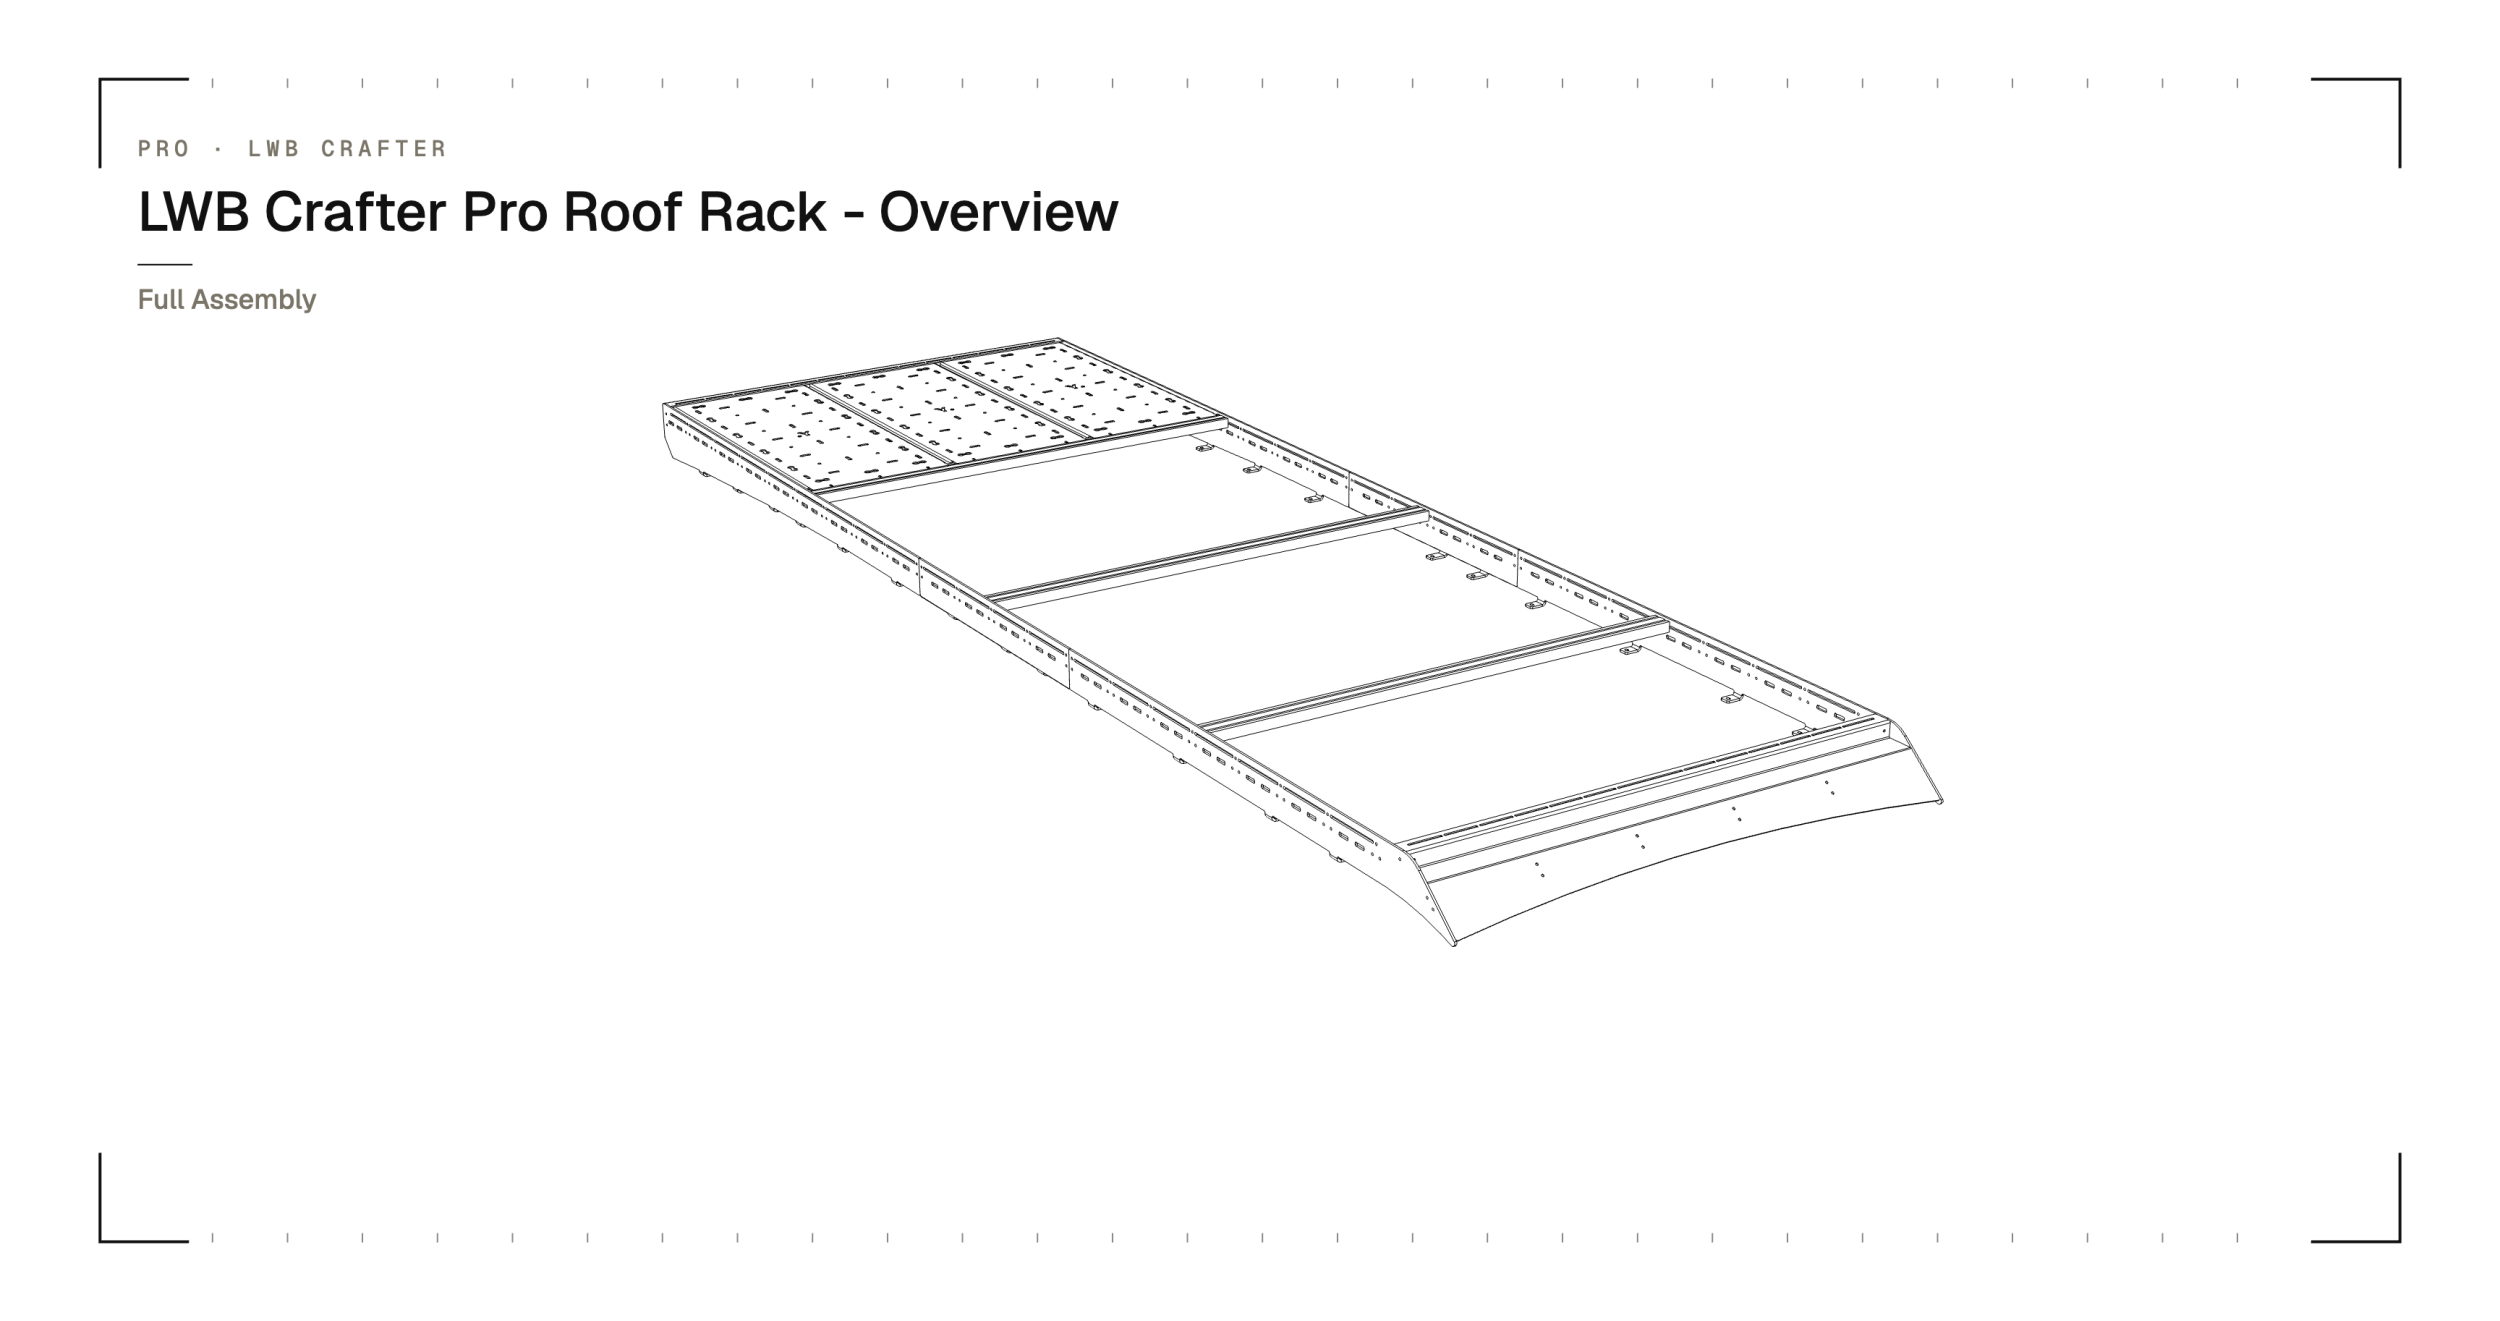
What’s in the box
Rack contents
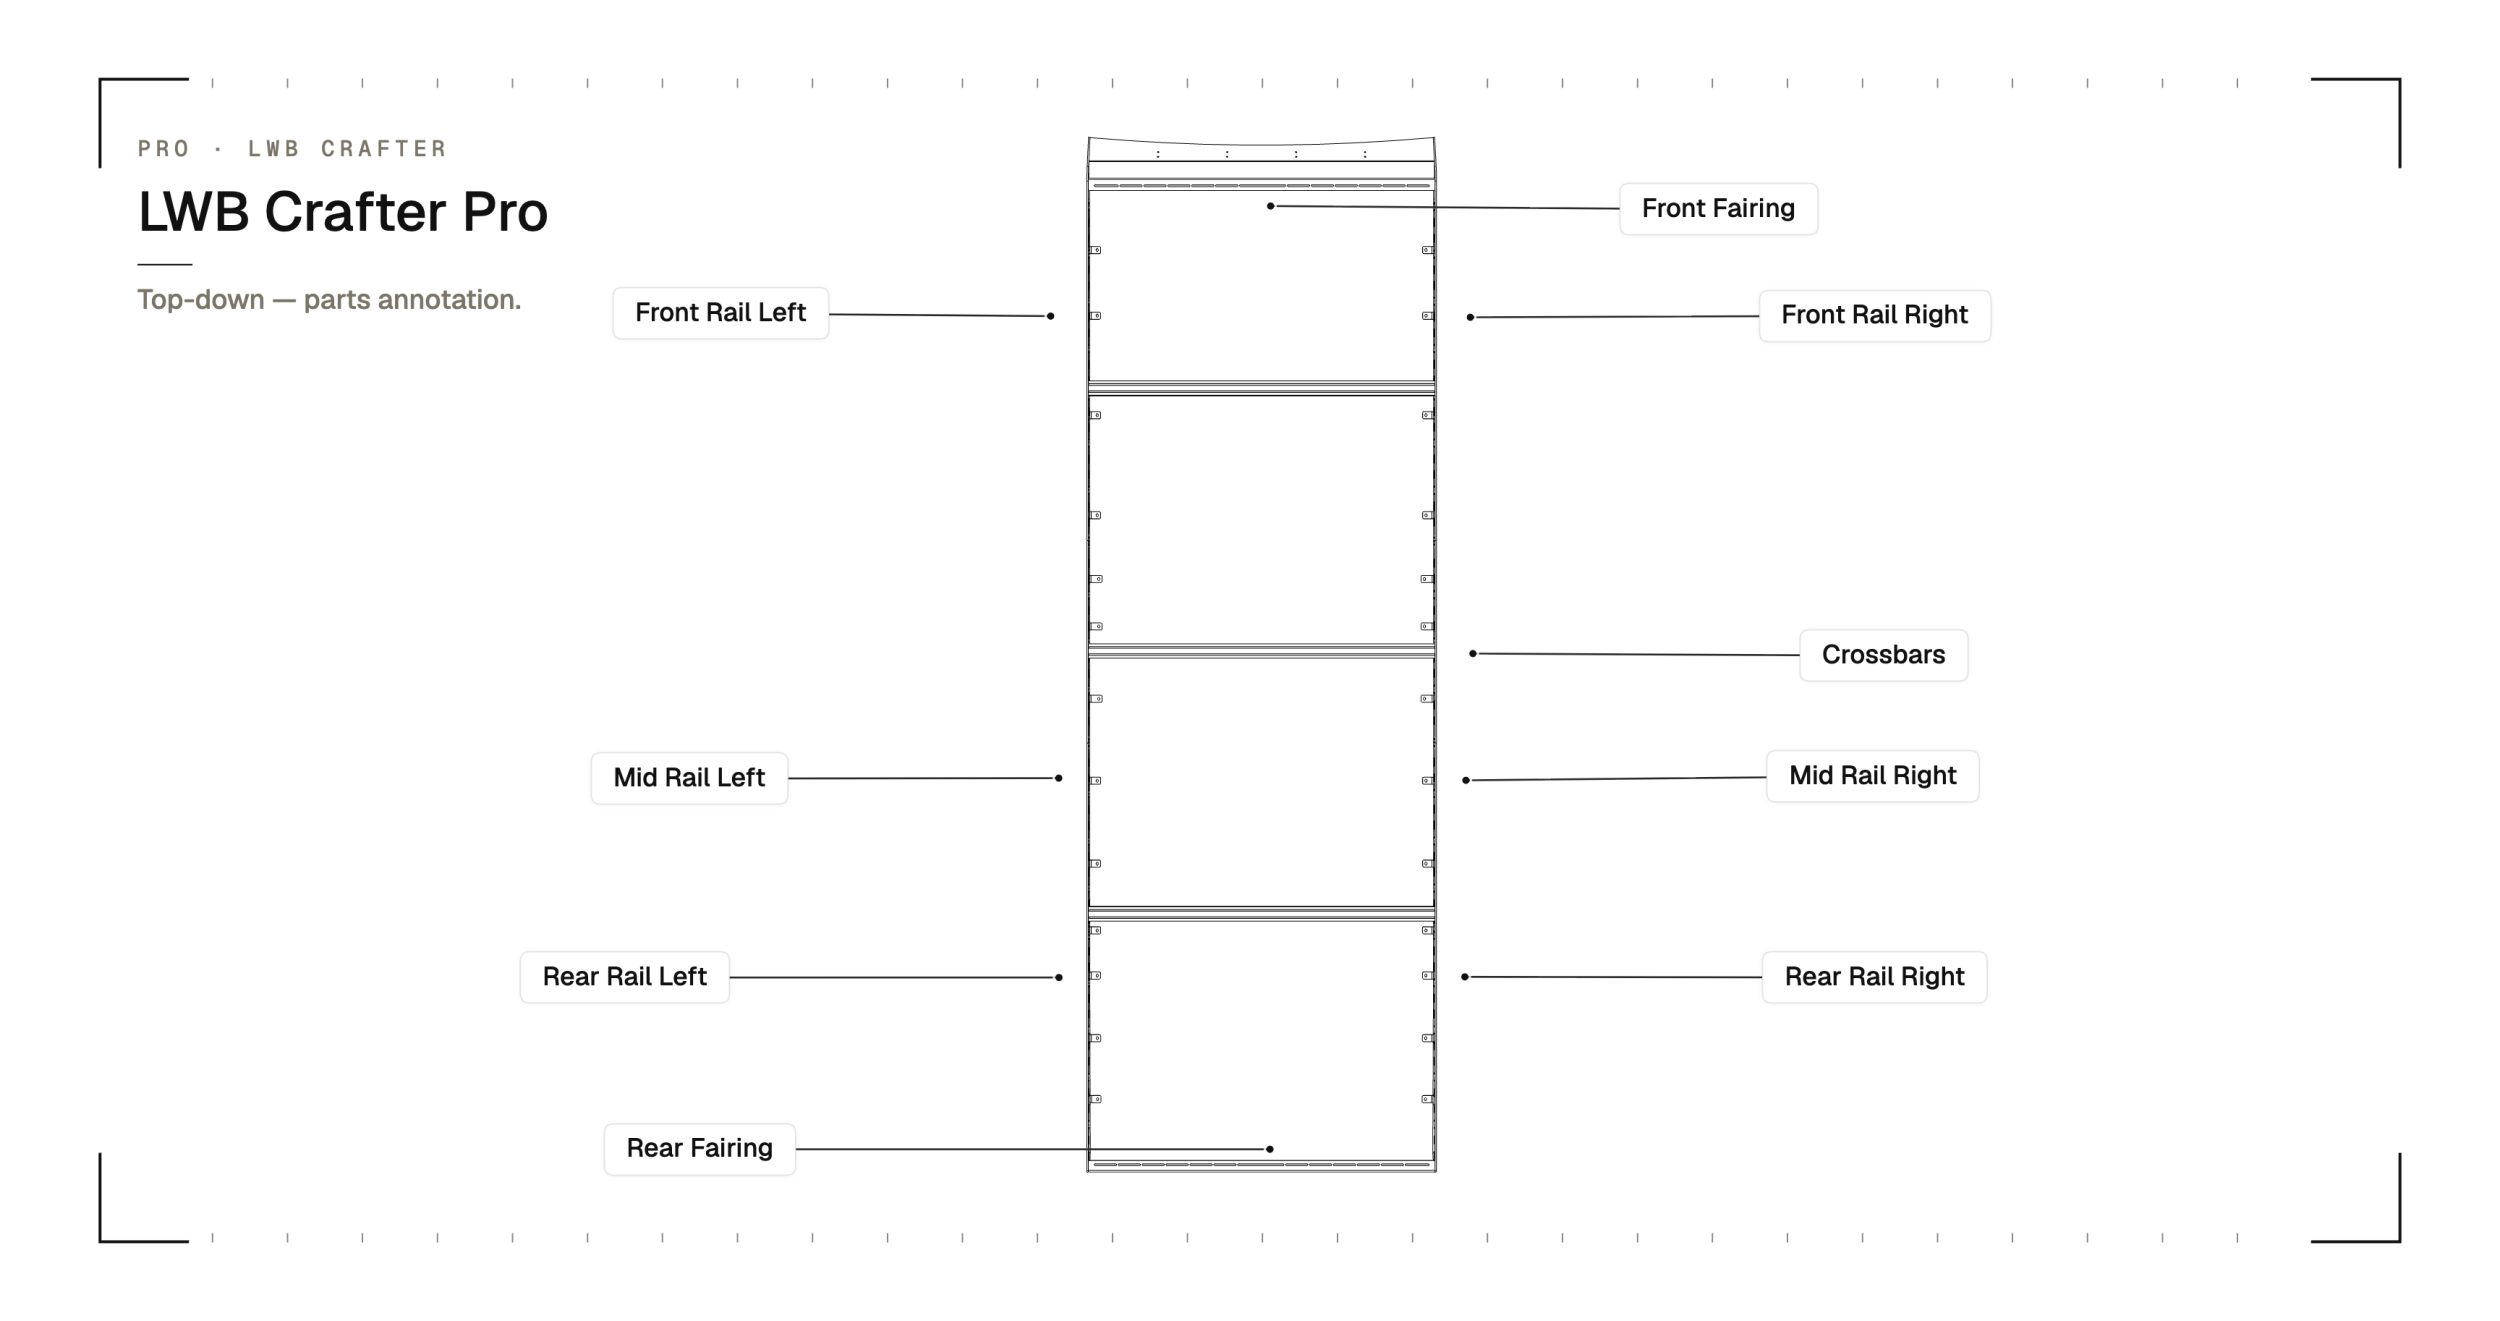
- Front Side Rail (Left)
- Front Side Rail (Right)
- Mid Side Rail (Left)
- Mid Side Rail (Right)
- Rear Side Rail (Left)
- Rear Side Rail (Right)
- Rear Fairing
- Front Fairing
- Crossbars × 4
Fitting kit
- Side Rail Hardware Bag
- EPDM Rubber Spacers × 26
- UNIV-4 Brackets × 2
- UNIV-2 Brackets × 2
- UNIV Rail Connectors × 4
- UNIV-4 × 2 Hardware Bag
- UNIV-2 × 2 Hardware Bag
- UNIV Connector × 4 Hardware Bag
- Front Fairing
- Crossbars
Hardware bag breakdown
Each fitting kit ships with the hardware bags listed below. Counts match the corresponding step in the install guide.
| Bag | Contents |
|---|---|
| LWB-C-RR-SIDERAILS | M8 × 25mm Stainless Flanged Head Bolt × 26 M8 Penny Washer × 26 M8 Stainless Nyloc Nut × 26 |
| UNIV4 BRACKET X2 BAG | M6 × 25mm Black Stainless Bolt × 8 M6 Stainless Penny Washer × 8 M6 Stainless Nyloc Nut × 8 |
| UNIV2 BRACKET X2 BAG | M6 × 25mm Black Stainless Bolt × 4 M6 Stainless Penny Washer × 4 M6 Stainless Nyloc Nut × 4 |
| UNIV CONNECTOR X4 BAG | M6 × 25mm Black Stainless Bolt × 16 M6 Stainless Penny Washer × 16 M6 Stainless Nyloc Nut × 16 |
| FRONT FAIRING BAG (X8) | M6 × 10mm Black Stainless Bolt × 8 T-Nut Insert × 8 |
| CROSSBARS X4 | M6 × 25mm Black Stainless Bolt × 16 |
Tools you’ll need
- A second pair of hands
- A ladder
- Heat gun (for vehicles with glued plastic caps over the factory mount points)
- Trim removal tool or flat-head screwdriver
- M8 / 13mm socket and spanner
- M6 / 10mm socket and spanner
- Impact driver or ratchet
- Hex bit set (M4 / M5)
01 / 08
Factory Tabs
Locate the factory M8 mounting points along the roof. On the Crafter and MAN TGE these are covered by small glued plastic tabs from the factory — 26 tabs in total on this variant (MWB = 20, LWB = 26).
Use a heat gun to gently warm the adhesive holding each tab, then ease the tab off to reveal the M8 mounting hole beneath.
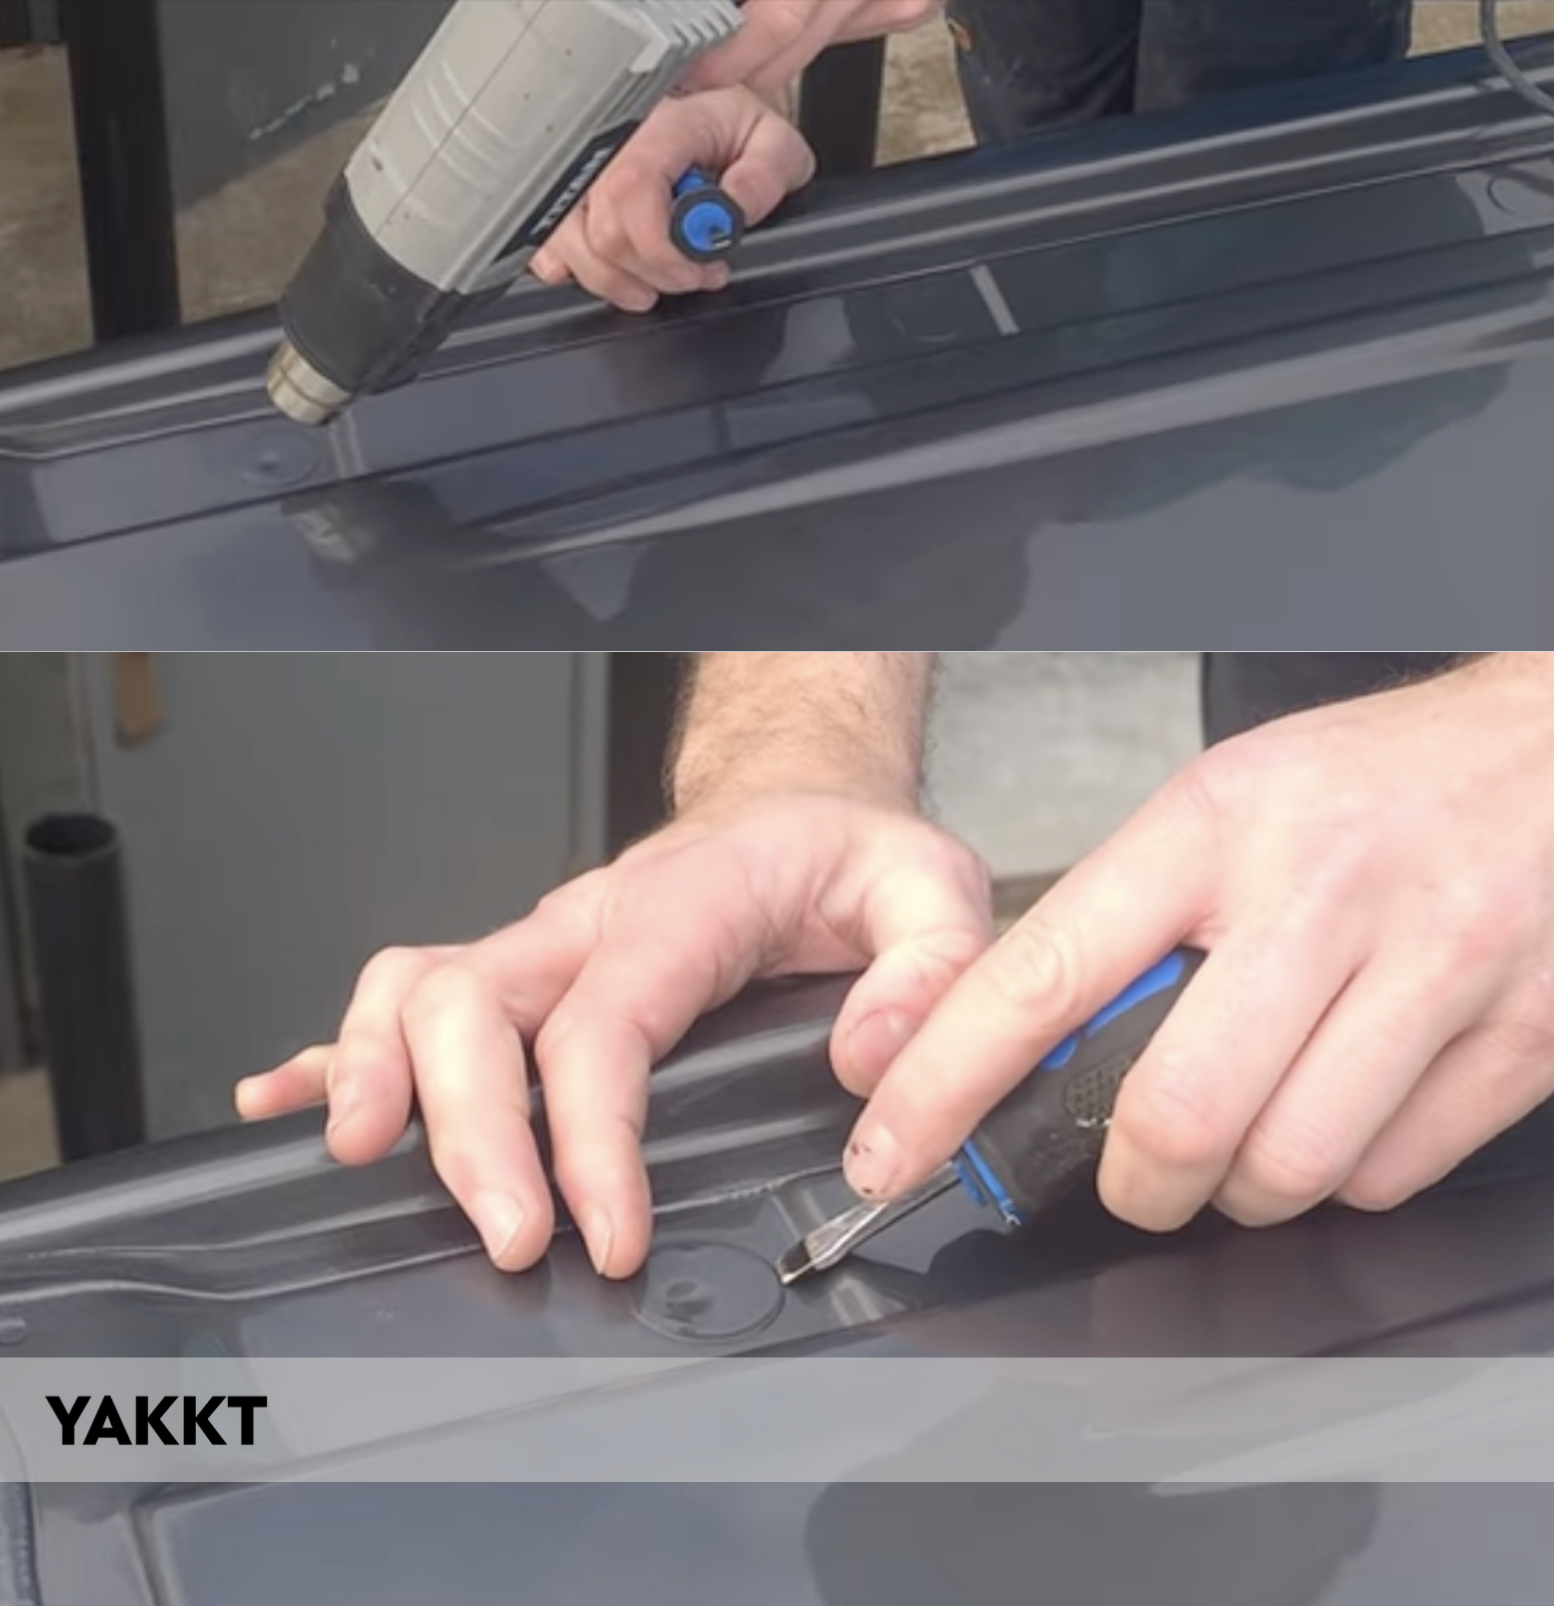
Repeat for every tab along both roof channels. Once all 26 are removed, the factory M8 mounting holes are exposed and ready for the YAKKT side rails.
Plastic trim removal tool
If you’re not confident using a flat-head, use a plastic trim removal tool to avoid damaging your paintwork.
02 / 08
Side Rails
Position each side rail along the roof, lining up its mounting holes with the now-exposed factory M8 holes underneath. Two-person job — one above on a ladder dropping the bolts through, one below inside the van threading the nyloc nuts.
At each fixing point the stack is: bolt head → side rail → EPDM rubber spacer → vehicle roof skin → penny washer → nyloc nut.
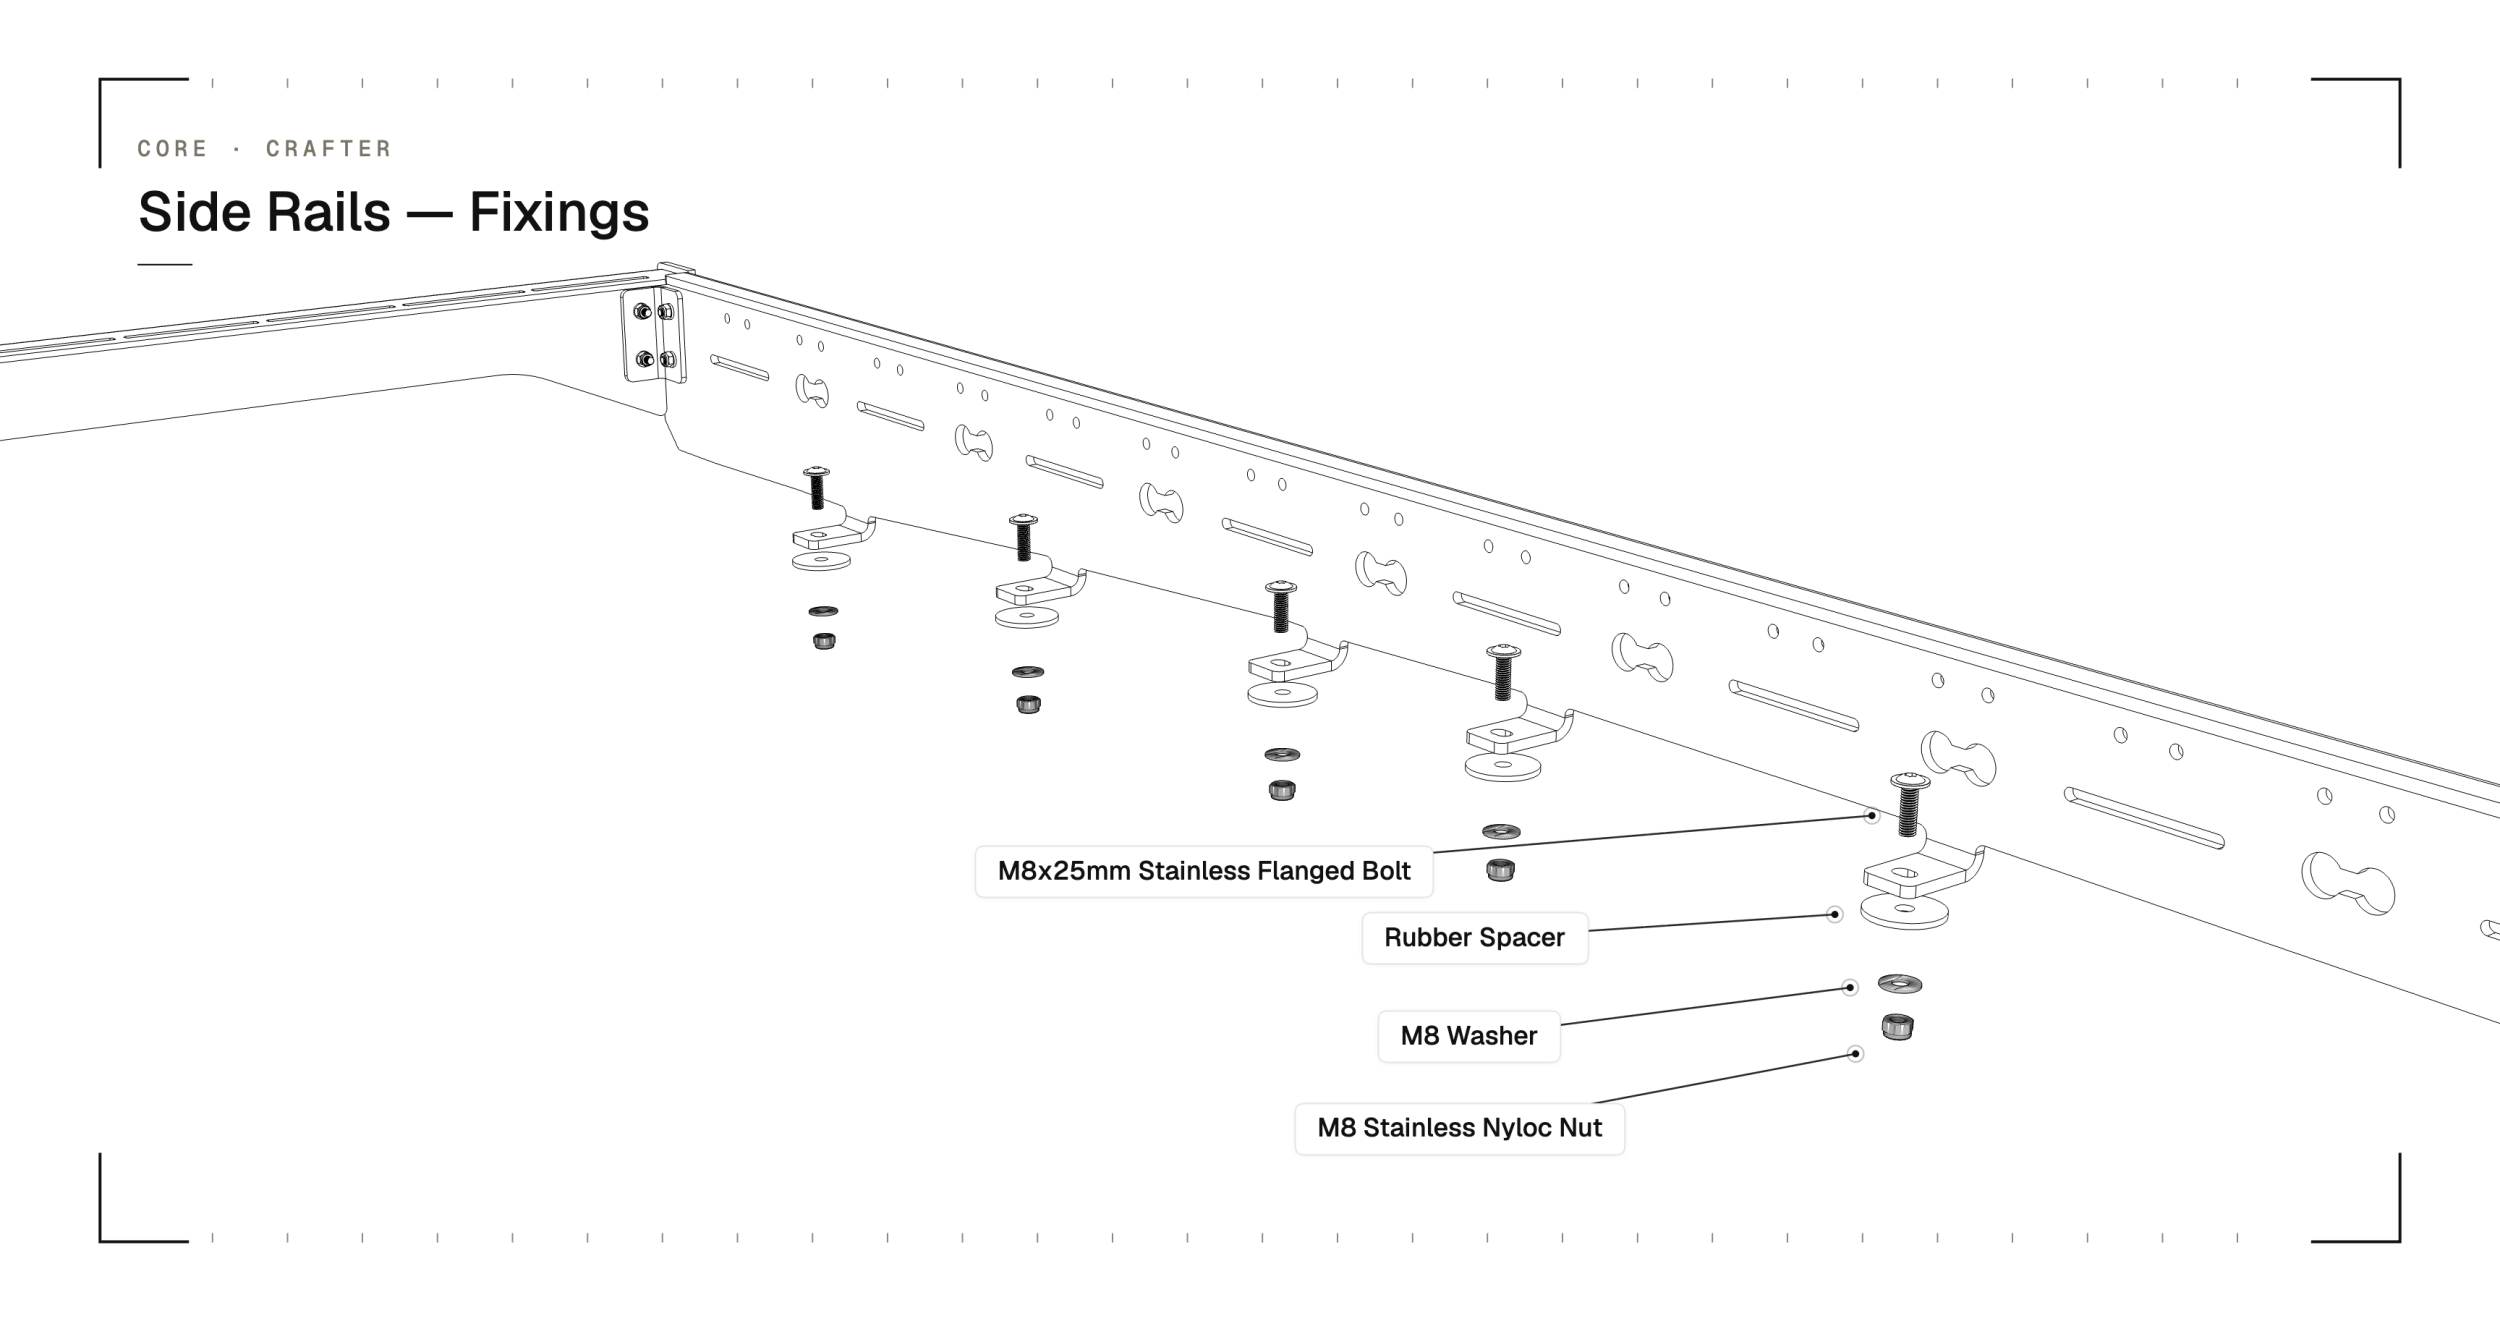
Snug each bolt only — don’t fully tighten yet. The side rails need play so the rack can be squared in the final step.
03 / 08
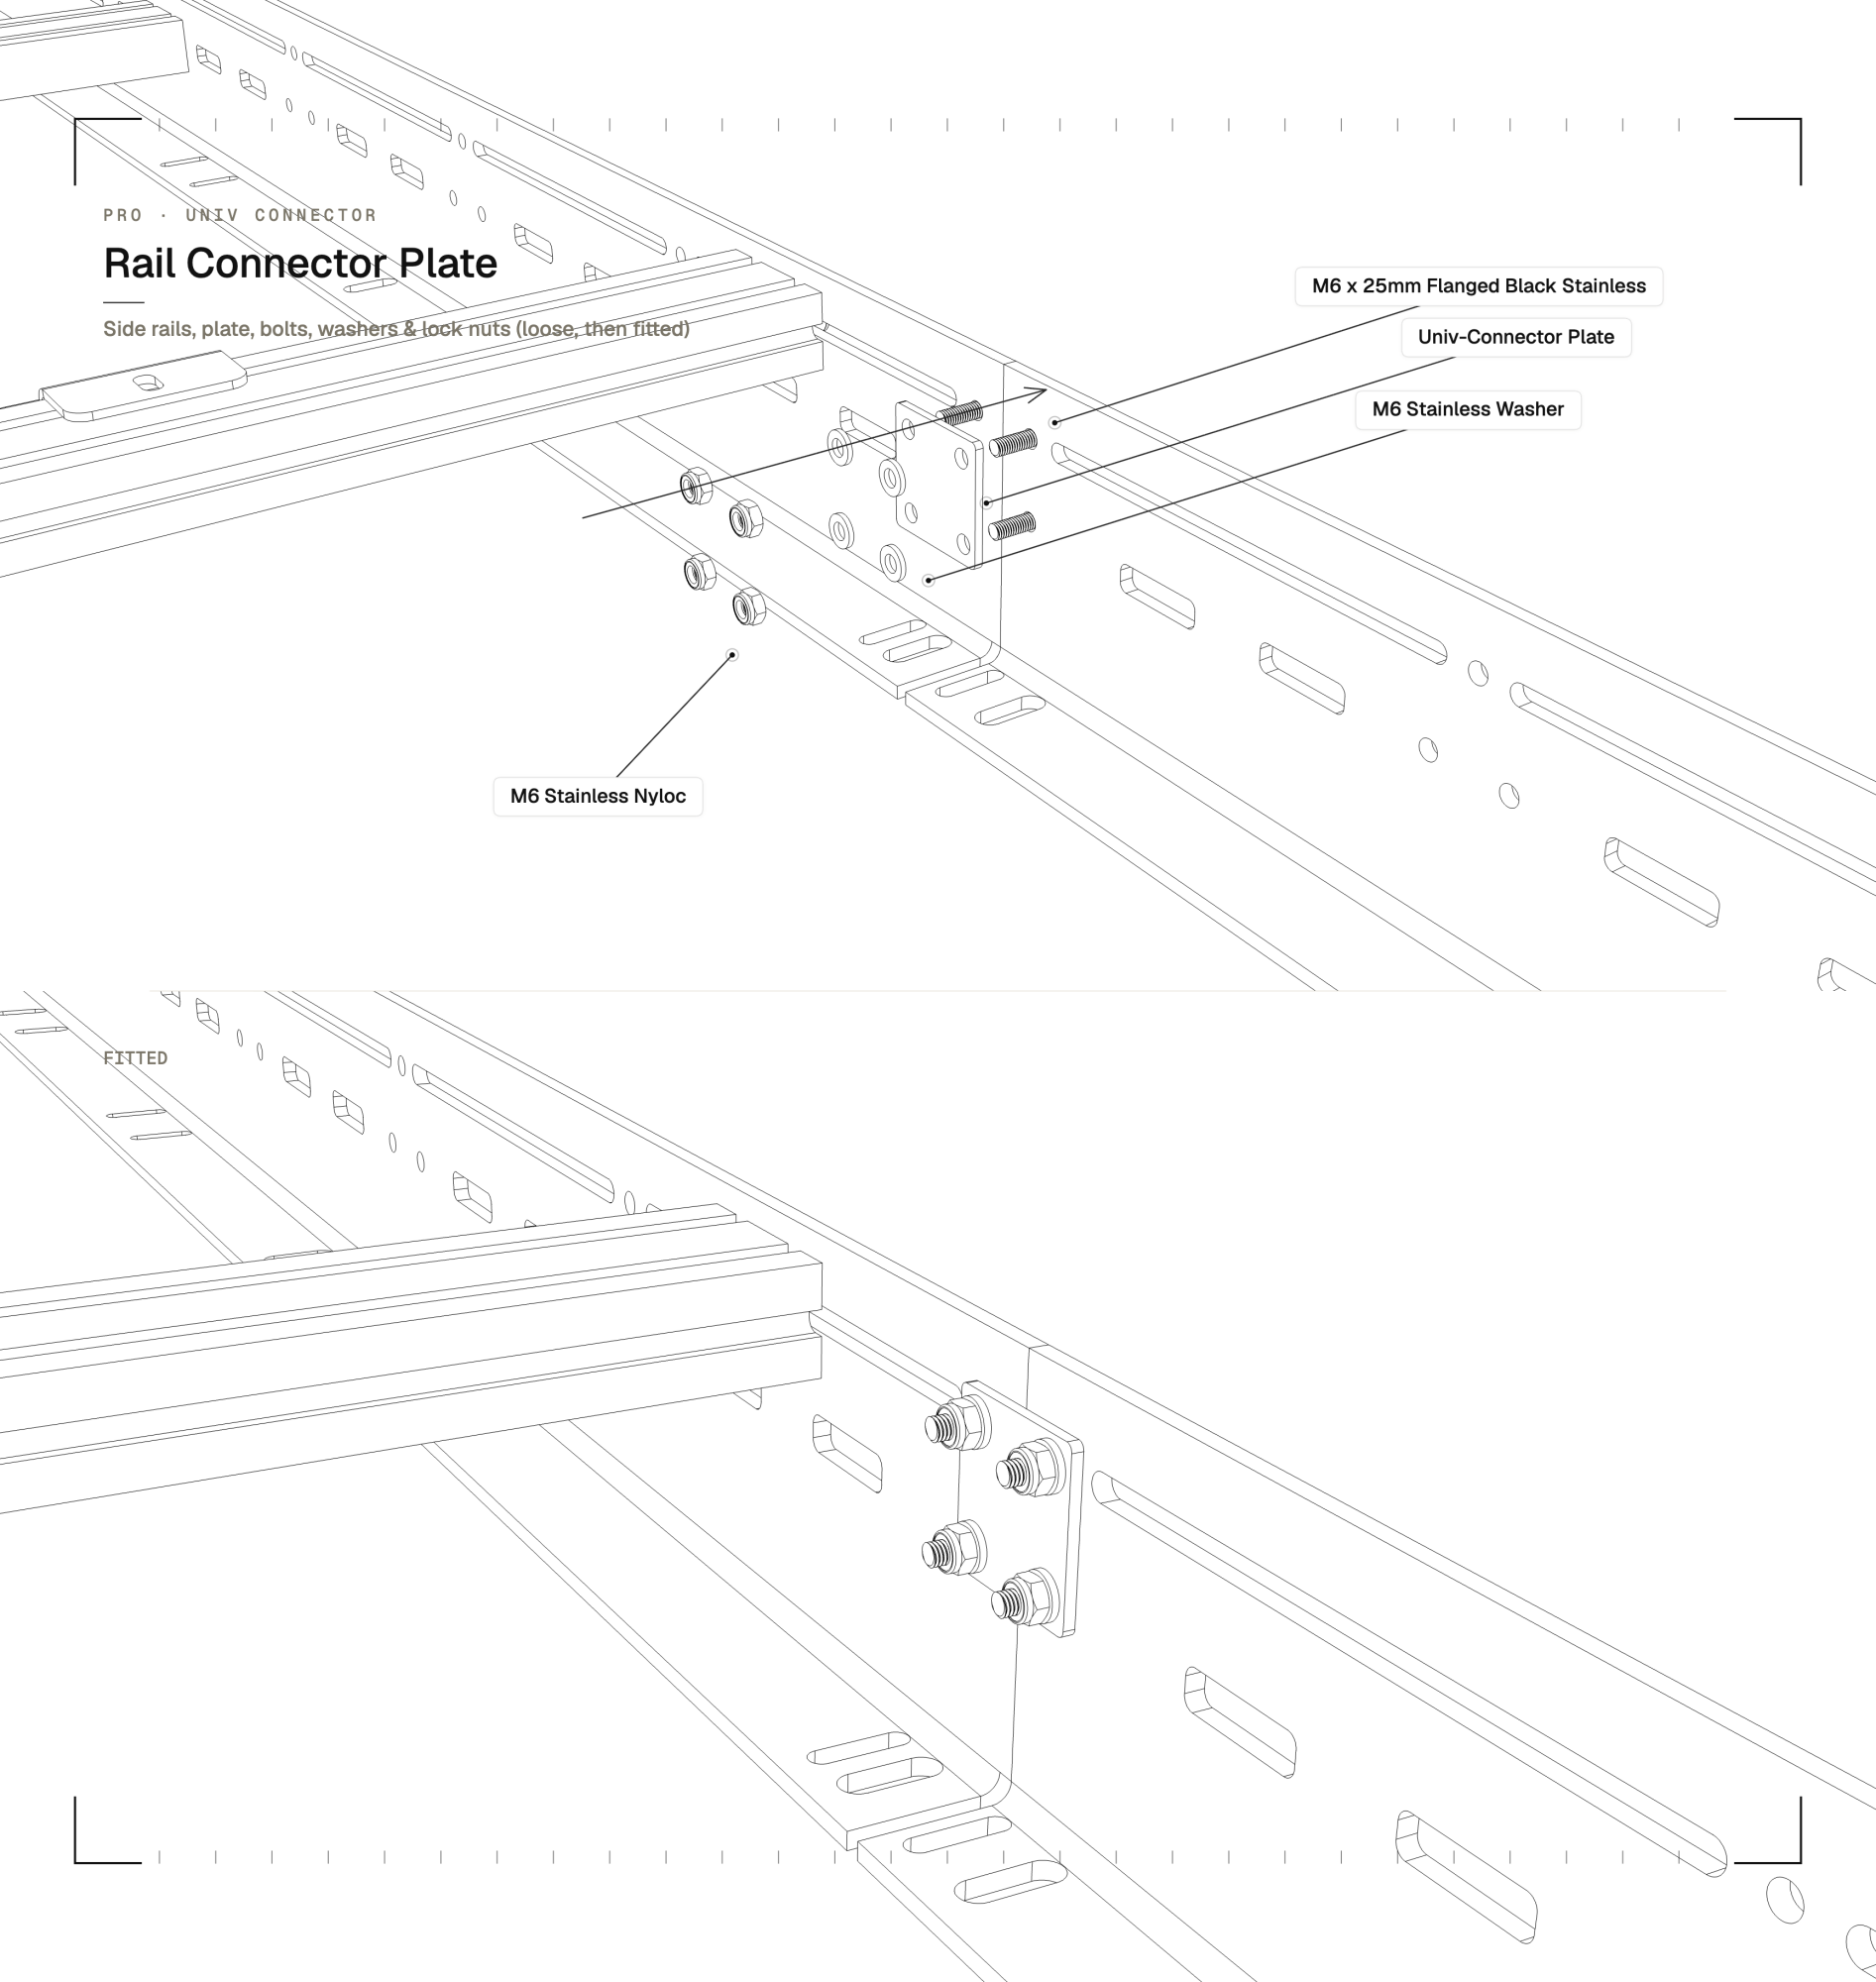
Rail Connectors
You’ve fitted your side rails — now you can fit your connecting plates to join the side rail sections together securely.
Grab your UNIV-4 connectors and the rail connector bag. You’ll have 4× M6 × 25mm black stainless bolts, 4× M6 stainless penny washers and 4× M6 stainless nyloc nuts per connector.
Your side rails should still be slightly loose. Offer up your connectors and bolt through with the plate on the inside. Make your side rails as close together as possible whilst you tighten the fixings.
04 / 08
Crossbars
You’ve fitted your side rails and connectors. Your side rails still have some movement and aren’t fully tightened yet.
Grab your crossbars and your crossbar fixing packet — you’ll have 4× 25mm black stainless bolts per crossbar. Remember to use Loctite on the bolts when fitting.
Fit your crossbars in their desired location (remember to leave one for your front fairing). You can move these later very easily. Fitting now will help you square your rack before you fit your front and rear fairing.
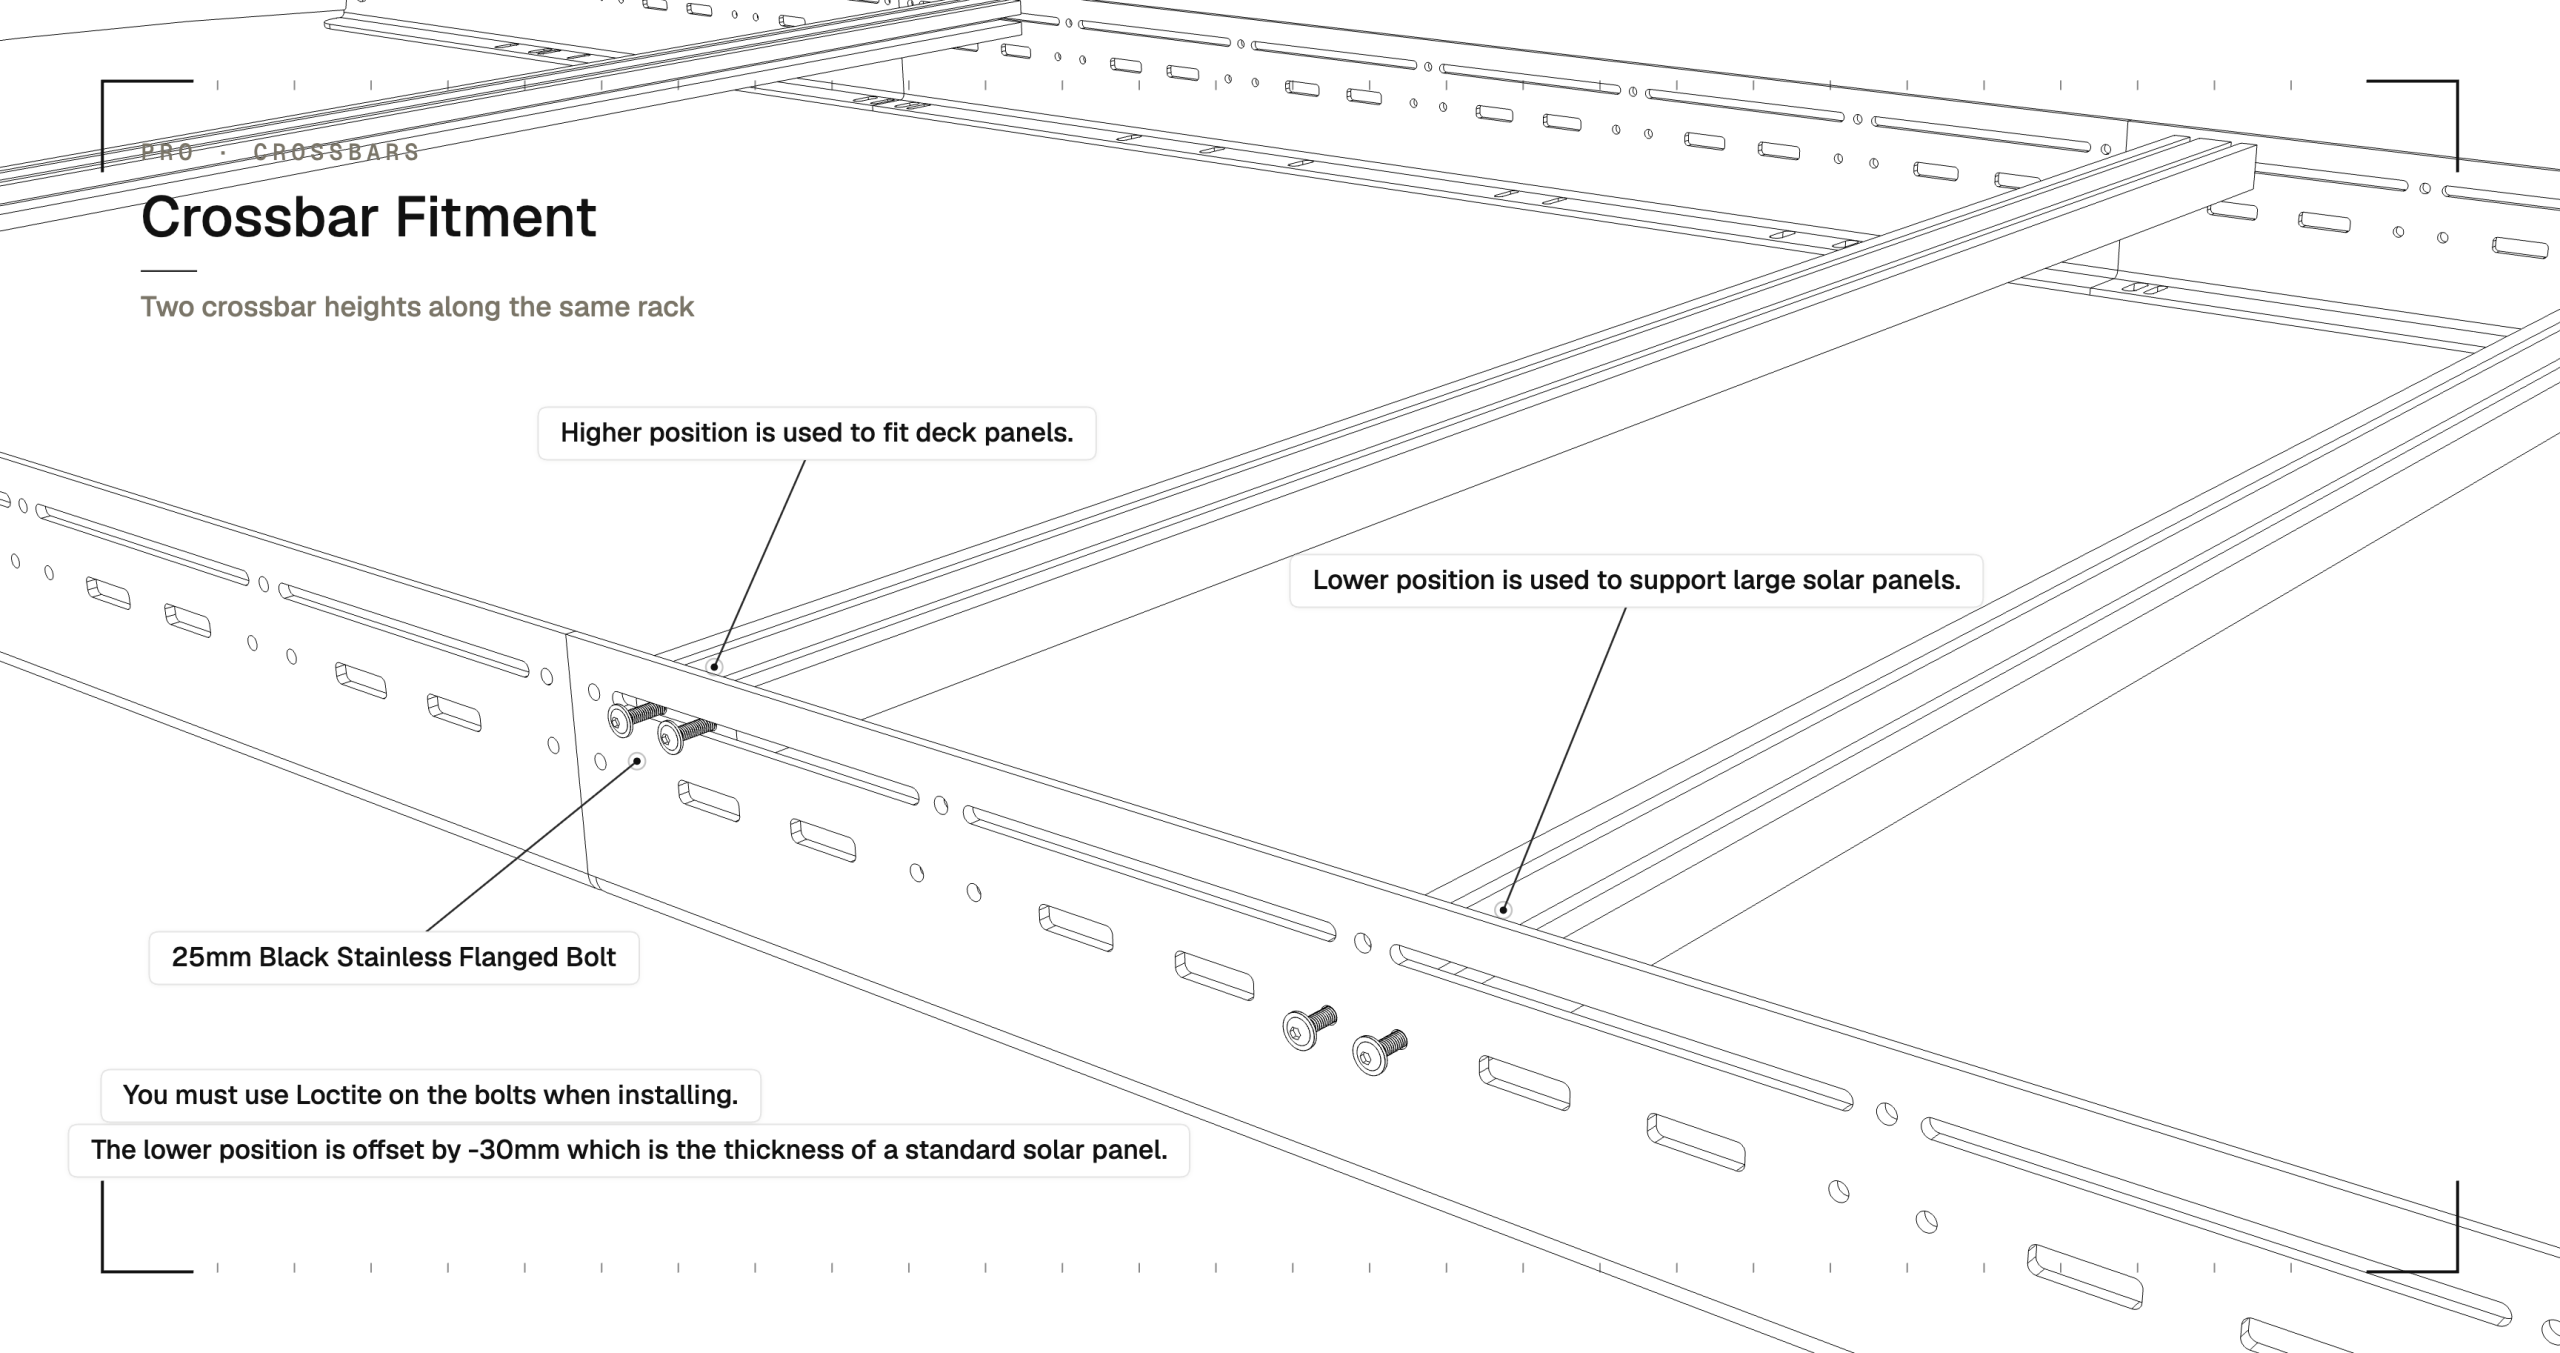
Leave one crossbar for the front fairing
The front-most crossbar gets assembled to the front fairing in a later step, so set one aside before you fit the rest.
Plan crossbar positions for your accessories
Deck panels, solar brackets and awning brackets all clamp onto the crossbars. Position the crossbars to align with where you want those accessories before final tightening.
05 / 08
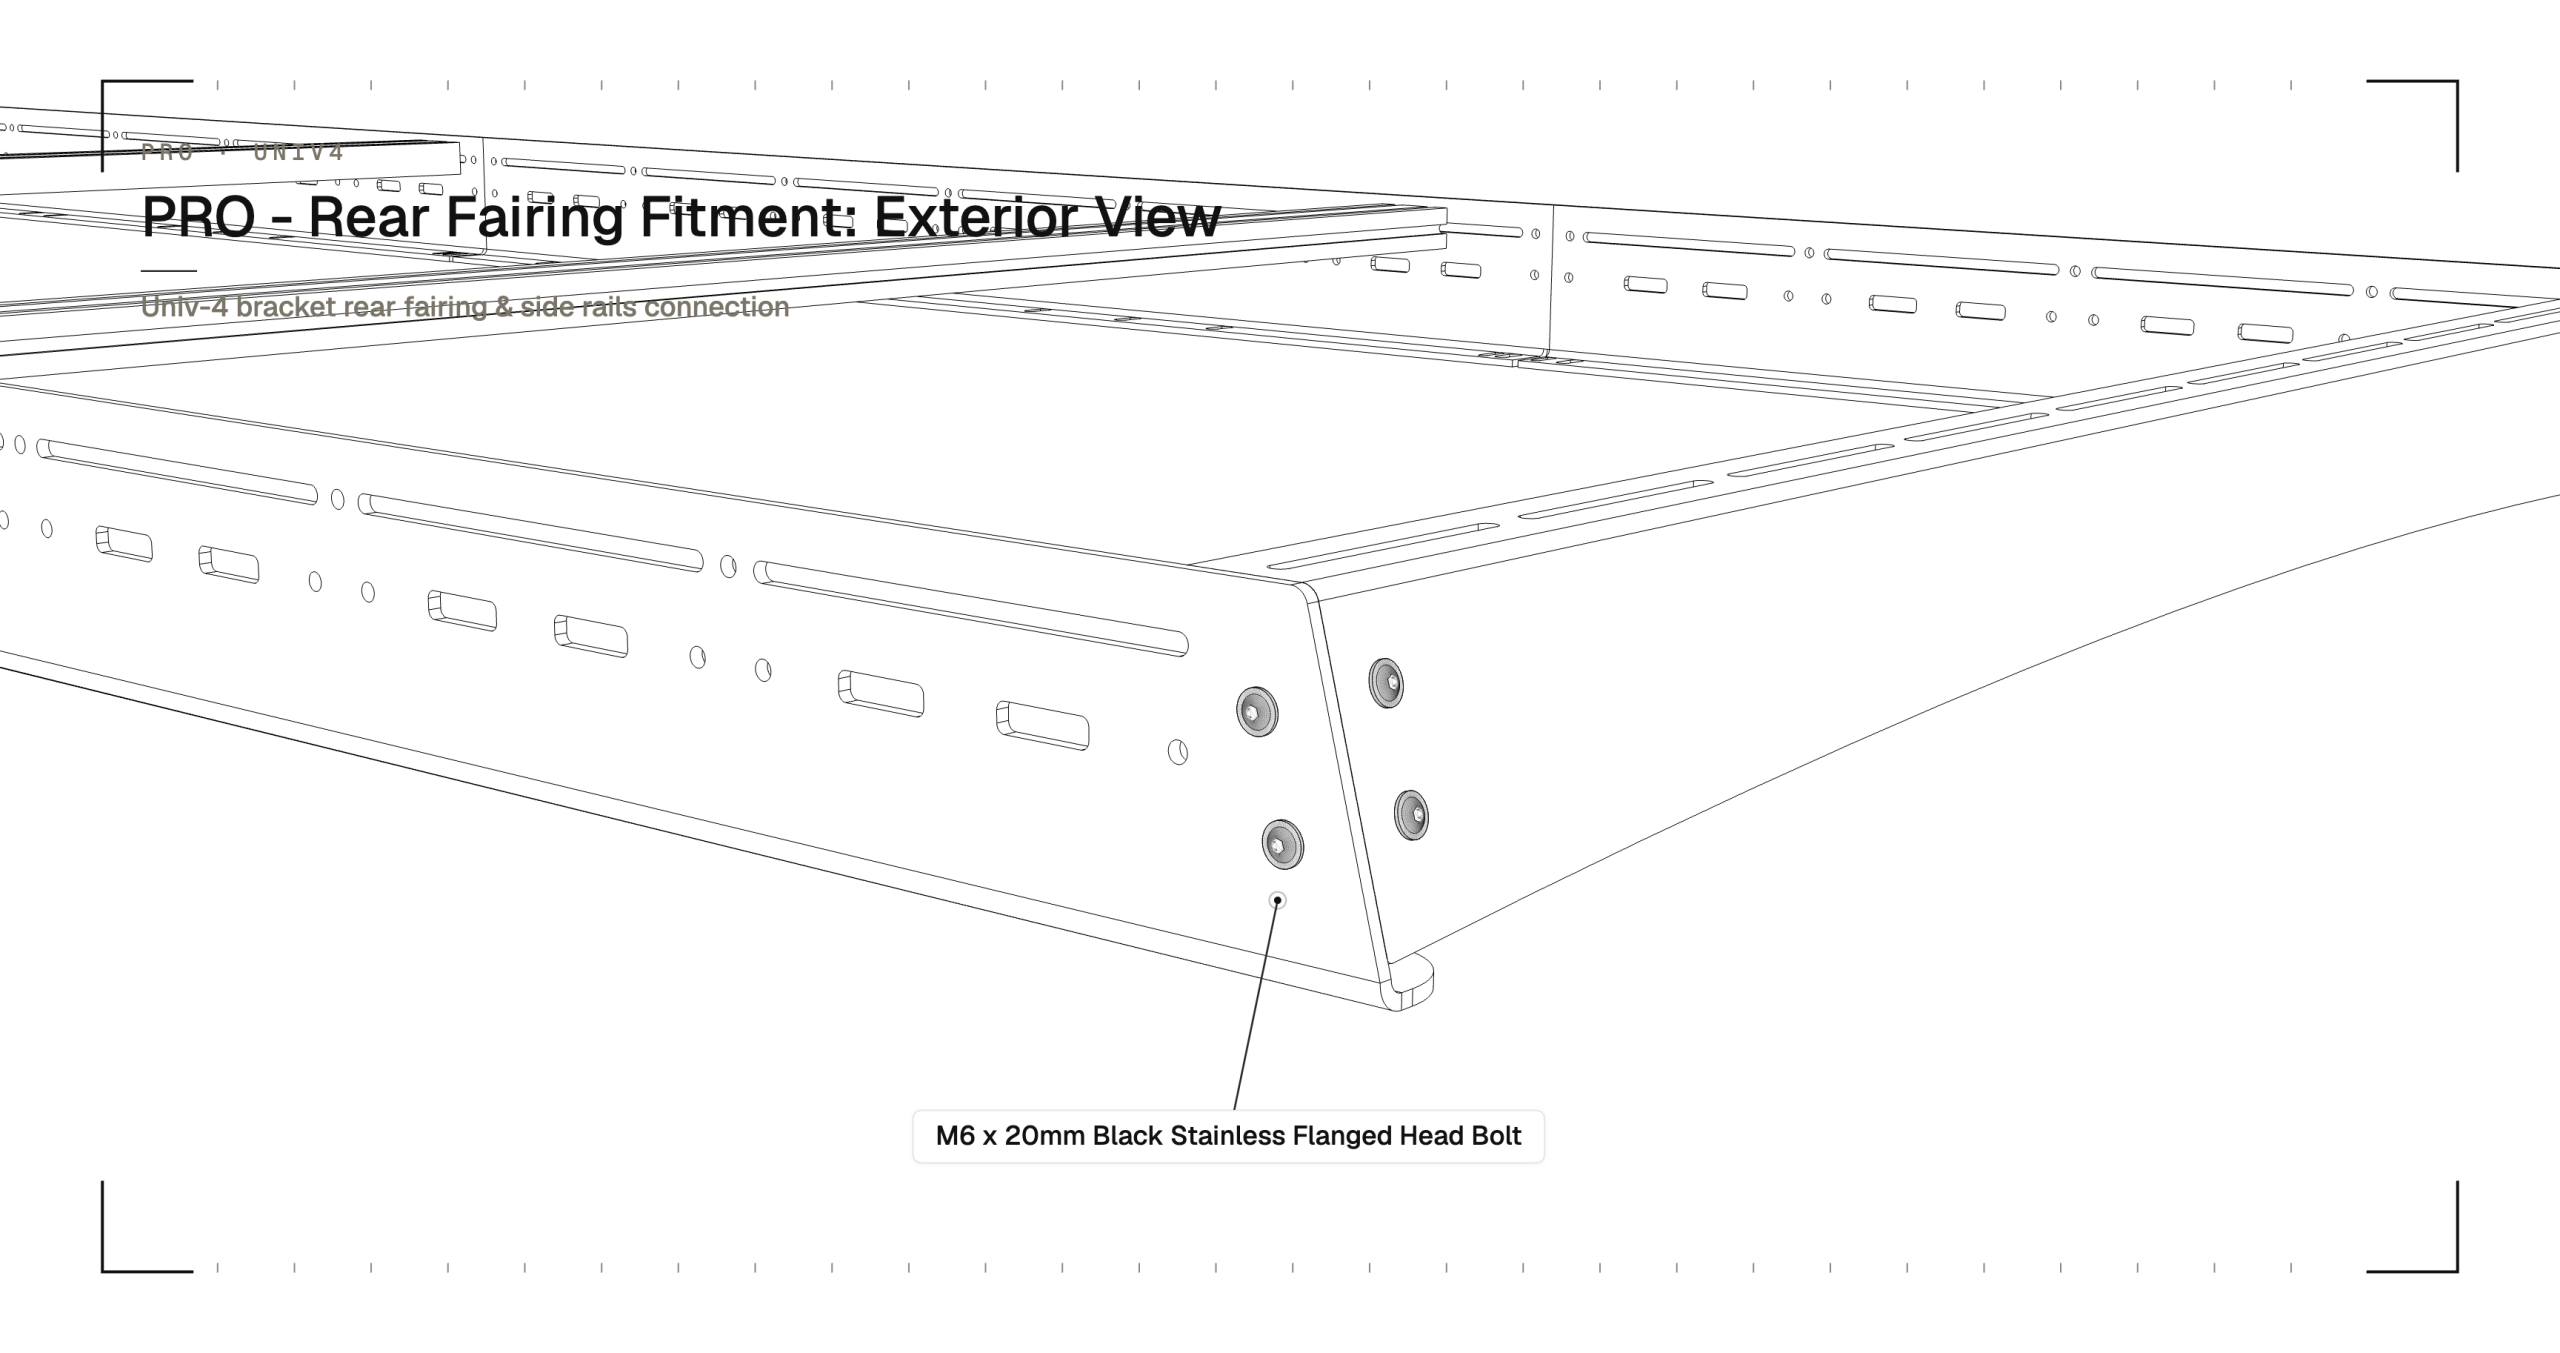
Rear Fairing
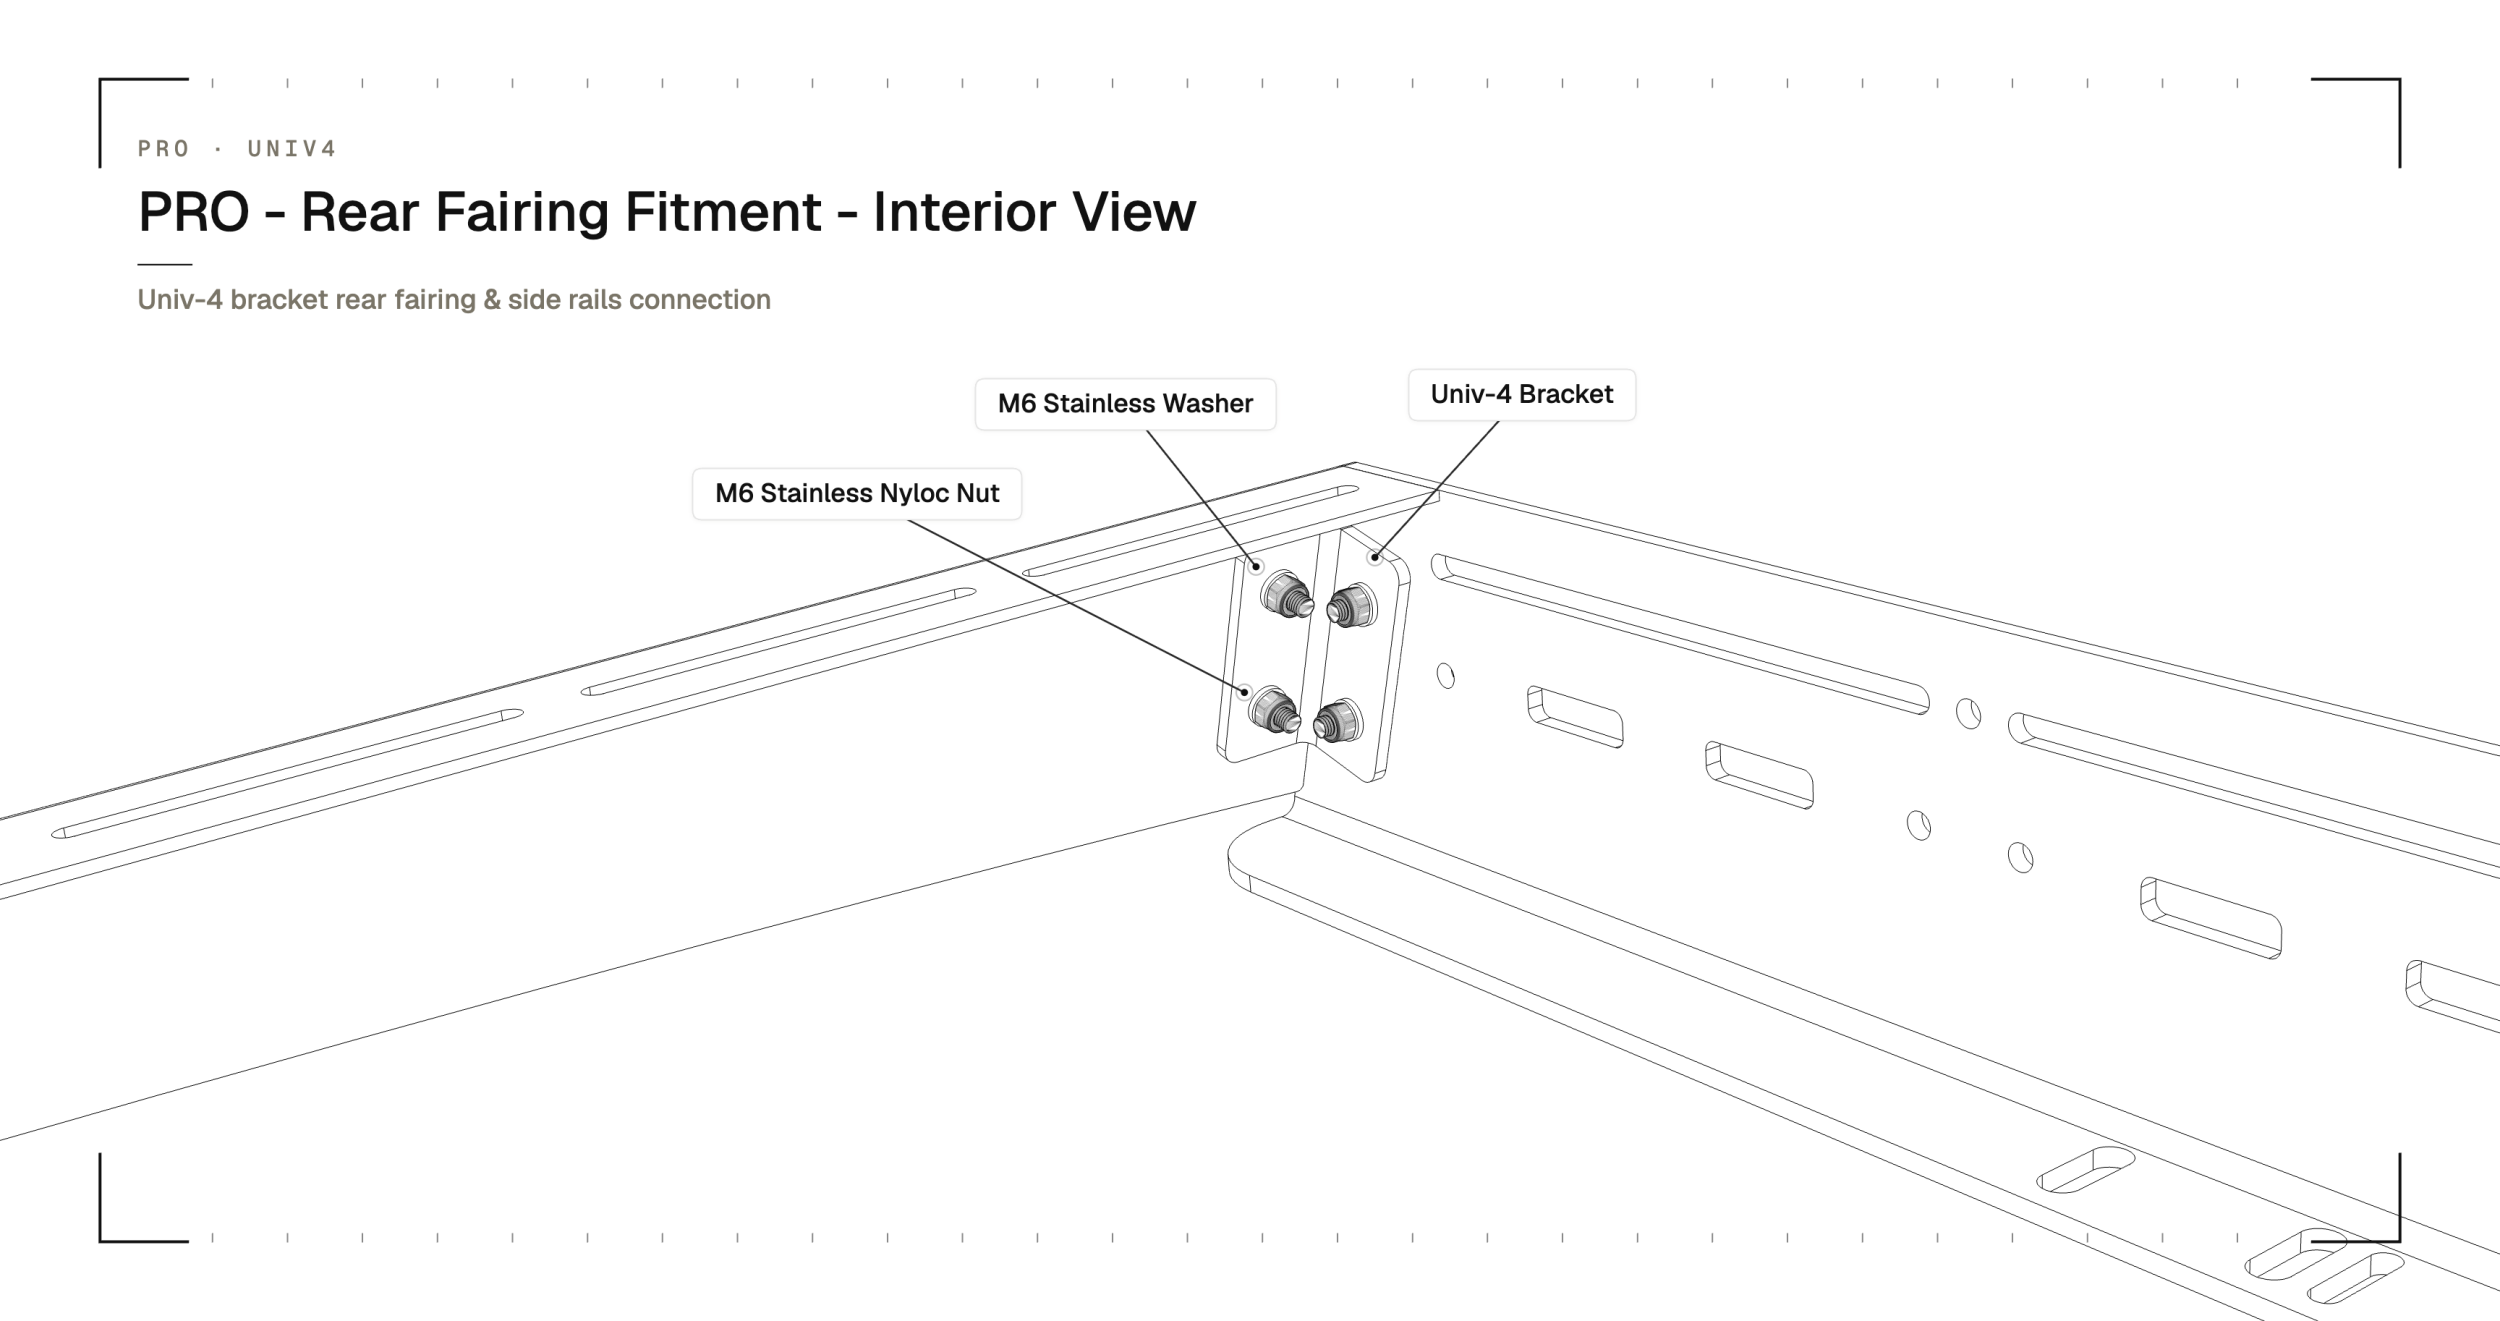
Once you’ve fitted your crossbars, it’s time to fit your rear fairing. Grab your rear fairing and 2× UNIV-4 brackets.
You’ll need your UNIV-4 fixing packet which contains: 8× 25mm M6 bolts, 8× M6 stainless washers, 8× M6 stainless nyloc nuts.
We recommend that you pre-install your UNIV-4 brackets onto the rear fairing to make it easier when working on the vehicle.
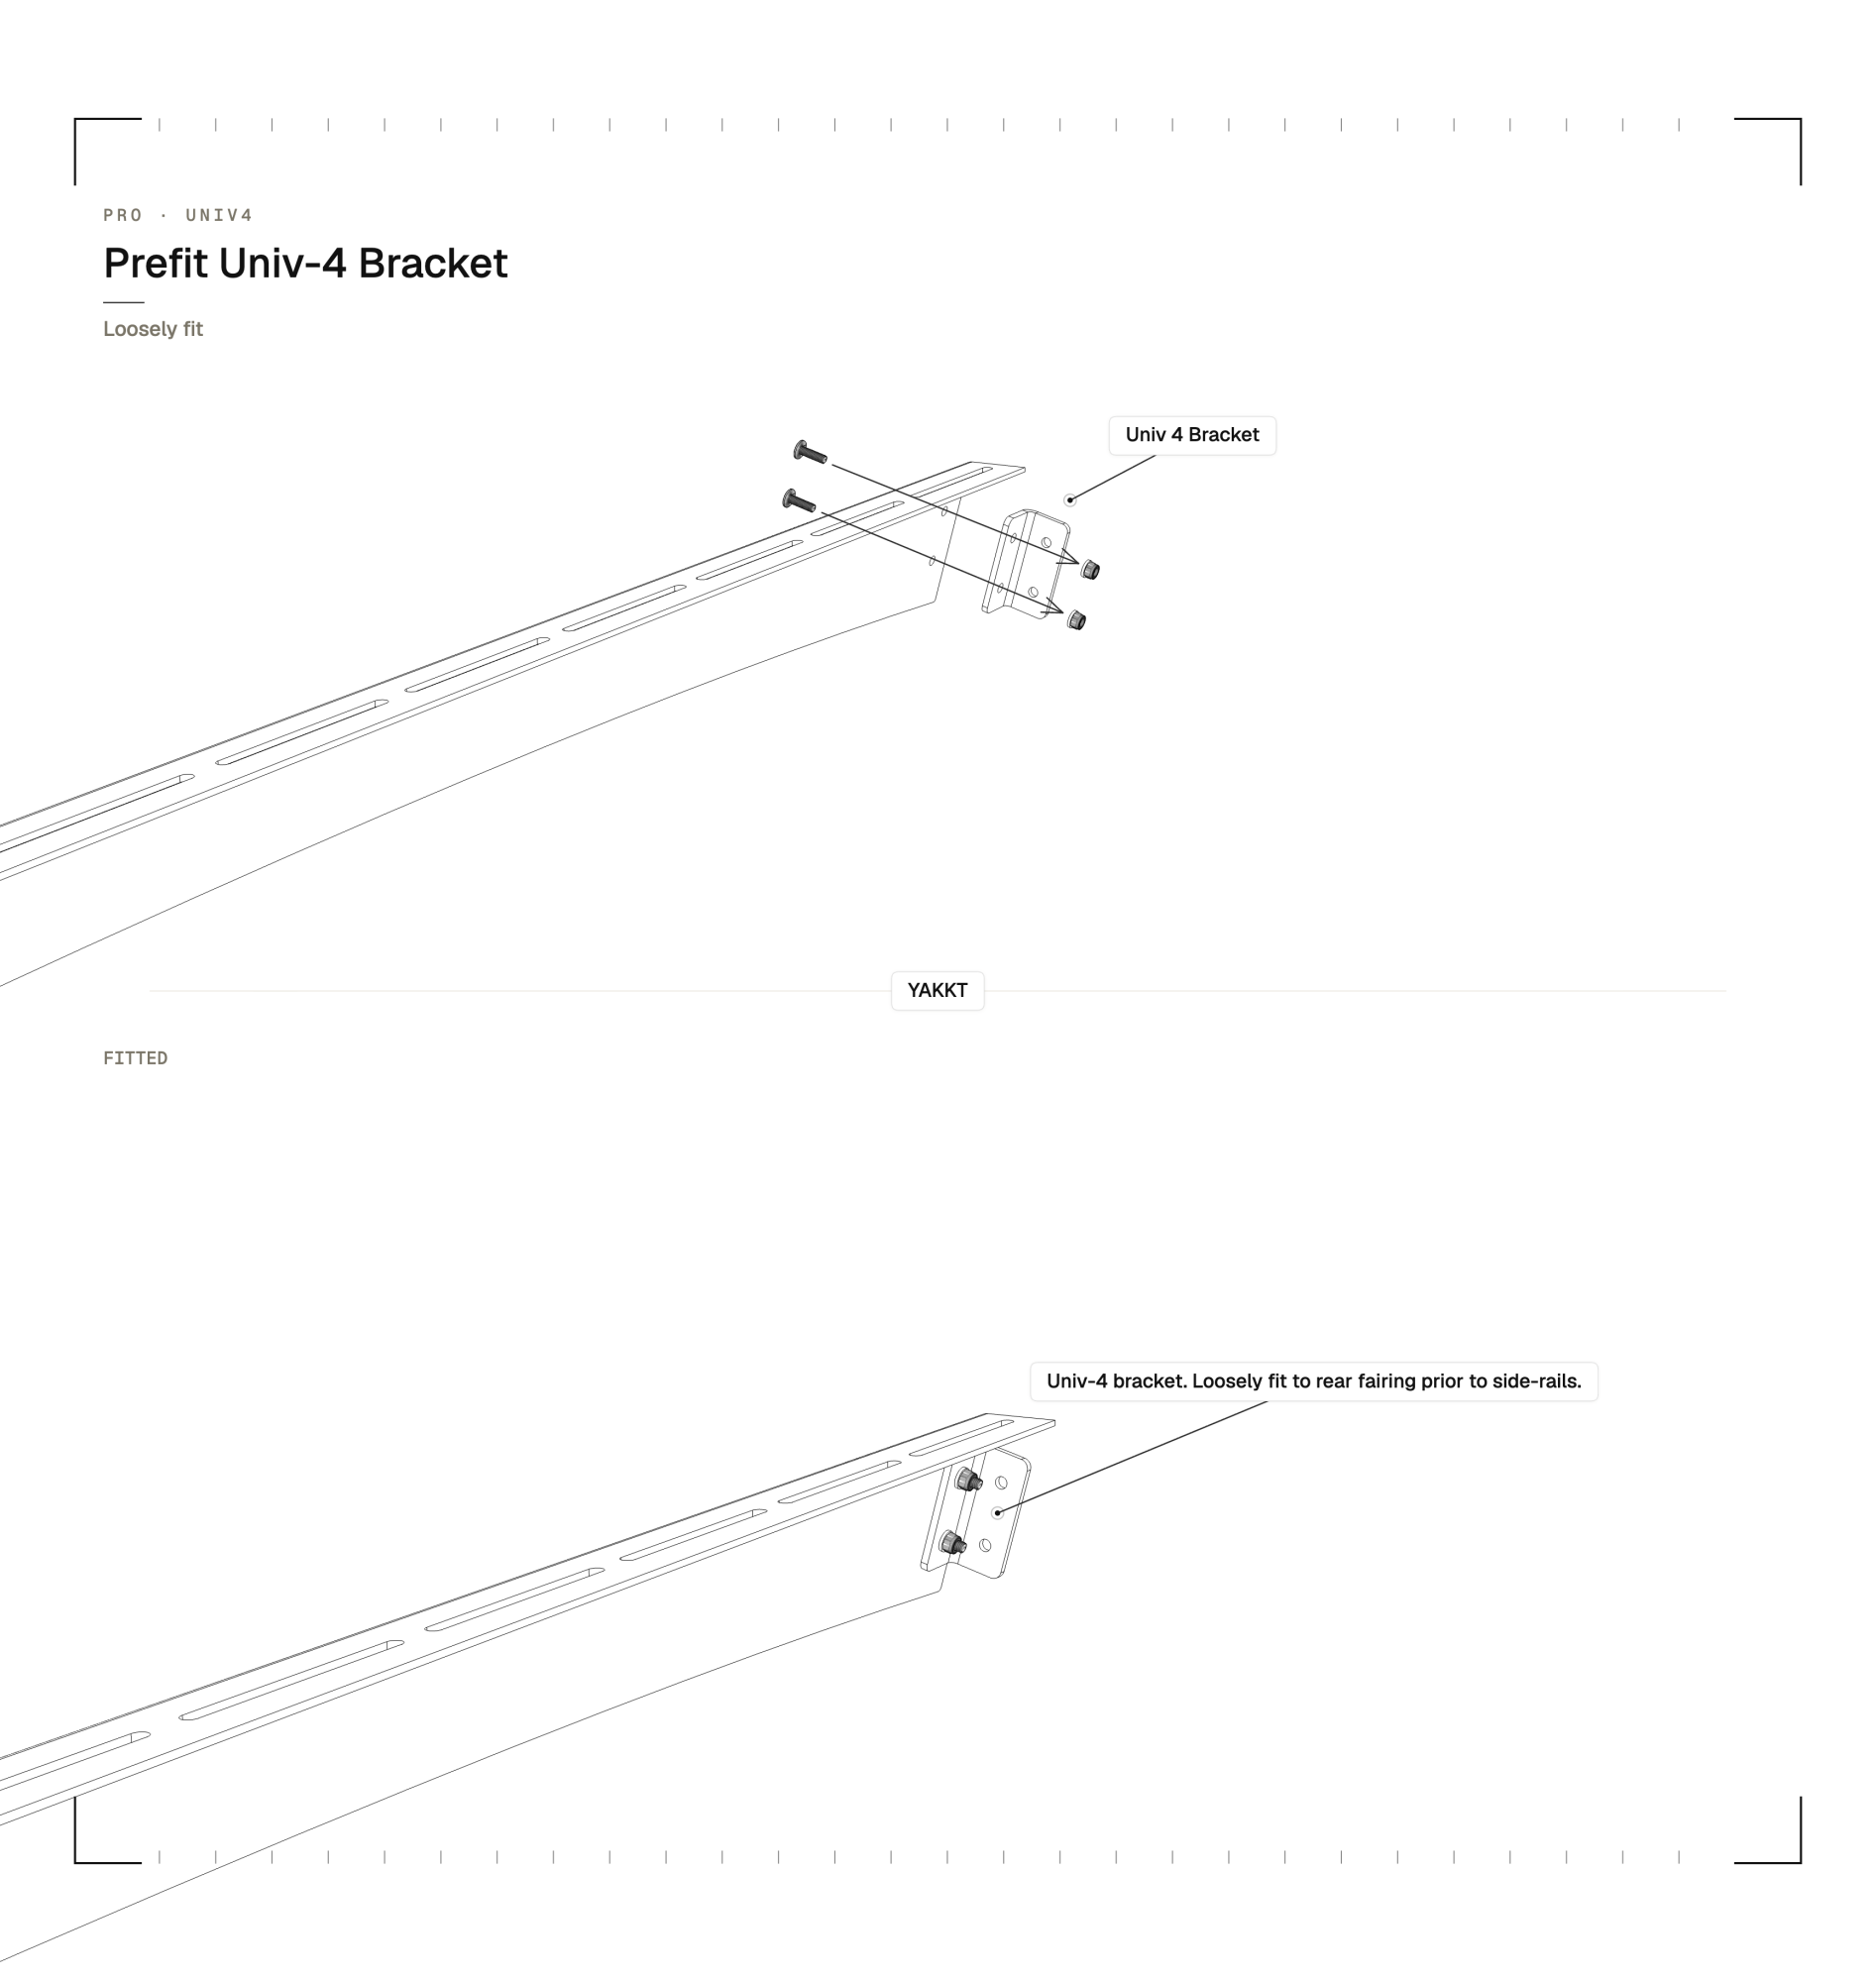
Offer up the rear fairing and bolt through your side rails using the remaining fixings.
06 / 08
Front Fairing
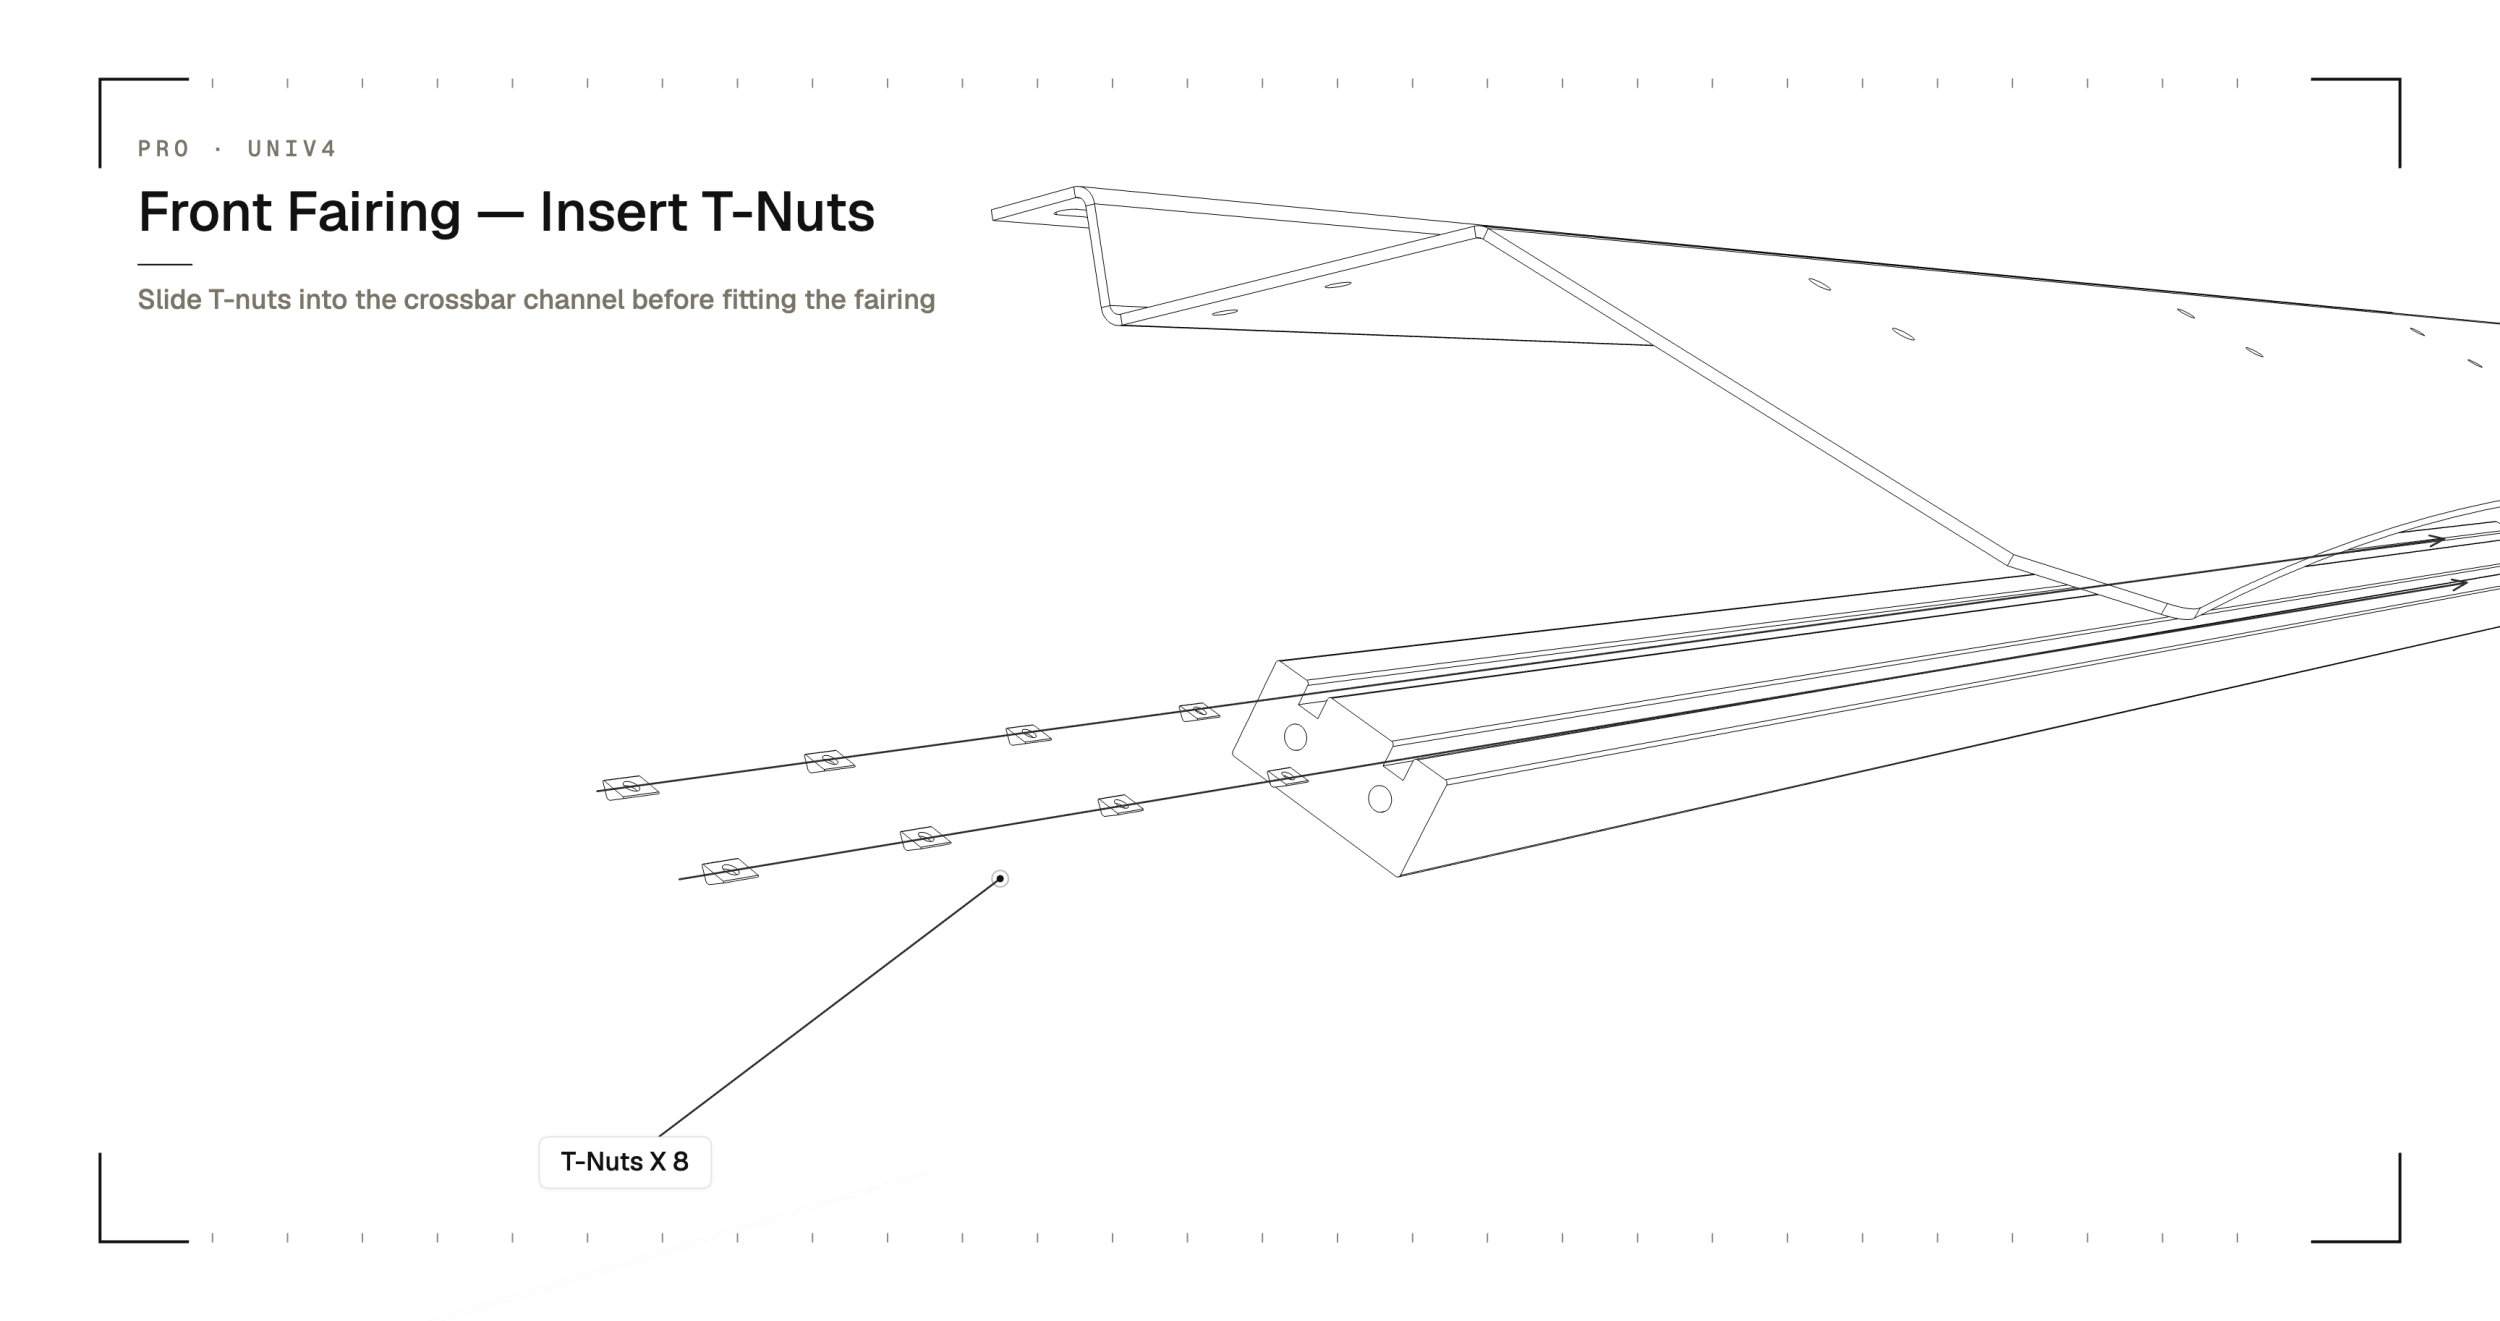
It’s now time to fit your front fairing. Grab your front fairing, a crossbar and your fixings.
In your front fairing fixing kit you’ll have: 8× T-nuts, 8× 10mm black stainless bolts. You’ll then use the 4× 25mm black stainless bolts from your crossbar packet. You’ll also need your 2× UNIV-4 brackets and fixings.
Lay out your crossbar and front fairing on a bench and slide in your T-nuts as shown. Align them to the 8 holes on the front of your front fairing as best as possible.
Overlay your front fairing on top of the crossbar, and use your 10mm M6 bolts to bolt the fairing to the crossbar. You can bolt loosely and move the fairing from left to right to easily align the fairing with your T-nuts.
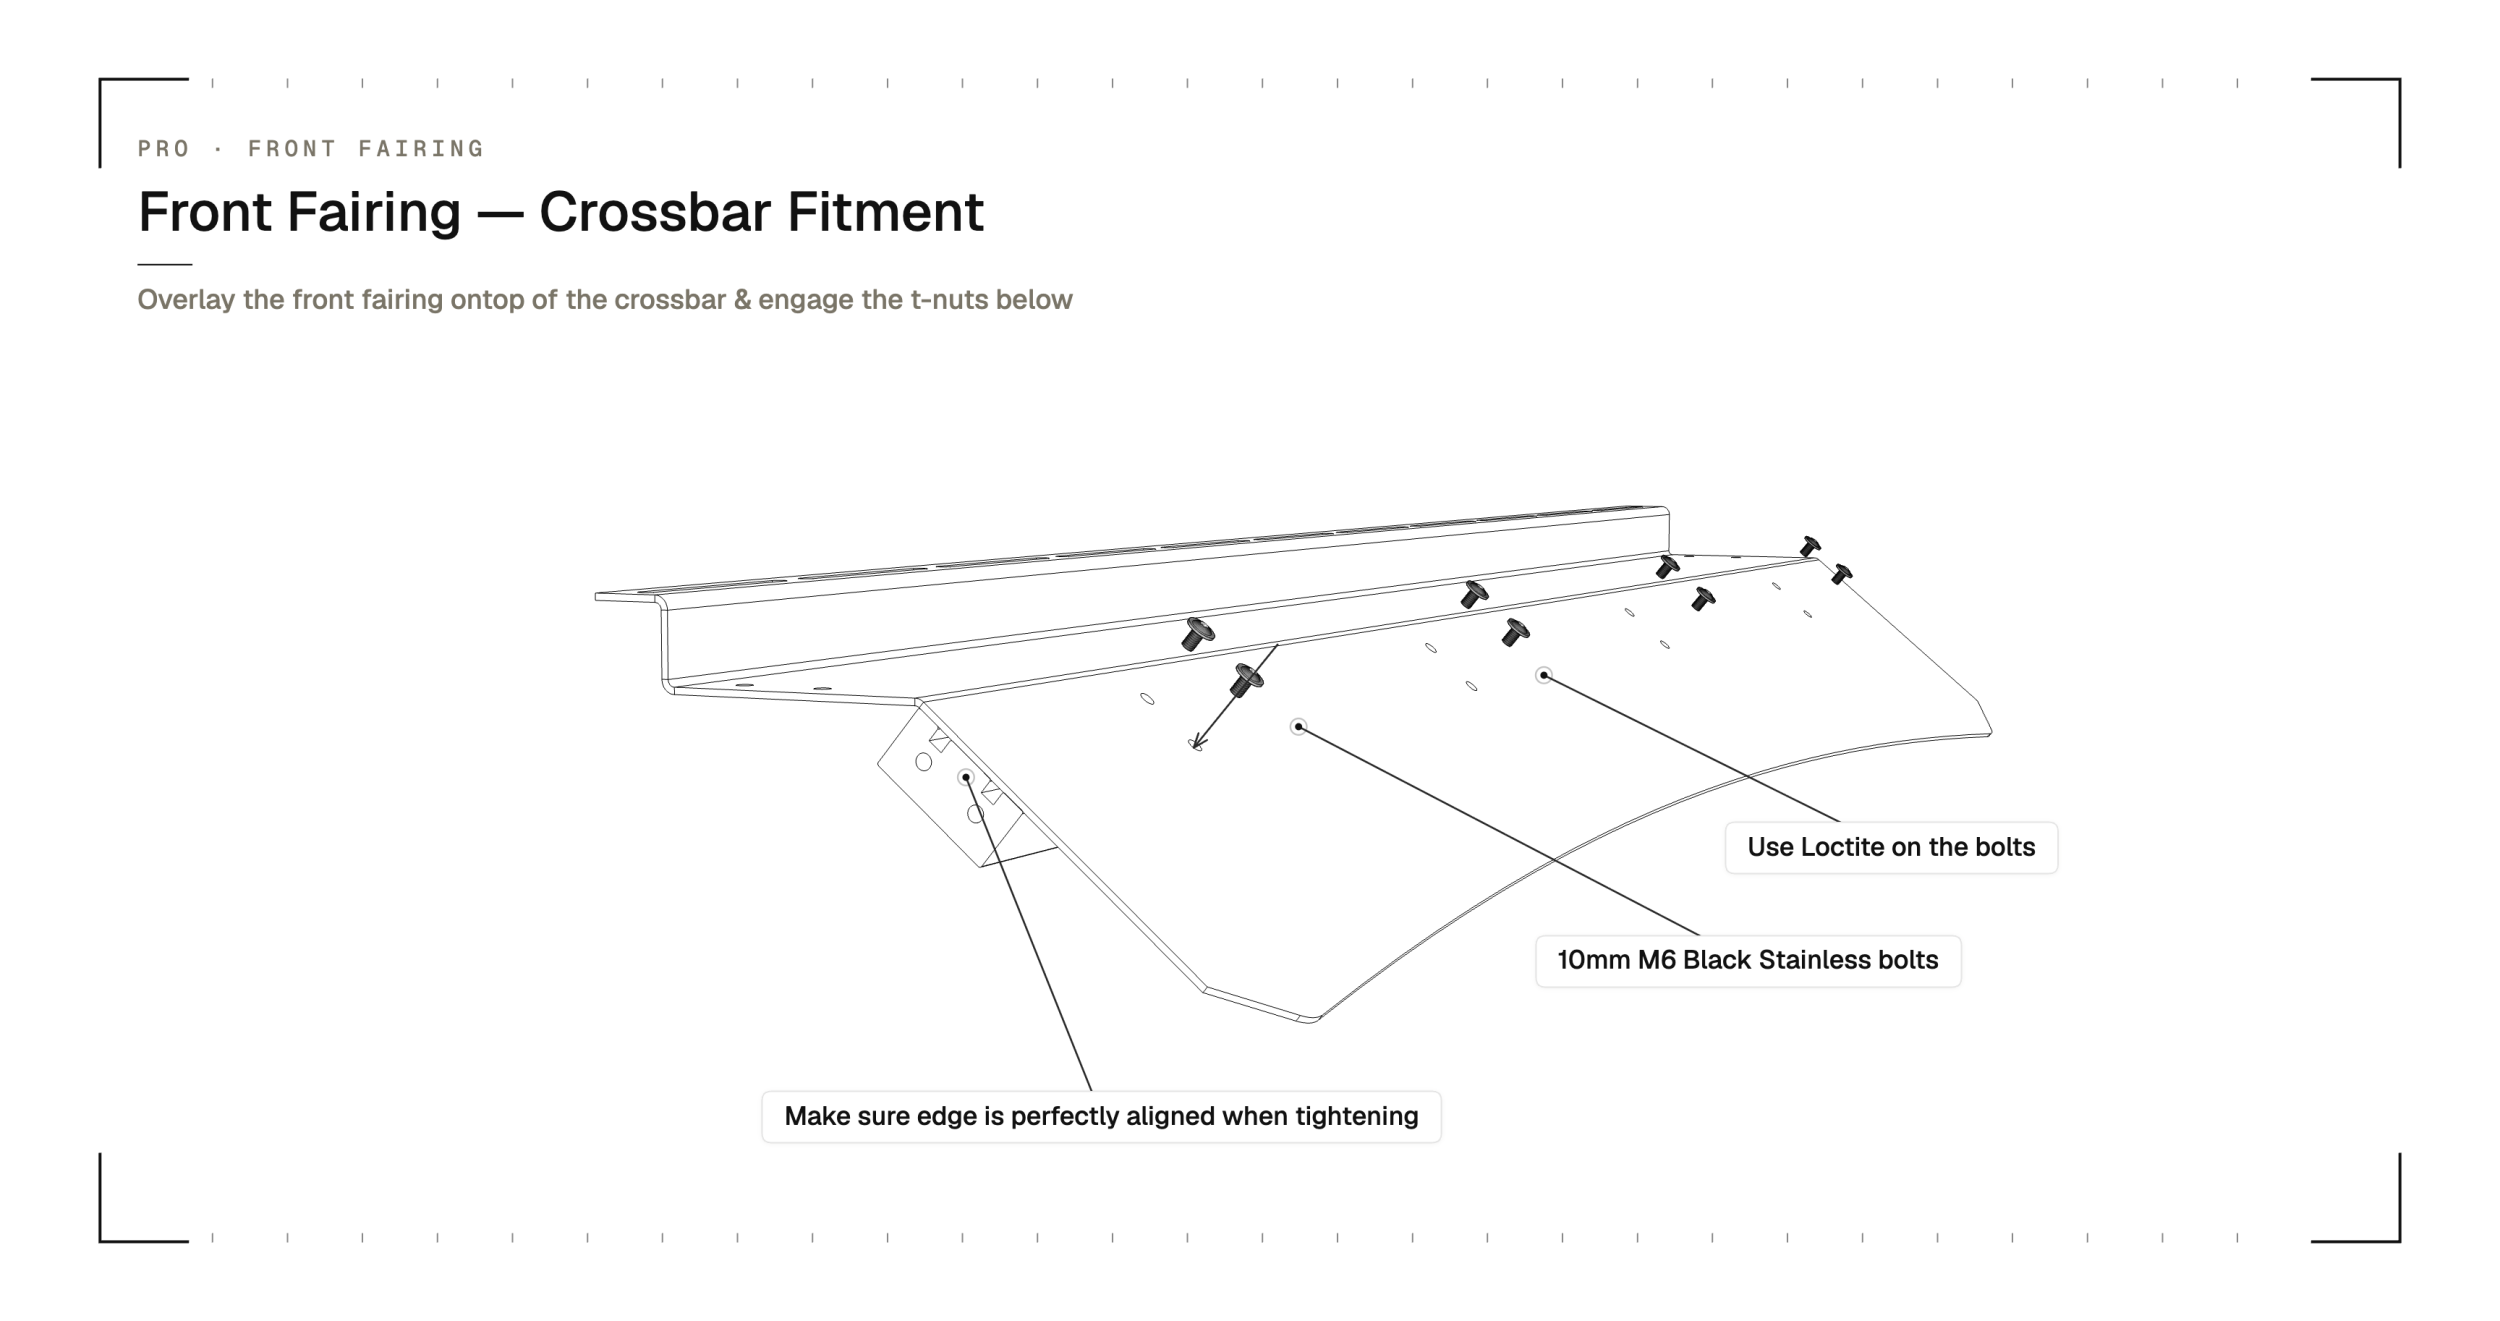
Once you have all of your bolts installed, make sure the front fairing and crossbar is perfectly flush end-to-end. You can now fully tighten the fairing to the crossbar.
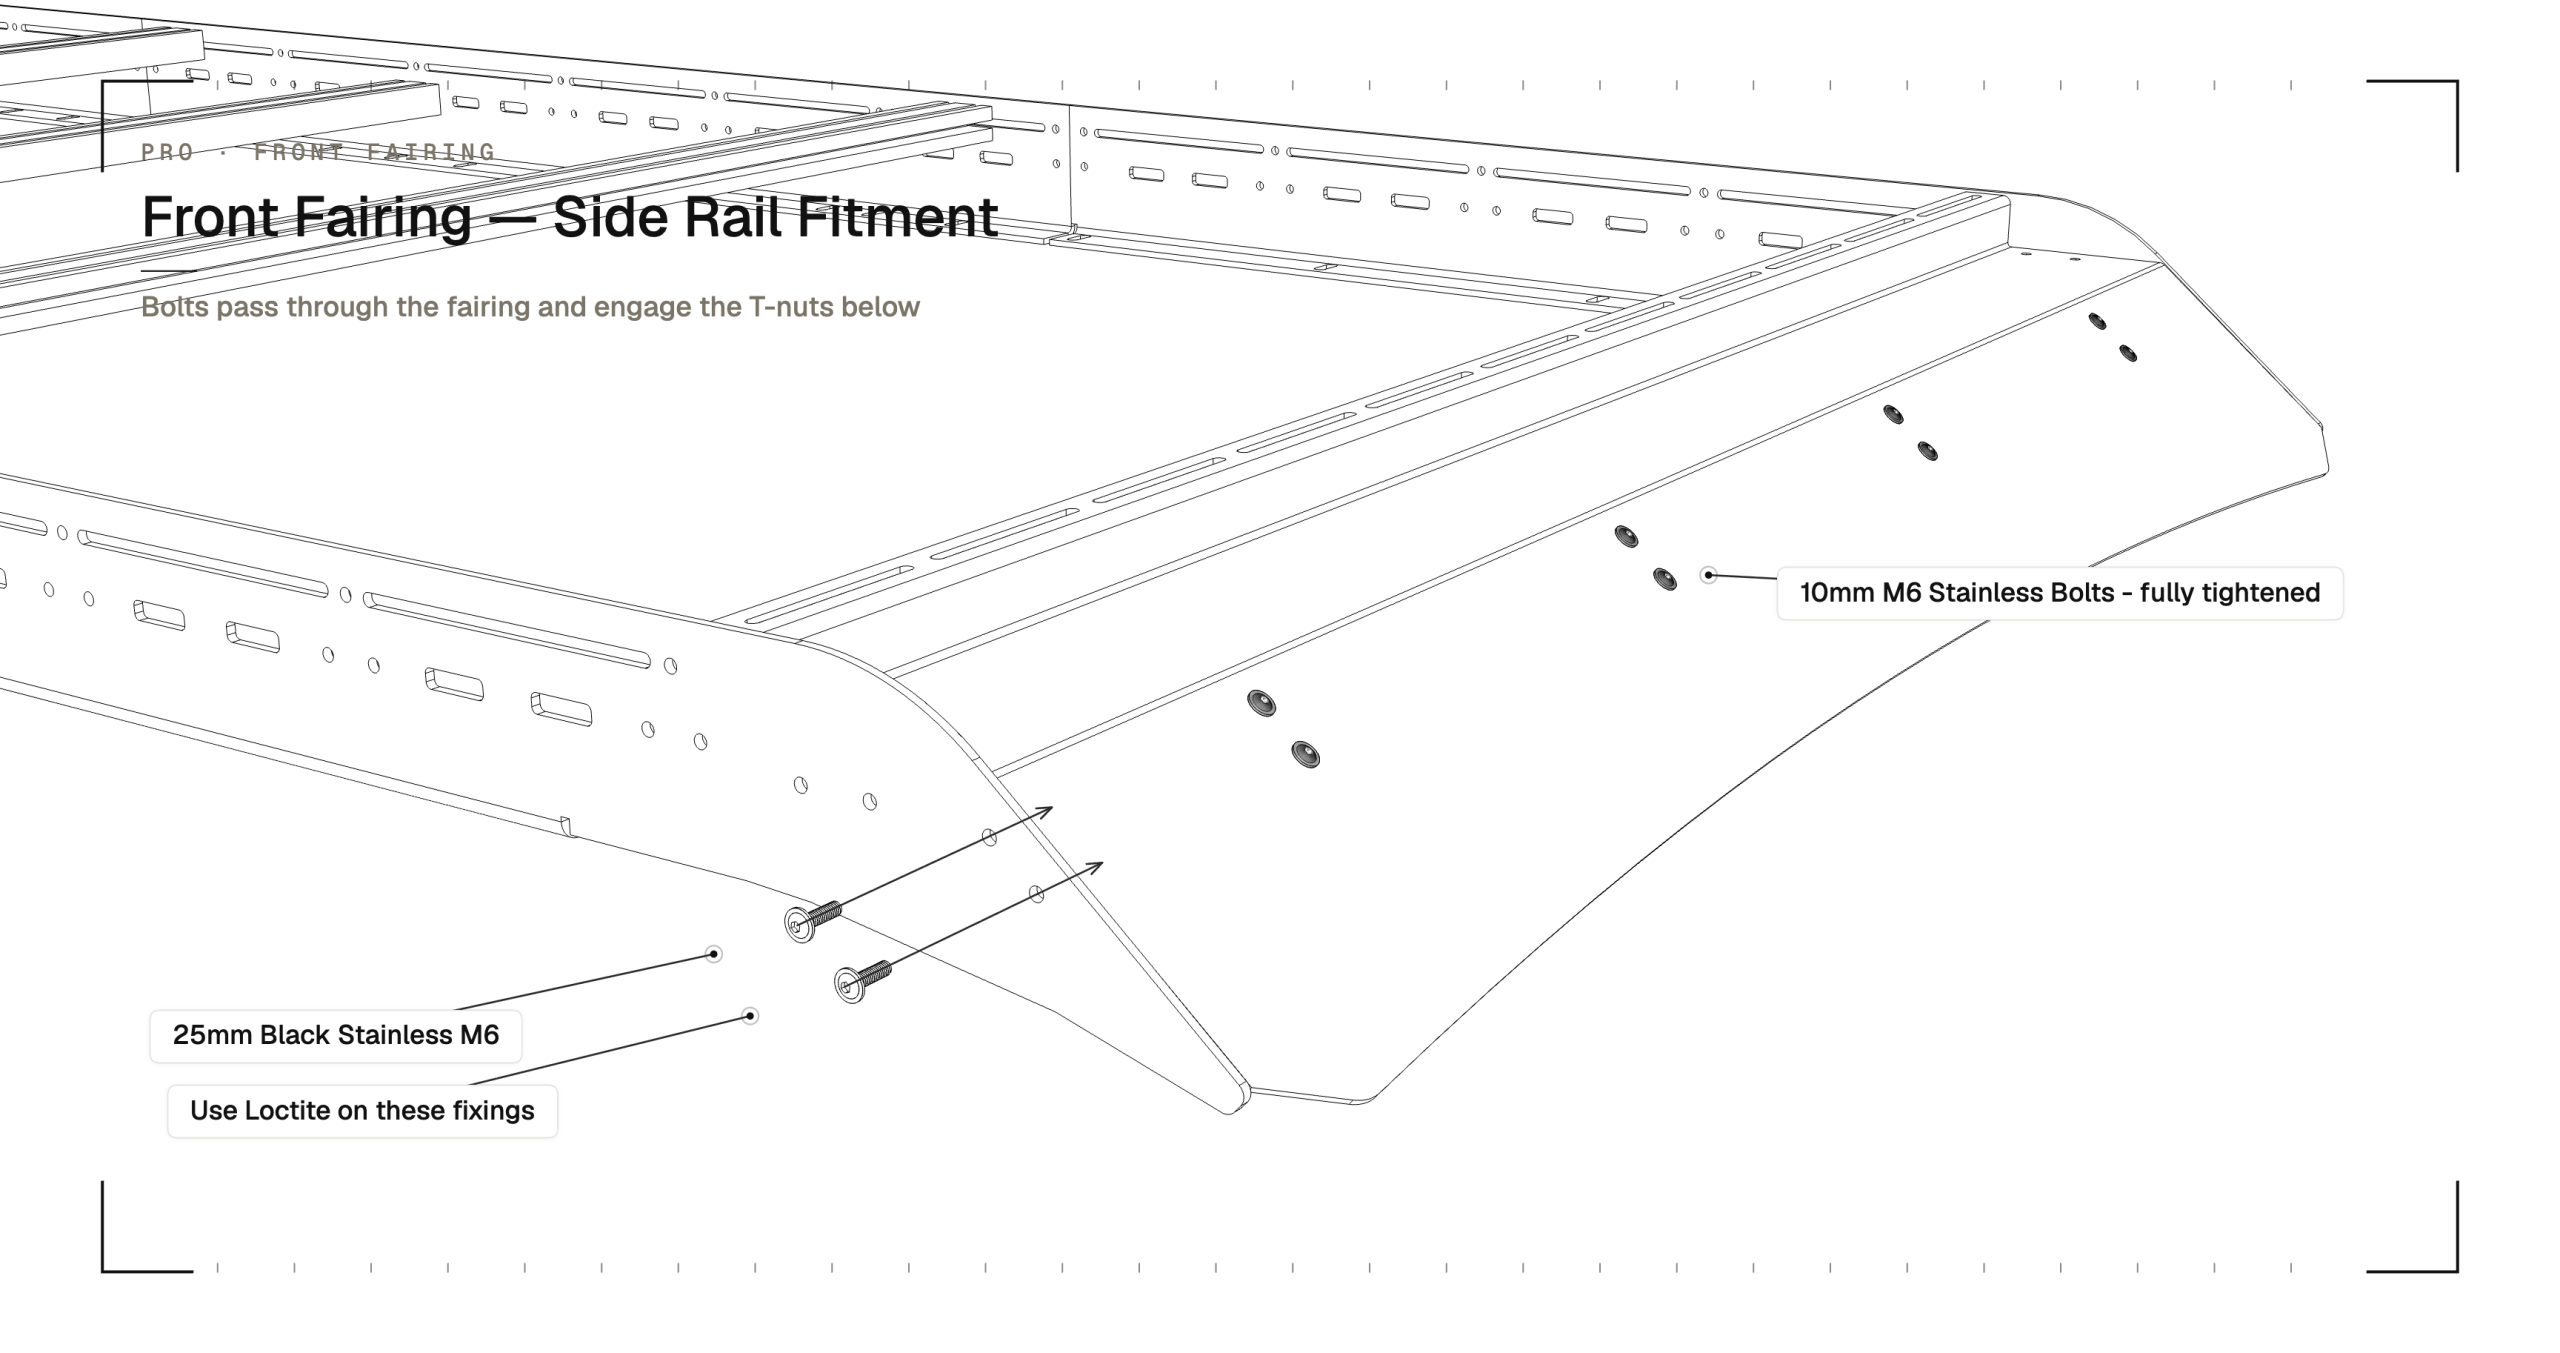
Offer up your assembly onto your van. This is a two-person job — you can put some protective film or a towel down to protect your vehicle as you lift the front fairing up onto the vehicle.
Use your 25mm black stainless fixings to bolt the side rails to the tapped holes in the crossbar. Remember to use Loctite before fitting.


Two-person job
Always lift the assembled front fairing with two people — one at each end — to avoid scraping the bodywork.
Don’t forget the Loctite
Use Loctite on the 25mm bolts that fix the side rails to the tapped holes in the crossbar.
07 / 08
Final Tighten
Everything is now loosely fitted. Before fully tightening, square the rack by pushing the side rails fully forward in their mounting holes and checking the rack sits parallel to the vehicle’s bodyline.
Once squared, work through the rack tightening every joint firmly in the order below:
- Front fairing to side rails (or UNIV-2 brackets on Crafter CORE)
- Rear fairing UNIV-4 brackets to side rails
- Crossbars to side rails
- Side rails to vehicle (M8 chassis bolts on Crafter, mounting feet on Transit/Ducato, factory rail bolts on Sprinter)
Tighten by hand using a standard socket — firm but not over-cranked. Don’t compress the EPDM rubber spacers on the side-rail joints; they’re there to absorb vibration and need to keep their shape.
Don’t over-tighten the side-rail bolts
The most common install error is over-cranking the M8 chassis bolts and crushing the EPDM rubber spacers. Tighten firmly so the rack can’t move, but stop short of compressing the rubber.
08 / 08
You’re done
Stand back and admire it. You can now add deck panels, solar panels, an awning, a roof tent, or any other accessory you can think of.
Browse compatible accessories on the YAKKT shop.

Common mistakes
- Fitting the front fairing without the crossbar. The front fairing assembles to its crossbar on the bench first — make sure the crossbar is bolted into the fairing before you lift the assembly onto the van.
- Not using Loctite on the 25mm bolts. Loctite the 25mm bolts where called out in the install steps. Without it the bolts can back off over time with road vibration.
Troubleshooting
- M8 stainless bolts feel like they’re binding as you thread them in. Stainless-into-stainless can occasionally gall. Back the bolt out, apply a small amount of copper slip to the thread, and run it back in. The bolt should now turn freely.
Related products
- View the VW Crafter / MAN TGE LWB PRO rack on the YAKKT shop
- Universal deck panels
- Solar brackets
- Awning bracket
- Spare crossbars
Need a hand?
Email info@yakkt.com or WhatsApp +44 7871 319441 — we answer fitment questions personally, usually within a few hours.
YAKKT manufactures and supplies modular aluminium roof racks and accessories. We assume no liability for the installation of our products. Customers who install these products themselves are responsible for ensuring proper fitment and adherence to safety standards. It is the vehicle owner’s responsibility to comply with all relevant vehicle legislation, road laws and safety requirements in their jurisdiction before installing or using any roof-mounted equipment. Customers are also responsible for verifying with their vehicle manufacturer the fitment of roof equipment and the static / dynamic weight limits of their vehicle. YAKKT is not liable for non-compliance with such laws or for any consequences resulting from improper installation or use.


